As explained in previous posts, WebScheduler 3 focused on performance and usability improvements. To improve the performance when rendering events, especially when large dataset is used, Client Paging feature is introduced in WebScheduler.
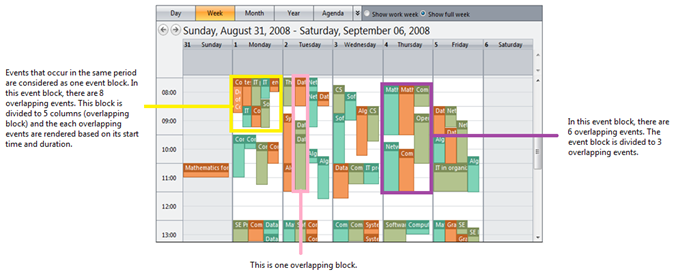
In Day and Week view, events that occur on the same period are rendered as overlapping events. However, when too many events occurred on the same period, it is difficult for user to see and differentiate these events, as seen in the below screenshot.

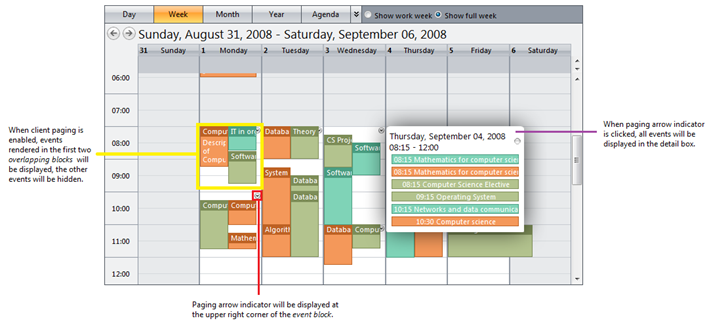
Client paging can be enabled in Day and Week view using ViewSettings >> DayView | Week View >> EnableClientPaging property. Client paging is view dependent, which means it can be enabled in one view and disabled in other views.
Both Day and Week views have the same layout structure, which divided to all-day area and hour area. Client paging applied to each area are implemented differently, following the nature layout of the area.
Client Paging in Hour Area
Before we continue, let’s synchronize the term. Events that occur in the same period is called overlapping events and all of the events are considered as one event block. In the below screenshot, event blocks are marked by yellow and purple square. Each event block is divided to several columns, will further called overlapping blocks (marked by pink square), depends on the start time and duration of overlapping events in the event block.

In hour area, the maximum number of overlapping events displayed in an event block is determined by ViewSettings >> DayView | WeekView >> EventBlockSize property. In the above screenshots, 8 overlapping events occurs in the same period (marked by yellow square). If client paging is enabled and EventBlockSize property is set to 2, events rendered in the first two overlapping block will be displayed and the other events will be hidden. A small paging arrow indicator will be displayed at the upper right corner of the block. When the indicator is clicked, detail box that lists all overlapping events included in the event block, will be displayed.

Client Paging in All-day Area
The following screenshot shows overlapping events in all-day area. The start time and duration of each event determines the overall event layout in this area. In the screenshots, eight rows are needed to render all the events.

When client paging is enabled, you can determine the maximum number of rows in all-day area using ViewSettings >> DayView | WeekView >> AllDayEventPageSize. If the property is set to 5, events rendered in the first five rows will be rendered and the other events are hidden. A paging arrow indicator is also displayed at the bottom of the area to indicate there are more events that occur in the specified time. When it is clicked, all the hidden events will be displayed.

Feel free to try client paging samples in our live demo and post your questions and feedback in our forum.
Related