

| Intersoft ClientUI 8 > ClientUI Fundamentals > Window and Dialog Boxes Overview |
Built on the top of solid architecture, Intersoft ClientUI delivers rich desktop experiences to the Silverlight and WPF platform through a host of windowing controls, ranging from multi-purpose window, modal dialog box, message box, window chrome to dock-style task bar and much more.
The ClientUI windowing controls are designed with ISO-standards 9241 compliance to deliver consistent and reliable user experiences throughout the application. The windowing controls are themed with professional Aero-style theme design and includes predefined animation library. To learn more about usability features and user experiences implemented in ClientUI controls, see User Experiences Overview.
This overview describes the windowing controls available in ClientUI, the key concepts, features, and provides guidance about how to implement windowing in your Silverlight and WPF applications.
This topic contains the following sections:
User interface applications can be generally categorized into two pattern at the high level, which are Single Document Interface (SDI) and Multiple Document Interface (MDI).
SDI is the mostly adopted user interface pattern in typical business applications. You can think it as a single task-based interface. For example, navigating to a Customers page will show you a list of customers where you can view customer information, edit, delete or do actions related to it. Next, if you would like to see some Reports, you need to navigate to the Reports page which consequently leaving the Customers page. This model of presentation pattern describes a single document interface.
While SDI pattern suits most of basic applications, a more complex business application such as composite application can use more innovative presentation to overcome the single-task limitation, while at the same time enhances user experiences and productivity. One of the most popular presentation patterns for composite applications is the multiple document interface (MDI) pattern.
ClientUI implements MDI pattern through a solid framework along with a host of desktop and windowing controls. The MDI pattern is an ideal solution to empower the next-generation RIAs with compelling user experience that revolutionizes the way people work with information. Contrary to SDI, the MDI pattern allows multiple documents to be shown at the same time, such as showing Contacts and Reports in either stacked or side-by-side.
The following illustration compares the presentation model between SDI and MDI pattern.

The ClientUI windowing architecture and concepts such as the events and lifetime, commands, as well as other key features, are discussed in the following sections.
The UXDesktop and UXWindow are two fundamental building blocks in implementing MDI presentation pattern. Designed to meet the platform-standards in usability and user experience, UXWindow delivers consistent and reliable results regardless of browsers or platforms. The UXDesktop manages the lifetime of all window instances, which includes the window arrangement, the window state management, the window events and command management, while the UXWindow represents a logical container that supports fundamental MDI features such as ability to activate, deactivate, minimize, maximize, restore, close, move, resize and more. The UXDesktop is often referred as desktop manager in ths topic.
The following illustration shows the UXDesktop and UXWindow at a glance.

UXWindow is a full-featured windowing control that provides all the user interface elements required in a window such as title bar, control box, option buttons, chrome border, content area and more. It gives you complete customization over its look and feel, allowing you to create commercial-class user interface applications.
The following illustration shows the user interface overview of a window control.

As seen in the above illustration, UXWindow does not only provide the user interface and styles, but also implement the behaviors and user experience aspects such as 8-edge resizing mode, active and inactive state, drag and drop, and context menu.
For more information about user experience implementation in ClientUI controls, see User Experiences Overview. For more information about the complete features of the window control, see UXWindow Overview.
You implement the container that hosts the windows by adding a UXDesktop control to your page. You then add the window instances to the Items property of the desktop control.
The following example shows the XAML code to implement a simple desktop-style interface using UXDesktop and UXWindow control.
| XAML |
Copy Code
|
|---|---|
<Intersoft:UXPage xmlns="http://schemas.microsoft.com/winfx/2006/xaml/presentation" xmlns:x="http://schemas.microsoft.com/winfx/2006/xaml" xmlns:d="http://schemas.microsoft.com/expression/blend/2008" xmlns:mc="http://schemas.openxmlformats.org/markup-compatibility/2006" xmlns:Intersoft="http://intersoft.clientui.com/schemas" mc:Ignorable="d" Title="UXDesktop1 Page" d:DesignWidth="640" d:DesignHeight="480"> <Grid x:Name="LayoutRoot"> <Intersoft:UXDesktop> <Intersoft:UXWindow x:Name="wnd1" Header="UXWindow1 Title"> <Grid> <TextBlock Text="Content for UXWindow1"/> </Grid> </Intersoft:UXWindow> <Intersoft:UXWindow x:Name="wnd2" Header="UXWindow2 Title" IsActive="True"> <Grid> <TextBlock Text="Content for UXWindow2"/> </Grid> </Intersoft:UXWindow> </Intersoft:UXDesktop> </Grid> </Intersoft:UXPage> |
|
In most cases, you may want to implement the window content in more modular design instead of defining the window instances and embedding its content directly in a single page. To achieve modular design, you add a new XAML to your project that represents the window along with its content, and then add the window to the Items collection of the UXDesktop control.
The following example shows the XAML code for the HomeWindow and how to define it in the main page that contains the desktop host control.
| HomeWindow.xaml |
Copy Code
|
|---|---|
<Intersoft:UXWindow xmlns="http://schemas.microsoft.com/winfx/2006/xaml/presentation" xmlns:x="http://schemas.microsoft.com/winfx/2006/xaml" xmlns:d="http://schemas.microsoft.com/expression/blend/2008" xmlns:mc="http://schemas.openxmlformats.org/markup-compatibility/2006" mc:Ignorable="d" xmlns:Intersoft="http://intersoft.clientui.com/schemas" x:Class="ClientUIApplication_Docs.Desktop.HomeWindow" Header="HomeWindow" d:DesignWidth="640" d:DesignHeight="480"> <Grid x:Name="LayoutRoot"> <TextBlock Text="Put some content here..."/> </Grid> </Intersoft:UXWindow> |
|
Once you add the XAML to your page, a class associated to the page can be used as reference in the other pages, such as in the XAML of the main page that contains the desktop control.
In the following example, you can notice that the UXDesktop is referencing to the HomeWindow class which was created in the previous example. It is important to add the xmlns:local attribute to your page to be able to reference the types existed in the namespace that specified in the value of the xmlns:local attribute.
| MainPage.xaml |
Copy Code
|
|---|---|
<Intersoft:UXPage xmlns="http://schemas.microsoft.com/winfx/2006/xaml/presentation" xmlns:x="http://schemas.microsoft.com/winfx/2006/xaml" xmlns:d="http://schemas.microsoft.com/expression/blend/2008" xmlns:mc="http://schemas.openxmlformats.org/markup-compatibility/2006" xmlns:Intersoft="http://intersoft.clientui.com/schemas" xmlns:local="ClientUIApplication_Docs.Desktop" mc:Ignorable="d" Title="UXDesktop1 Page" d:DesignWidth="640" d:DesignHeight="480"> <Grid x:Name="LayoutRoot"> <Intersoft:UXDesktop> <local:HomeWindow WindowName="wndHome" /> </Intersoft:UXDesktop> </Grid> </Intersoft:UXPage> |
|
For a more complete walkthrough to implement desktop and window in your application, see Walkthrough: Create Rich Application using Windowing and MVVM Pattern.
ClientUI provides predefined project and item templates that integrates to Visual Studio 2010. This allows you to easily create a new windowing project, and then rapidly add as many windows as needed, such as shown in the following figure.
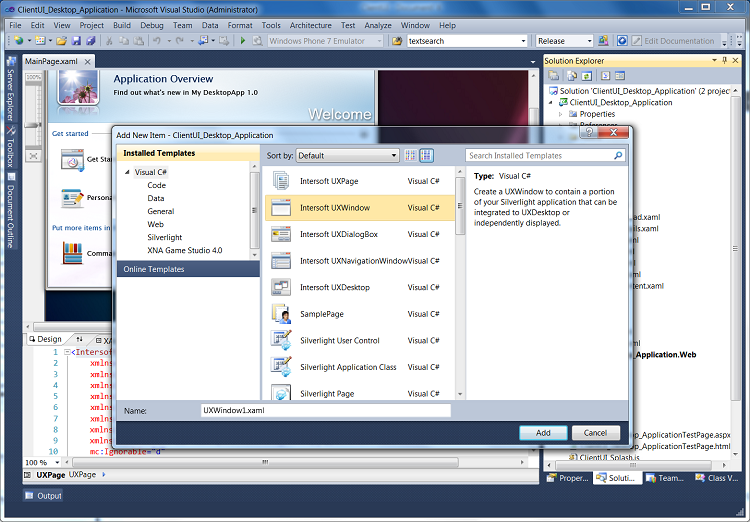
For a step-by-step walkthrough to add new windows to your application, see Walkthrough: Add New Item such as Page, Dialog Box and Window.
For more information about project templates in ClientUI, see Introduction to ClientUI Project Templates.
In most scenarios, you do not show all windows directly in the first page load. You can use the following strategies to show a window dynamically at runtime.
By default, a UXWindow is not automatically shown eventhough it is defined in the UXDesktop control, or when used independently.
To show a window, you set its IsClientVisible property to true. If you use MVVM pattern development, you can bind this property to control the window's visibility in your ViewModel. For more information about MVVM pattern, see MVVM Pattern Overview.
The following example shows how to show a window when the desktop control is loaded.
| XAML |
Copy Code
|
|---|---|
<Intersoft:UXPage xmlns="http://schemas.microsoft.com/winfx/2006/xaml/presentation" xmlns:x="http://schemas.microsoft.com/winfx/2006/xaml" xmlns:d="http://schemas.microsoft.com/expression/blend/2008" xmlns:mc="http://schemas.openxmlformats.org/markup-compatibility/2006" xmlns:Intersoft="http://intersoft.clientui.com/schemas" xmlns:local="ClientUIApplication_Docs.Desktop" mc:Ignorable="d" Title="UXDesktop1 Page" d:DesignWidth="640" d:DesignHeight="480"> <Grid x:Name="LayoutRoot"> <Intersoft:UXDesktop> <local:HomeWindow WindowName="wndHome" /> </Intersoft:UXDesktop> </Grid> </Intersoft:UXPage> |
|
If you prefer to use API over property-based approach, you can call the Show method of the window control to display the window.
The following example shows how to create a new instance of HomeWindow class and show the window using API on a button click.
| C# |
Copy Code
|
|---|---|
private void UXButton1_Click(object sender, RoutedEventArgs e) { HomeWindow window = new HomeWindow(); window.Show(); } |
|
 |
If the window being shown is a new instance and the window framework detected an active UXDesktop in the application, the Show method will automatically integrate the window to the desktop. |
The ClientUI windowing framework is built around commanding semantics which allows you to work with the windows using routed commands, such as opening a window by defining the command in the XAML. More about window commands is discussed in Window Commands section.
For more information about using commands in your application, see Commanding Overview.
Similar to showing a window, you can hide a window by either using property or API call.
To hide a window using property, you set the IsClientVisible property to false. To hide a window using API, you call the Hide method of the window instance.
 |
Hiding a window does not release the allocated resources from memory. To remove a window permanently, you should close the window instead of hiding it. However, if your window content is lightweight and commonly accessible throughout the application, hiding it would be ideal since re-opening the window will not create a new instance of the window. |
In ClientUI windowing framework, closing a window will permanently destroy the window and free the allocated resources used by the window. Consequently, closing a window is not identical to hiding a window as the implemention is significantly different. You need to carefully design your application and decide whether a particular window should be permanently closed instead of collapsed. You can consider to permanently close a window if the window contains a relatively large amount of objects.
 |
In contrast to a hidden window, a closed window can no longer be reused. An exception will be thrown if a closed window is being accessed, or re-opened. |
There are also several important factors that determine whether a window will be hidden or closed when initiated by users in the runtime, for example, when users clicked on the "X" button of the window, which are expained in the following:
 |
In addition to clicking the "Close" button of the window, a user can also close a window through several ways, such as by pressing a combination of Ctrl+Shift+F4 key, or choose the Close command from the window's context menu. |
At any events, you can programmatically close a window by calling the Close method such as shown in the following example.
| C# |
Copy Code
|
|---|---|
private void UXButton1_Click(object sender, RoutedEventArgs e) { // Finds the specified window in the UXDesktop IWindow window = desktop1.FindWindow("UXWindow1"); // Close the window, if found. if (window != null) window.Close(); } |
|
 |
When integrated to UXDesktop, closing a window will automatically invalidate the active window which is implemented according to ISO Standards. This means that closing a window will activate the last active window based on the z-index order. |
In desktop-integrated mode, only one window can be active at a time. When a window is set as active, the desktop manager automatically deactivates the previously active window.
To set a window as active, you set the IsActive property of the window to true, such as shown in the following example.
| XAML |
Copy Code
|
|---|---|
<Grid x:Name="LayoutRoot"> <Intersoft:UXDesktop> <local:HomeWindow WindowName="wndHome" IsActive="True"/> <local:ReportWindow WindowName="wndReport"/> <local:SettingsWindow WindowName="wndSettings"/> </Intersoft:UXDesktop> </Grid> |
|
When a window is set to active, its visual state will be changed to Active state. The related events such as Deactivated and Activated will be raised consecutively. The window events are discussed later in this topic.
You can set a window to be automatically positioned to certain location at startup by setting its WindowStartupLocation property. UXWindow exposes three values that you can apply which is explained below:
When the Auto mode is used, the desktop manager first checks for the Left and Top property of the window. If an exact location is not specified, the desktop manager automatically calculates the position from the last shown window and position the window cascaded against the previous position. The cascading space can be customized through CascadingSpace property.
The following example shows how to setup the window to appear with the position centered to the screen.
| XAML |
Copy Code
|
|---|---|
<Grid x:Name="LayoutRoot"> <Intersoft:UXDesktop> <local:HomeWindow WindowName="wndHome" IsActive="True" WindowStartupLocation="CenterScreen"/> </Intersoft:UXDesktop> </Grid> |
|
For more information about working with the window control, see UXWindow Overview.
ClientUI windowing framework is built upon routed events architecture for consistency with other class library available in ClientUI framework. Consequently, a number of advanced features are made possible such as loosely-coupled integration between the window and task bar. This also enables you to easily handle the window events from anywhere in the visual tree node. For more information on routed events, see Routed Events Overview.
The following list describes the events that raised by UXWindow control.
The events listed above are specific window events, and does not include the events derived from Silverlight, such as Loaded, Unloaded, GotFocus and so on.
The window events are raised in the sequence which is illustrated in the following figure.
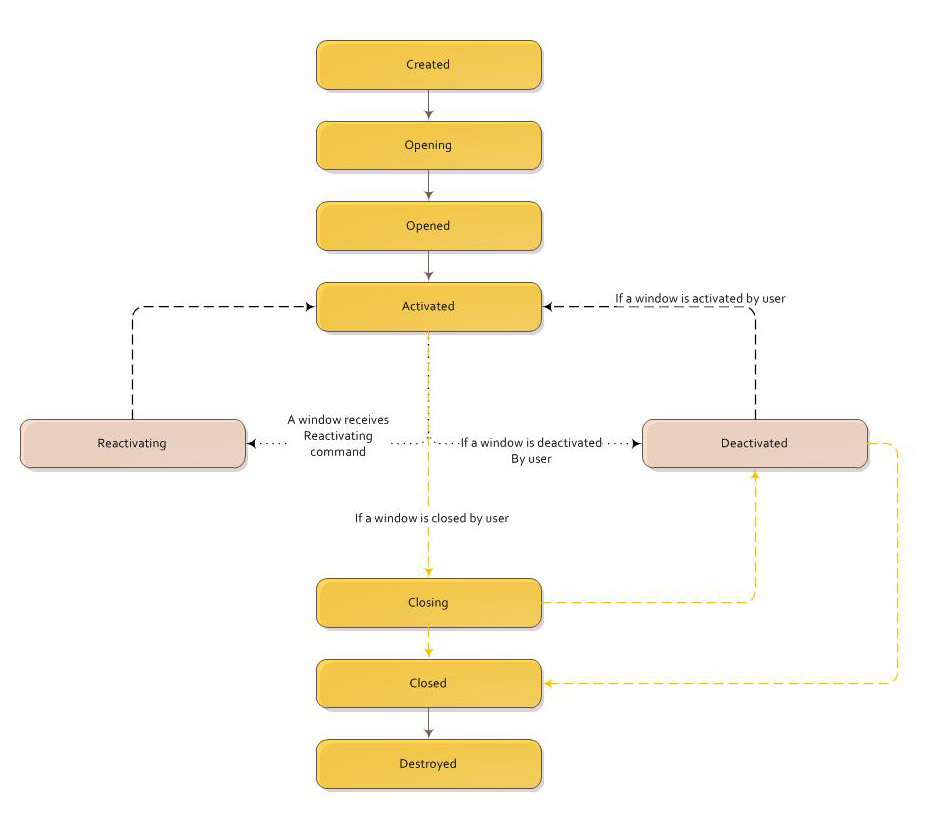
The following example shows how to prevent a window from being closed by handling its Closing event and set the Handled property of the event data to true.
| C# |
Copy Code
|
|---|---|
public partial class HomeWindow : UXWindow { public HomeWindow() { InitializeComponent(); this.Closing += new Intersoft.Client.Framework.WindowEventHandler(HomeWindow_Closing); } void HomeWindow_Closing(object sender, Intersoft.Client.Framework.WindowEventArgs e) { if (DocumentNotSaved) { MessageBox.Show("Your document has not been saved. Close aborted"); // When the Handled is set to true, the window will cancel the Close command. e.Handled = true; } } } |
|
The ClientUI windowing framework is built around the commanding semantics which allows certain features of the window to be executed through declarative definition in the XAML markup. The commanding semantics is also an ideal approach for MVVM pattern development. To learn more about using MVVM pattern in your application, see MVVM Pattern Overview.
ClientUI includes several predefined windowing commands that you can use in your application. The following commands are implemented directly in the ClientUI windowing framework and can be used directly in your application.
The following example shows how to close the current window from a menu item.
| XAML |
Copy Code
|
|---|---|
<Intersoft:UXWindow xmlns="http://schemas.microsoft.com/winfx/2006/xaml/presentation" xmlns:x="http://schemas.microsoft.com/winfx/2006/xaml" xmlns:d="http://schemas.microsoft.com/expression/blend/2008" xmlns:mc="http://schemas.openxmlformats.org/markup-compatibility/2006" mc:Ignorable="d" xmlns:Intersoft="http://intersoft.clientui.com/schemas" x:Class="ClientUIApplication_Docs.Desktop.HomeWindow" Header="HomeWindow" d:DesignWidth="640" d:DesignHeight="480"> <Grid x:Name="LayoutRoot"> <Intersoft:UXMenuBar HorizontalAlignment="Left" Name="uXMenuBar1" VerticalAlignment="Top" Width="640"> <Intersoft:UXMenuItem Header="File"> <Intersoft:UXMenuItem Header="Exit" Command="Intersoft:WindowCommands.Close" /> </Intersoft:UXMenuItem> </Intersoft:UXMenuBar> </Grid> </Intersoft:UXWindow> |
|
The following figure shows the result of the above code.
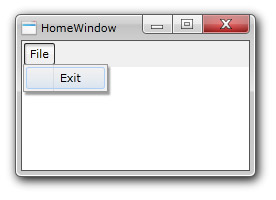
When you click on the Exit menu item, the window will be closed. Notice that you do not write any code or call API to achieve the action, but efficiently assigning the provided command to the Command property of the menu item.
For more information about commanding concept and how to use it in your application, see Commanding Overview.
MDI applications typically have a main window that displays the main data over which the application operates and contains user interface and navigation controls such as menu bars, tool bars, and status bars. In many cases, you may also need additional windows to do the following:
These types of windows are known as dialog boxes, which typically operate in modeless or modal mode.
ClientUI windowing framework provides dialog boxes that support both modeless and modal mode. The following sections describe the available dialog boxes.
A modal dialog box is displayed by a function when the function needs additional data from a user to continue. Because the function depends on the modal dialog box to gather data, the modal dialog box also prevents a user from activating other windows in the application while it remains open. In most cases, a modal dialog box allows a user to signal when they have finished with the modal dialog box by pressing either an OK or Cancel button. The most common examples of modal dialog boxes are shown to open, save, and print data.
A modeless dialog box, on the other hand, does not prevent a user from activating other windows while it is open. For example, if a user wants to find occurrences of a particular word in a document, a main window will often open a dialog box to ask a user what word they are looking for. Since finding a word doesn't prevent a user from editing the document, however, the dialog box doesn't need to be modal. A modeless dialog box at least provides a Close button to close the dialog box, and may provide additional buttons to execute specific functions, such as a Find Next button to find the next word that matches the find criteria of a word search.
ClientUI windowing framework provides a multi-purpose dialog box that you can use to gather user information, or displays specific information. You use a UXDialogBox to represent the content that you want to show in modal mode. By default, UXDialogBox is automatically set to use modal mode. To show the dialog box in modeless mode, set the DialogBoxMode property to Modeless.
Since the dialog box is mostly used to gather user input, UXDialogBox provides a consistent way to obtain the result of the dialog box through DialogResult enumeration. While you can explicitly set the DialogResult property of the dialog box in the Closing event, ClientUI provides a more consistent technique that streamlines the DialogResult value through the properties of ClientUI button controls such as UXButton, UXToolBarButton, and more. To learn more about dialog box and its advanced features, see UXDialogBox Overview.
UXDialogBox is typically used in two scenarios: standalone and desktop-integrated mode. In standalone mode, the dialog box will be modal to the entire screen. This means that users can only interact with the content in the dialog box which is commonly seen in login or registration form scenario.
The following example shows how to display a dialog box in standalone mode using ShowDialog API, and handle the closing callback in the code.
| C# |
Copy Code
|
|---|---|
private void UXButton1_Click(object sender, RoutedEventArgs e) { EditDialogBox dialogBox = new EditDialogBox(); dialogBox.ShowDialog( // show dialog box in standalone mode null, // callback handler for the close event (dialogResult) => { if (dialogResult == Intersoft.Client.Framework.DialogResult.OK) { MessageBox.Show("The dialog box result is OK"); } }); } |
|
When integrated with desktop manager, the dialog box will be attached to a specified window instance which makes the dialog box modal only to that particular attached window. This implementation conforms to the usability standards such as defined in ISO Standards 9241. To learn more about user experiences, see User Experiences Overview.
The following example explains how to show a dialog box that is attached to a parent window.
| C# |
Copy Code
|
|---|---|
private void uXButton1_Click(object sender, RoutedEventArgs e) { EditDialogBox dialogBox = new EditDialogBox(); UXDesktop currentDesktop = this.GetDesktop(); dialogBox.ShowDialog( // show dialog box attached to the wndHome. currentDesktop.FindWindow("wndHome"), // callback handler for the close event (dialogResult) => { if (dialogResult == Intersoft.Client.Framework.DialogResult.OK) { MessageBox.Show("The dialog box result is OK"); } }); } |
|
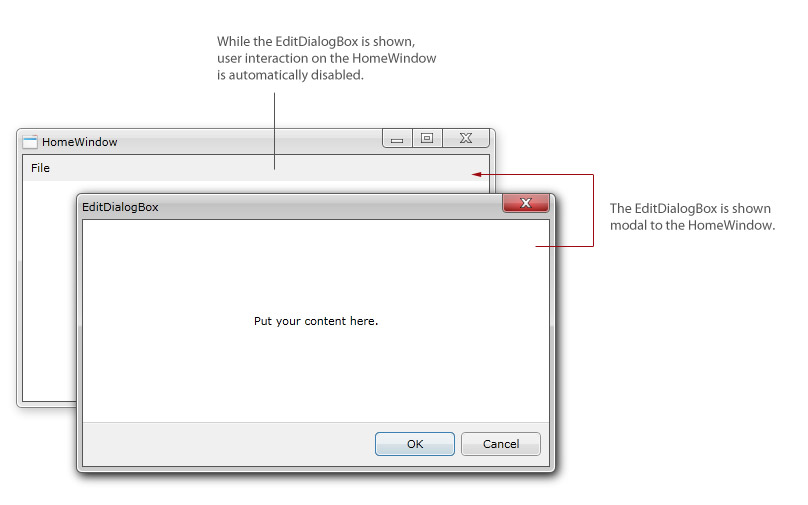
The result is shown in the following figure.
 |
When a dialog box is shown attached to a window, the attached window becomes modal to the dialog box. This means that users will not be able to interact with the particular window until the dialog box is closed. When users attempted to access the attached window by clicking on it, the window will set a blinking animation similar to the Windows operating system. |
If you are using MVVM pattern, you can use the DialogBoxProvider to create the dialog box in the ViewModel, which is further explained in the Advanced MVVM topic. To learn more about dialog box and its advanced features, see UXDialogBox Overview.
A message box is a dialog box that can be used to display textual information and to allow users to make decisions with buttons. The following figure shows a message box that displays textual information, asks a question, and provides the user with three buttons to answer the question.
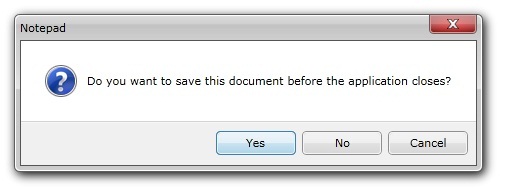
To show a message box, you use the Show static method of UXMessageBox class. UXMessageBox provides a set of predefined buttons and icons to let you easily show the message box according to specific message type.
The predefined message box buttons contain the following mode:
The following example shows how to use the Show static method to display a message box with predefined buttons and icon, and then handle the closing callback in the code.
| C# |
Copy Code
|
|---|---|
private void UXButton2_Click(object sender, RoutedEventArgs e) { UXMessageBox.Show( // owner of the message box null, // message "Do you want to save this document before the application closes?", // caption "Notepad", // predefined buttons Intersoft.Client.UI.Aqua.UXDesktop.MessageBoxButton.YesNoCancel, // predefined image MessageBoxImage.Question, // callback handler for the close event (dialogResult) => { if (dialogResult == Intersoft.Client.Framework.DialogResult.OK) { // save the document } } ); } |
|
To learn more about message boxes and its advanced features, see UXMessageBox Overview.
In addition to the multi-purpose window and dialog boxes described in the previous sections, the ClientUI windowing framework also provides several types of special window that designed with their respective unique capabilities.
The following sections discuss the other window types available in ClientUI.
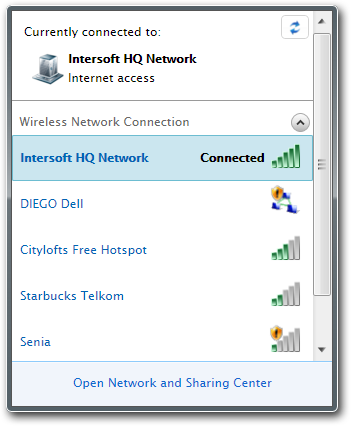
UXWindowChrome is a lightweight version of UXWindow which includes fundamental windowing features and integration to UXDesktop, but without the caption bar, context menu or other window management features. This makes UXWindowChrome suitable in certain user interface requirements such as floating toolbox, splash screen, window popups and much more.
The following figure shows an example of popup window using UXWindowChrome control.
To learn more about Window Chrome, see UXWindowChrome Overview.
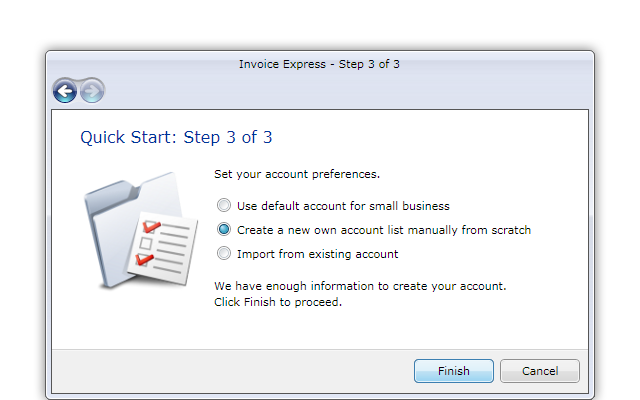
UXNavigationWindow is a full-featured window control that combines the richness of windowing and powerful navigation capabilites.
The following figure shows a wizard application that uses UXNavigationWindow to provide local pages navigation.
To learn more about Navigation Window, see UXNavigationWindow Overview.
This overview describes the basics that you need to know to get started with multiple document interface (MDI) application using ClientUI windowing framework. The ClientUI windowing framework also includes a number of advanced features that you may be interested in, such as integration with UXDesktopDock as task bar, managing busy state of a window, using commands to work with the window controls, and more.
To learn more about these advanced features, see Advanced Window Features.
To get started creating desktop-style (MDI) application using ClientUI windowing framework, see the walkthroughs in the list below.
Walkthrough: Create Rich Application using Windowing and MVVM Pattern
Walkthrough: Add New Item such as Page, Dialog Box and Window
Walkthrough: Style a Window in Blend Designer
For more walkthroughs, see Window and Dialog Boxes Walkthroughs.