
| Intersoft ClientUI 8 > ClientUI Controls > Control Library > Windowing Controls Overview > UXNavigationWindow |
UXNavigationWindow is a full-featured window control that combines the richness of windowing and powerful navigation capabilites.
The control enables local page navigation with automatic journal management through the built-in navigation bar. Many of the advanced navigation features found in UXFrame are also available in UXNavigationWindow to provide easy configuration, such as Source, UriMapper, UseGlobalShell, and complete navigation-related APIs.

UXNavigationWindow derives from UXWindow class, which means it uses the windowing presentation model and exposes the same rich windowing features and capabilities as in UXWindow such as highly customizable appearance, rich window interactions, corner-mode resizing, focus scope, activation and deactivation, desktop integration and much more. To learn more about the features and capabilities of a window, see UXWindow Overview.
UXNavigationWindow supports many advanced features essential to build multiple document interface (MDI) applications such as desktop and task bar integration. To learn more about MDI concept and the integration features, see Window and Dialog Boxes Overview.
Built on the top of ClientUI windowing presentation, UXNavigationWindow adds built-in navigation capability that allows local pages navigation within the navigation frame that predefined in the UXNavigationWindow. It also provides journal buttons that consisted of Back and Forward button to facilitate history navigation for the navigation frame.
UXNavigationWindow implements INavigate interface which exposes Navigate method. This means that UXNavigationWindow is one of the navigation hosts supported by ClientUI Navigation Framework. For more information about navigation host and the basics of navigation such as creating user-friendly URIs, see Navigation Overview.
You can use UXNavigationWindow in a number of scenarios such as described in the following sections.
In standalone scenario, you create a single instance of UXNavigationWindow in your page to facilitate navigation to the pages in your application. You can either define the UXNavigationWindow directly in your page, or create a modular XAML that represents a single UXNavigationWindow to be referenced in the page.
The following example shows how to define the UXNavigationWindow directly in the page.
| UXPage.xaml |
Copy Code
|
|---|---|
<Intersoft:UXPage xmlns="http://schemas.microsoft.com/winfx/2006/xaml/presentation" xmlns:x="http://schemas.microsoft.com/winfx/2006/xaml" xmlns:d="http://schemas.microsoft.com/expression/blend/2008" xmlns:mc="http://schemas.openxmlformats.org/markup-compatibility/2006" mc:Ignorable="d" xmlns:Intersoft="http://intersoft.clientui.com/schemas" x:Class="ClientUIApplication_Docs.Navigation.UXPage1" Title="UXPage1 Page" d:DesignWidth="640" d:DesignHeight="480"> <Grid x:Name="LayoutRoot"> <Intersoft:UXNavigationWindow Header="My Navigation Window" Height="350" Width="500" Source="/Home" IsClientVisible="True"> <Intersoft:UXNavigationWindow.UriMapper> <Intersoft:UriMapper> <Intersoft:UriMapping Uri="/{page}" MappedUri="/Navigation/{page}.xaml"/> </Intersoft:UriMapper> </Intersoft:UXNavigationWindow.UriMapper> </Intersoft:UXNavigationWindow> </Grid> </Intersoft:UXPage> |
|
Alternatively, you can create a new UXNavigationWindow by adding it from the provided template in Visual Studio 2010. To learn more on how to add a new UXNavigationWindow from Visual Studio, see Walkthrough: Add New Item such as Page, Dialog Box and Window in VS 2010.
The following example shows how to create a physical XAML that represents a UXNavigationWindow and reference it in the page. This approach allows you to reuse the same window across the pages in your application.
| MyNavigationWindow.xaml |
Copy Code
|
|---|---|
<Intersoft:UXNavigationWindow xmlns="http://schemas.microsoft.com/winfx/2006/xaml/presentation" xmlns:x="http://schemas.microsoft.com/winfx/2006/xaml" xmlns:d="http://schemas.microsoft.com/expression/blend/2008" xmlns:mc="http://schemas.openxmlformats.org/markup-compatibility/2006" mc:Ignorable="d" xmlns:Intersoft="http://intersoft.clientui.com/schemas" x:Class="ClientUIApplication_Docs.Navigation.MyNavigationWindow" Header="My Navigation Window" Height="350" Width="500" Source="/Home" IsClientVisible="True"> <Intersoft:UXNavigationWindow.UriMapper> <Intersoft:UriMapper> <Intersoft:UriMapping Uri="/{page}" MappedUri="/Navigation/{page}.xaml"/> </Intersoft:UriMapper> </Intersoft:UXNavigationWindow.UriMapper> </Intersoft:UXNavigationWindow> |
|
Once you added a new XAML page such as shown above, you can reference it in your page and instantiate it in the same way as instantiating controls. The following example shows how to add the xmlns:local to reference the namespace of the XAML, then instantiate it using local:MyNavigationWindow.
| UXPage.xaml |
Copy Code
|
|---|---|
<Intersoft:UXPage xmlns="http://schemas.microsoft.com/winfx/2006/xaml/presentation" xmlns:x="http://schemas.microsoft.com/winfx/2006/xaml" xmlns:d="http://schemas.microsoft.com/expression/blend/2008" xmlns:mc="http://schemas.openxmlformats.org/markup-compatibility/2006" mc:Ignorable="d" xmlns:Intersoft="http://intersoft.clientui.com/schemas" xmlns:local="clr-namespace:ClientUIApplication_Docs.Navigation" x:Class="ClientUIApplication_Docs.Navigation.UXPage1" Title="UXPage1 Page" d:DesignWidth="640" d:DesignHeight="480"> <Grid x:Name="LayoutRoot"> <local:MyNavigationWindow /> </Grid> </Intersoft:UXPage> |
|
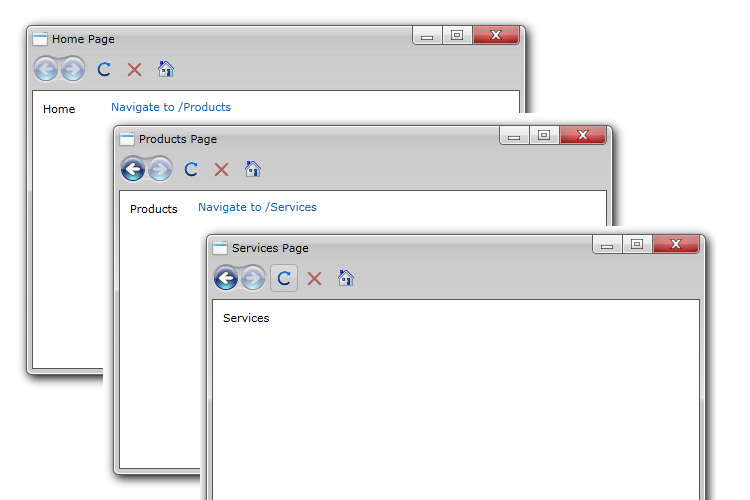
The following illustration shows a high level overview of UXNavigationWindow. Notice that the journal button is synchronized to the navigation frame of the window.

 |
As a member of ClientUI navigation framework, UXNavigationWindow works similar to UXFrame in many ways, for instance, you set the Source property to initially navigate to a particular page when loaded. For more information, see Navigation Overview. |
Built upon the ClientUI windowing framework, UXNavigationWindow leverages the power of desktop and shell integration that it brings. When used with UXDesktop, you can open multiple navigation windows at the same time, with each navigation window having their own navigation frame. For more information about the advanced concepts of desktop integration, see Advanced Window Features.
Using desktop integrated mode, you can work with UXNavigationWindow in several ways such as explained below.
The simplest way to open a UXNavigationWindow is to set its IsClientVisible property to true, which is applicable when you define the UXNavigationWindow in the UXDesktop, such as shown in the following.
| UXPage.xaml |
Copy Code
|
|---|---|
<Intersoft:UXDesktop> <Intersoft:UXWindow Header="UXWindow1 Title" IsClientVisible="True"> <Grid> <TextBlock Text="Content for UXWindow1"/> </Grid> </Intersoft:UXWindow> <Intersoft:UXNavigationWindow Header="My Navigation Window" Source="/Home" IsClientVisible="True"> <Intersoft:UXNavigationWindow.UriMapper> <Intersoft:UriMapper> <Intersoft:UriMapping Uri="/{page}" MappedUri="/Navigation/{page}.xaml"/> </Intersoft:UriMapper> </Intersoft:UXNavigationWindow.UriMapper> </Intersoft:UXNavigationWindow> </Intersoft:UXDesktop> |
|
In a real world application, it is uncommon to show all windows during the application startup. You typically show a list of applications in the task bar (or shortcut) and allow users to launch the applications on demand. In this scenario, the window that associated to the application is dynamically created upon user's requests.
The following shows how to navigate to a page from UXDesktopDockButton which subsequently opens a new UXNavigationWindow to host the target page.
| UXPage.xaml |
Copy Code
|
|---|---|
<Intersoft:UXDesktop TaskBar="{Binding ElementName=desktopDock, Mode=OneWay}"> <Intersoft:UXDesktop.UriMapper> <Intersoft:UriMapper> <Intersoft:UriMapping Uri="/{page}" MappedUri="/Navigation/{page}.xaml"/> </Intersoft:UriMapper> </Intersoft:UXDesktop.UriMapper> </Intersoft:UXDesktop> <Intersoft:UXDesktopDock> <Intersoft:UXDesktopDockButton Icon="/Assets/Images/Products.png" Text="Navigate to Products" NavigateUri="/Products"/> </Intersoft:UXDesktopDock> |
|
In the above example, you create the user-friendly URIs by defining the UriMapper of the UXDesktop control. This is required because the navigation window will be created dynamically at runtime instead of predefined in the desktop. Consequently, the UXDesktopDockButton will try to find the matching URI specified in its NavigateUri property against the UriMapper defined in the UXDesktop which is integrated to the UXDesktopDock through element binding.
For more information about more advanced features related to window and desktop integration, see Advanced Window Features.
Alternatively, you can also open a navigation window by using NavigateNewWindow command, which you can declaratively associate to the controls that support command source such as UXButton, UXNavigationButton and more. This approach allows you to open a new navigation window from virtually anywhere in your application as long as the command source is within the desktop scope.
Once you have configured the command source, you then assign a new instance of WindowOptions in the CommandParameter declaratively in the XAML. The following example shows how to open a UXNavigationWindow and subsequently navigates to a target page using commanding.
| UXPage.xaml |
Copy Code
|
|---|---|
<Intersoft:UXDesktop Name="desktop1"> <Intersoft:UXDesktop.UriMapper> <Intersoft:UriMapper> <Intersoft:UriMapping Uri="/{page}" MappedUri="/Navigation/{page}.xaml"/> </Intersoft:UriMapper> </Intersoft:UXDesktop.UriMapper> </Intersoft:UXDesktop> <Intersoft:UXButton Content="Button" Command="Intersoft:NavigationCommands.NavigateNewWindow" CommandTarget="{Binding ElementName=desktop1}"> <Intersoft:UXButton.CommandParameter> <Intersoft:WindowOptions Uri="/Products"/> </Intersoft:UXButton.CommandParameter> </Intersoft:UXButton> |
|
 |
When using NavigateNewWindow command, the Uri specified in the WindowOptions automatically resolves the friendly URIs through the UriMapper defined in the UXDesktop. This behavior is consistent with the entire navigation semantics used in ClientUI navigation framework. For more information about navigation framework, see Navigation Overview. For more information about commanding, see Commanding Overview. |
In case you are required to setup the navigation window in code, you can use OpenNewNavigationWindow API to open a new UXNavigationWindow and navigates to a target page, such as shown in the following example.
| UXPage.xaml |
Copy Code
|
|---|---|
private void UXButton1_Click(object sender, RoutedEventArgs e)
{
    desktop1.OpenNewNavigationWindow(
        new Uri("/Products", UriKind.RelativeOrAbsolute),
        "wndProducts");
} |
|
You can easily customize the UXNavigationWindow appearance through the following properties.
If you would like to completely customize the control appearance or if you want to change the styles of each visual state, you can edit the template of the control and do the modification accordingly.
To learn how to customize the template and visual states, see Styles and Template Overview.
For the list of ClientUI walkthroughs, see Walkthroughs and How-to Topics.
For the list of ClientUI samples available in local installation, see Locating the Samples in Local Installation.