

| Intersoft ClientUI 8 > ClientUI Fundamentals > Window and Dialog Boxes Overview > Window and Dialog Boxes Walkthroughs > Walkthrough: Add New Item such as Page, Dialog Box and Window |
This walkthrough guides you through the steps of creating a new Silverlight project, and add new project items such as UXPage, UXDialogBox, and UXWindow to your Expression Blend project.
In this walkthrough, you perform the following tasks:
You need the following components to complete this walkthrough:
The first step is to create a new Silverlight Application + Website project using Silverlight Application + Website project template in Expression Blend 4.

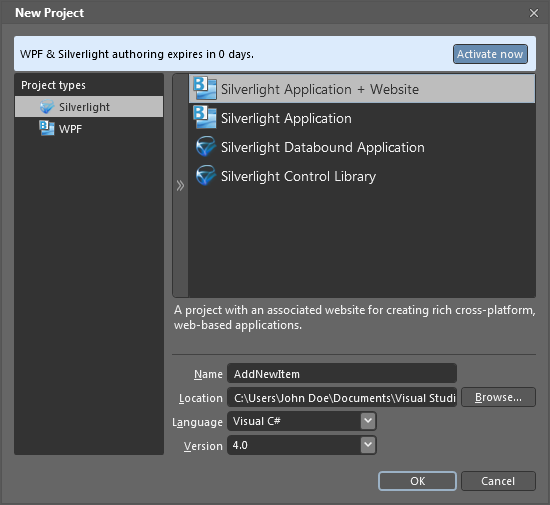
Next, you will add UXPage as new item in the AddNewItem Silverlight project.
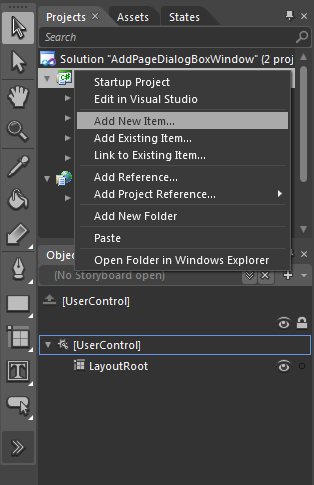
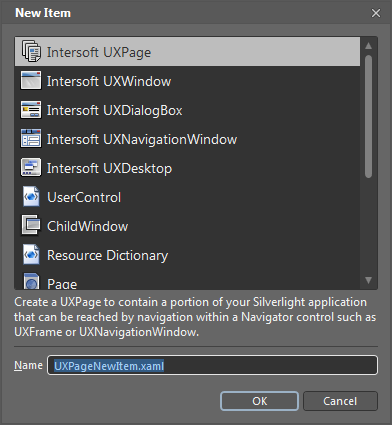
This section shows how to add a new UXPage to your ClientUI application project. You add a new UXPage to contain a portion of your Silverlight application that can be reached by navigation within a Navigator control such as UXFrame or UXNavigationWindow.
| Sample Code |
Copy Code
|
|---|---|
<Intersoft:UXPage xmlns="http://schemas.microsoft.com/winfx/2006/xaml/presentation" xmlns:x="http://schemas.microsoft.com/winfx/2006/xaml" xmlns:d="http://schemas.microsoft.com/expression/blend/2008" xmlns:mc="http://schemas.openxmlformats.org/markup-compatibility/2006" mc:Ignorable="d" xmlns:Intersoft="http://intersoft.clientui.com/schemas" x:Class="AddPageDialogBoxWindow.UXPageNewItem" Title="UXPageNewItem Page" d:DesignWidth="640" d:DesignHeight="480"> <Grid x:Name="LayoutRoot"> </Grid> </Intersoft:UXPage> |
|

Next, you will add UXDialogBox as new item in the AddNewItem Silverlight project.
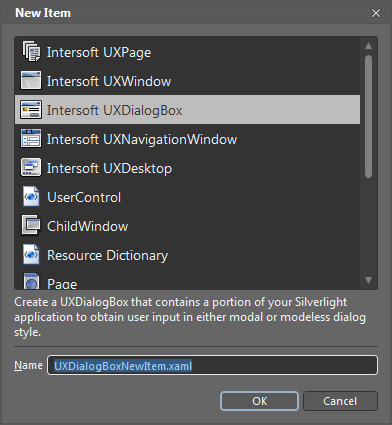
This section shows how to add a new UXDialogBox to your Silverlight project. You add a new UXDialogBox to contain a portion of your Silverlight application to obtain user input in either modal or modeless dialog style.

| Sample Code |
Copy Code
|
|---|---|
<Intersoft:UXDialogBox xmlns="http://schemas.microsoft.com/winfx/2006/xaml/presentation" xmlns:x="http://schemas.microsoft.com/winfx/2006/xaml" xmlns:d="http://schemas.microsoft.com/expression/blend/2008" xmlns:mc="http://schemas.openxmlformats.org/markup-compatibility/2006" mc:Ignorable="d" xmlns:Intersoft="http://intersoft.clientui.com/schemas" x:Class="AddPageDialogBoxWindow.UXDialogBoxNewItem" Header="UXDialogBoxNewItem" ContentMargin="0" d:DesignWidth="640" d:DesignHeight="480"> <Grid x:Name="LayoutRoot"> <Grid.RowDefinitions> <RowDefinition/> <RowDefinition Height="44"/> </Grid.RowDefinitions> <Grid> <TextBlock Text="Put your content here." HorizontalAlignment="Center" VerticalAlignment="Center"/> </Grid> <Intersoft:UXCommandBar Height="44" VerticalAlignment="Bottom" Grid.Row="1"> <Intersoft:UXButton Content="OK" Width="80" IsDefault="True" DialogResult="OK"/> <Intersoft:UXButton Content="Cancel" Width="80" IsCancel="True"/> </Intersoft:UXCommandBar> </Grid> </Intersoft:UXDialogBox> |
|

Next, you will add UXWindow as new item in the AddNewItem Silverlight project.
This section shows how to add a new UXWindow to your Silverlight project. You add a new UXWindow to contain a portion of your Silverlight application that can be integrated to UXDesktop or independently displayed.

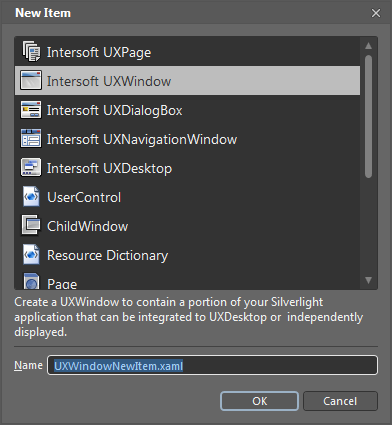
| Sample Code |
Copy Code
|
|---|---|
<Intersoft:UXWindow xmlns="http://schemas.microsoft.com/winfx/2006/xaml/presentation" xmlns:x="http://schemas.microsoft.com/winfx/2006/xaml" xmlns:d="http://schemas.microsoft.com/expression/blend/2008" xmlns:mc="http://schemas.openxmlformats.org/markup-compatibility/2006" mc:Ignorable="d" xmlns:Intersoft="http://intersoft.clientui.com/schemas" x:Class="AddPageDialogBoxWindow.UXDialogBoxNewItem" Header="UXDialogBoxNewItem" ContentMargin="0" d:DesignWidth="640" d:DesignHeight="480"> <Grid x:Name="LayoutRoot" /> </Intersoft:UXWindow> |
|

In this walkthrough, you have learned how to add new item such as UXPage, UXDialogBox, and UXWindow to a Silverlight project.
| Sample Code |
Copy Code
|
|---|---|
<Intersoft:UXPage xmlns="http://schemas.microsoft.com/winfx/2006/xaml/presentation" xmlns:x="http://schemas.microsoft.com/winfx/2006/xaml" xmlns:d="http://schemas.microsoft.com/expression/blend/2008" xmlns:mc="http://schemas.openxmlformats.org/markup-compatibility/2006" mc:Ignorable="d" xmlns:Intersoft="http://intersoft.clientui.com/schemas" x:Class="AddPageDialogBoxWindow.UXPageNewItem" Title="UXPageNewItem Page" d:DesignWidth="640" d:DesignHeight="480"> <Grid x:Name="LayoutRoot"> </Grid> </Intersoft:UXPage> |
|
| Sample Code |
Copy Code
|
|---|---|
<Intersoft:UXDialogBox xmlns="http://schemas.microsoft.com/winfx/2006/xaml/presentation" xmlns:x="http://schemas.microsoft.com/winfx/2006/xaml" xmlns:d="http://schemas.microsoft.com/expression/blend/2008" xmlns:mc="http://schemas.openxmlformats.org/markup-compatibility/2006" mc:Ignorable="d" xmlns:Intersoft="http://intersoft.clientui.com/schemas" x:Class="AddPageDialogBoxWindow.UXDialogBoxNewItem" Header="UXDialogBoxNewItem" ContentMargin="0" d:DesignWidth="640" d:DesignHeight="480"> <Grid x:Name="LayoutRoot"> <Grid.RowDefinitions> <RowDefinition/> <RowDefinition Height="44"/> </Grid.RowDefinitions> <Grid> <TextBlock Text="Put your content here." HorizontalAlignment="Center" VerticalAlignment="Center"/> </Grid> <Intersoft:UXCommandBar Height="44" VerticalAlignment="Bottom" Grid.Row="1"> <Intersoft:UXButton Content="OK" Width="80" IsDefault="True" DialogResult="OK"/> <Intersoft:UXButton Content="Cancel" Width="80" IsCancel="True"/> </Intersoft:UXCommandBar> </Grid> </Intersoft:UXDialogBox> |
|
| Sample Code |
Copy Code
|
|---|---|
<Intersoft:UXWindow xmlns="http://schemas.microsoft.com/winfx/2006/xaml/presentation" xmlns:x="http://schemas.microsoft.com/winfx/2006/xaml" xmlns:d="http://schemas.microsoft.com/expression/blend/2008" xmlns:mc="http://schemas.openxmlformats.org/markup-compatibility/2006" mc:Ignorable="d" xmlns:Intersoft="http://intersoft.clientui.com/schemas" x:Class="AddPageDialogBoxWindow.UXDialogBoxNewItem" Header="UXDialogBoxNewItem" ContentMargin="0" d:DesignWidth="640" d:DesignHeight="480"> <Grid x:Name="LayoutRoot" /> </Intersoft:UXWindow> |
|