
| Intersoft ClientUI 8 > ClientUI Fundamentals > Routed Events Overview |
Routed event is a powerful eventing framework employed in modern client user interface platforms such as in WPF and Silverlight. Routed event works by notifying the occuring event to the source's parent or child through a visual tree walk. ClientUI provides full-featured routed event framework that implements complete specification compatible with WPF, such as bubbling, tunneling and direct routing strategy. You can handle a routed event using instance handler or class handler explained later in this topic.
This topic describes the concept of routed events in ClientUI. The topic defines routed events terminology, describes how routed events are routed through a tree of elements, summarizes how you handle routed events, and introduces how to create your own custom routed events.
This topic contains the following sections.
Although Silverlight was engineered as a subset of WPF, it does not include full support for routed events as in WPF. Silverlight provides routed event only for Silverlight's internal framework purpose.
The following list summarizes the limitation of routed event in Silverlight 4:
To create solid user interface controls that take account cross-platform compatibility, ClientUI implements full routed event support in the ClientUI Framework. To learn more about the concepts and architecture of ClientUI Framework, see ClientUI Architecture Overview.
Many of the limitations due to the lacking of routed event in Silverlight are addressed with the new classes and types implemented in ClientUI to match the event routing behaviors in WPF, such as the EventManager class, RoutedEvent class and many other related types. Consequently, all user interface controls in ClientUI extensively implement the routed events to provide developers with the most flexible way to work with control's events.
ClientUI supports three routing strategies used to define a routed event which is explained in the following sections.
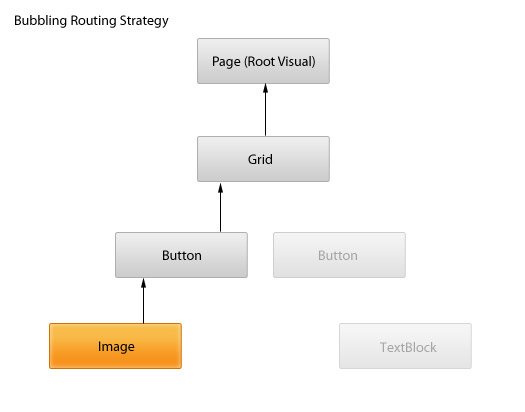
Event handlers on the event source are invoked. The routed event then routes to successive parent elements until reaching the element tree root. Most routed events use the bubbling routing strategy. Bubbling routed events are generally used to report input or state changes from distinct controls or other UI elements.
The following illustration shows how a bubbling routed event works.

In the above illustration, the Image element (highlighted box) represents the OriginalSource of which the routed event is raised against. In this example, the event is initially raised on the Image element, and then walk up to its parent in the visual tree, which is the Button element and so on, until it reaches the root of the visual tree.
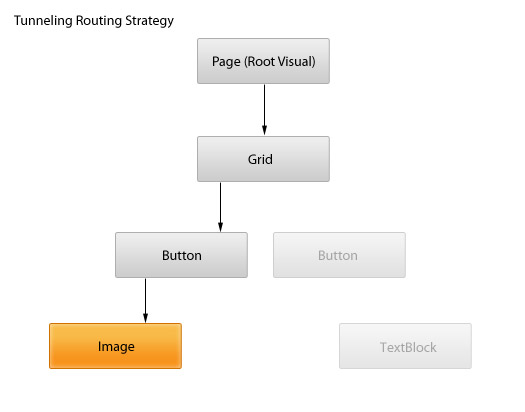
Event handlers at the element tree root are initially invoked. The routed event then travels a route through successive child elements along the route, towards the node element that is the routed event source (the element that raised the routed event). Tunneling events are also sometimes referred to as Preview events, because of a naming convention that is used for the pairs.
Tunneling routed events are often used or handled as part of the compositing for a control, such that events from composite parts can be deliberately suppressed or replaced by events that are specific to the complete control.
The following illustration shows how a tunneling routed event works.

In the above illustration, the Image element (highlighted box) represents the OriginalSource of which the routed event is raised against. In this example, the event is initially raised on the root of the visual tree, then walk down to its children until it reaches the Image element which is the OriginalSource that raises the event. It is important to note that the routed event walks through from the root element to the OriginalSource according to the path of the visual tree.
As a tunneling routed event is often paired with a bubbling event, the event will continue to walk up back to the root visual through the same path of the visual tree. This condition is true when the routed event has not been handled by the event handler raised by the tunneling routed event. The handling of a routed event is determined by the Handled property, which is explained later in this topic.
To learn how to handle a routed event, see How to: Handle a Routed Event.
To make UI development easier in Silverlight and to streamline the cross-platform development with WPF, ClientUI provides additional direct, bubbling and tunneling routed events mainly for input and focus events.
The following list describes the direct routed events available in ClientUI:
The following list describes the bubbling routed events available in ClientUI:
The following list describes the tunneling routed events available in ClientUI:
In addition to the input and focus events listed above, ClientUI also exposes numerous routed events for its frameworks such as the drag-drop framework, application framework and navigation framework, as well as many of the user interface controls such as windows, popup and more.
There are several ways to implement an event handler for a routed event. Based on your development preferences, you can implement an event handler using the techniques explained in the following sections.
To add an event handler in XAML, you simply add the event name to an element as an attribute and set the attribute value as the name of the event handler that implements an appropriate delegate, as in the following example.
| XAML |
Copy Code
|
|---|---|
<Intersoft:UXButton Name="button1" Click="button1_Click" Content="Button" HorizontalAlignment="Left" VerticalAlignment="Top" /> |
|
The button1_Click is the name of the implemented handler that contains the code that handles the Click event.
The event handler, button1_Click, must have the same signature as the RoutedEventHandler delegate, which is the event handler delegate for the Click event. The first parameter of all routed event handler delegates specifies the element to which the event handler is added, and the second parameter specifies the data for the event.
The following code example shows the button1_Click function that handles the Click event.
| C# |
Copy Code
|
|---|---|
void button1_Click(object sender, RoutedEventArgs e) { MessageBox.Show("Button1 Clicked"); } |
|
For a complete example of how to add an event handler to an element using XAML, see How to: Add an Event Handler in XAML.
The controls in ClientUI generally have event fields that corresponds to each routed event available in the control. For example, the Click event field in UXButton control allows you to handle its corresponding Click routed event using language-specific operator.
The following code example shows how to add an event handler using C# operator syntax.
| C# |
Copy Code
|
|---|---|
void UXPage1_Loaded(object sender, RoutedEventArgs e) { button1.Click += new RoutedEventHandler(button1_Click); } void button1_Click(object sender, RoutedEventArgs e) { MessageBox.Show("Button1 Clicked"); } |
|
For a complete example of how to add an event handler to an element using code, see How to: Add an Event Handler using Code.
Another way to handle a routed event using code is by using the AddHandler method available in an instance that derived from FrameworkElement. The AddHandler method is useful in the scenarios where the event fields are not exposed in the instance type.
The following code examples shows how to use the AddHandler method to handle a routed event.
| C# |
Copy Code
|
|---|---|
void UXPage1_Loaded(object sender, RoutedEventArgs e) { button1.AddHandler(ISButton.ClickEvent, new RoutedEventHandler(button1_Click)); } void button1_Click(object sender, RoutedEventArgs e) { MessageBox.Show("Button1 Clicked"); } |
|
Please note an import to Intersoft.Client.Framework is required to use the AddHandler extension method. For instance, the reference import in C# code is: using Intersoft.Client.Framework.
When a routed event is raised against an element, the event will continue to travel up or down according to the routing strategy until it reaches the end of point of the visual tree. An important concept in routed event is that it allows you to handle a routed event in a specific node and stop the event from being routed to the next node in the visual tree. This concept is referred as "Marking a routed event as handled".
This section explains the event handling concept of routed event and discusses several techniques to handle a routed event efficiently.
All routed events share a common event data base class, ISRoutedEventArgs. ISRoutedEventArgs defines the Handled property, which takes a Boolean value. The purpose of the Handled property is to enable any event handler along the route to mark the routed event as handled, by setting the value of Handled to true. After being processed by the handler at one element along the route, the shared event data is again reported to each listener along the route.
When the Handled value is set to true in the event data for a routed event, then handlers that listen for that routed event on other elements are no longer invoked for that particular event instance. This is true both for handlers attached in XAML and for handlers added by language-specific event handler attachment syntaxes such as += or Handles. For most common handler scenarios, marking an event as handled by setting Handled to true will stop routing for either a tunneling route or a bubbling route, and also for any event that is handled at a point in the route by a class handler.
In addition to the behavior that Handled state produces in routed events, the concept of Handled has implications for how you should design your application and write the event handler code. You can conceptualize Handled as being a simple protocol that is exposed by routed events.
The following list describes how the value of Handled property is intended to be used in your application design:
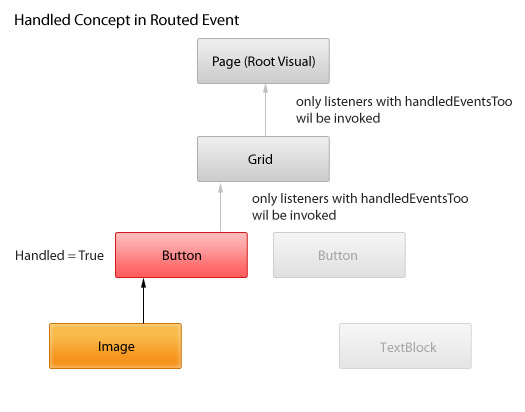
In the case that a routed event is not marked as handled, the handlers on the current listener will have three possible courses of action:
The following illustration shows how the value of Handled property affects a routed event process in the way such as described in the above list.

To learn how to mark a routed event as handled, see How to: Mark a Routed Event as Handled.
Although marking an event as handled by setting Handled to true will stop routing for either a tunneling route or a bubbling route that handled in the XAML or language-specific event handler syntax, the listeners that registered with handledEventsToo parameter set to true will continue to be invoked further.
ClientUI provides instance handlers with "handledEventsToo" mechanism whereby listeners can still run handlers in response to routed events where Handled is true in the event data. Instead of using a language-specific event syntax that works for general CLR events, call the extension method AddHandler(RoutedEvent, Delegate, Boolean) provided in the ClientUI Framework to add your handler. Specify the value of handledEventsToo as true.
The following code examples shows how to use the AddHandler method to handle a routed event that is invoked regardless of the Handled property value.
| C# |
Copy Code
|
|---|---|
void UXPage1_Loaded(object sender, RoutedEventArgs e) { button1.AddHandler(ISButton.ClickEvent, new RoutedEventHandler(button1_Click), true); } void button1_Click(object sender, RoutedEventArgs e) { MessageBox.Show("Button1 Clicked"); } |
|
In addition to the instance handlers, you can also handle a routed event using class handlers by calling the RegisterClassHandler method available in the EventManager class. Class handlers are invoked before any instance listener handlers that are attached to an instance of that class, whenever a routed event reaches an element instance in its route. Furthermore, class handlers are commonly called in the static contructor of your class.
Class handlers are typically used to effectively handle a routed event of multiple instances of controls having the same type, or derived type. For instance, consider a registration form where your application is responding as user types into textbox or changes selection in combobox. The handling of such events can be achieved more efficiently through class handlers.
The following code example shows how to add class handling for a routed event.
| C# |
Copy Code
|
|---|---|
static UXPage1() { EventManager.RegisterClassHandler(typeof(UXPage1), Keyboard.KeyUpEvent, new KeyEventHandler(OnKeyUp), true); } static void OnKeyUp(object sender, KeyEventArgs e) { // do something on key up } |
|
For a complete example of how to add class handling for a routed event, see How to: Add Class Handling for a Routed Event.