
| Intersoft ClientUI 8 > ClientUI Controls > Control Library > Windowing Controls Overview > UXWindow |
UXWindow is a state-of-the-art windowing control featuring full ISO-standards compliance in usability, focus management, and user experiences. Many of the modern windowing features can be found in UXWindow, ranging from window controls such as minimize and maximize, moving, 8-direction resizing, to context menu and fully-customizable window appearance.
UXWindow sports a beautiful Aero-style interface with subtle drop shadow, glassy border and glowing buttons which can be easily customized through brushes. It also features UXDesktop integration and built-in busy management which enables the window to be blocked from user interaction while processing a longer operation. Comprehensive APIs and routed events are also provided for more advanced scenarios.

UXWindow is a full-featured windowing control that provides all the user interface elements required in a window such as title bar, control box, option buttons, chrome border, content area and more. It gives you complete customization over its look and feel, allowing you to create commercial-class user interface applications.
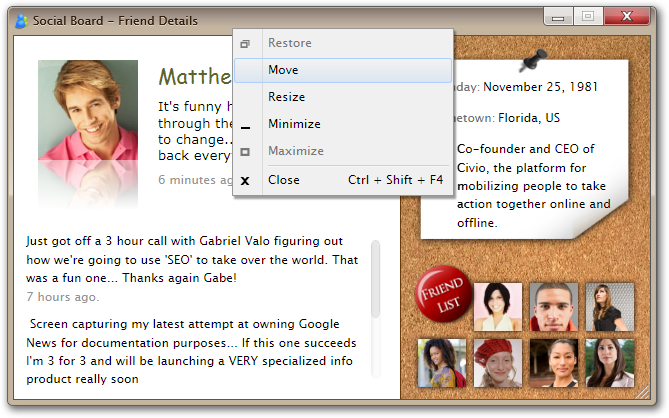
The following illustration shows the user interface overview of a window control.

As seen in the above illustration, UXWindow does not only provide the user interface and styles, but also implement the behaviors and user experience aspects such as 8-edge resizing mode, active and inactive state, drag and drop, and context menu.
For more information about user experience implementation in windowing and other ClientUI controls, see User Experiences Overview.
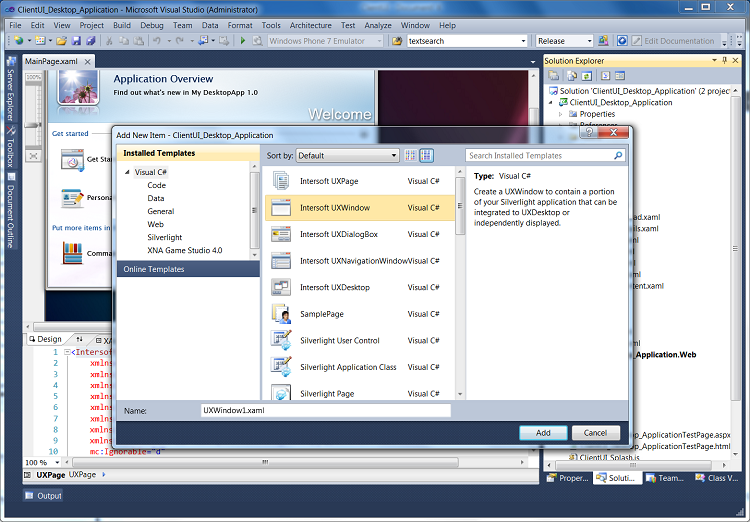
You use UXWindow to represent a single content that can be minimized, resized, maximized, moved and closed. The easiest way to create UXWindow is by adding a new item from the ClientUI templates in Visual Studio 2010.
ClientUI provides predefined project and item templates that integrates to Visual Studio 2010. This allows you to easily create a new windowing project, and then rapidly add as many windows as needed, such as shown in the following figure.

For a step-by-step walkthrough to add new windows to your application, see Walkthrough: Add New Item such as Page, Dialog Box and Window.
For more information about project templates in ClientUI, see Introduction to ClientUI Project Templates.
In most scenarios, you do not show all windows directly in the first page load. You can use the following strategies to show a window dynamically at runtime.
By default, a UXWindow is not automatically shown eventhough it is defined in the UXDesktop control, or when used independently.
To show a window, you set its IsClientVisible property to true. If you use MVVM pattern development, you can bind this property to control the window's visibility in your ViewModel. For more information about MVVM pattern, see MVVM Pattern Overview.
The following example shows how to show a window when the desktop control is loaded.
| XAML |
Copy Code
|
|---|---|
<Intersoft:UXPage xmlns="http://schemas.microsoft.com/winfx/2006/xaml/presentation" xmlns:x="http://schemas.microsoft.com/winfx/2006/xaml" xmlns:d="http://schemas.microsoft.com/expression/blend/2008" xmlns:mc="http://schemas.openxmlformats.org/markup-compatibility/2006" xmlns:Intersoft="http://intersoft.clientui.com/schemas" xmlns:local="ClientUIApplication_Docs.Desktop" mc:Ignorable="d" Title="UXDesktop1 Page" d:DesignWidth="640" d:DesignHeight="480"> <Grid x:Name="LayoutRoot"> <Intersoft:UXDesktop> <local:HomeWindow WindowName="wndHome" /> </Intersoft:UXDesktop> </Grid> </Intersoft:UXPage> |
|
If you prefer to use API over property-based approach, you can call the Show method of the window control to display the window.
The following example shows how to create a new instance of HomeWindow class and show the window using API on a button click.
| C# |
Copy Code
|
|---|---|
private void UXButton1_Click(object sender, RoutedEventArgs e) { HomeWindow window = new HomeWindow(); window.Show(); } |
|
 |
If the window being shown is a new instance and the window framework detected an active UXDesktop in the application, the Show method will automatically integrate the window to the desktop. |
The ClientUI windowing framework is built around commanding semantics which allows you to work with the windows using routed commands, such as opening a window by defining the command in the XAML.
For more information about using commands in your application, see Commanding Overview.
Similar to showing a window, you can hide a window by either using property or API call.
To hide a window using property, you set the IsClientVisible property to false. To hide a window using API, you call the Hide method of the window instance.
To learn about window features such as closing a window, positioning a window at startup, enabling resizing, as well as the window lifetime and events, see Window and Dialog Boxes Overview.
To learn about advanced window features and behaviors such as integration with desktop and task bar, managing busy state, and more, see Advanced Window Features.
You can easily customize the UXWindow appearance through the following properties.
If you would like to completely customize the control appearance or if you want to change the styles of each visual state, you can edit the template of the control and do the modification accordingly.
To learn how to customize the template and visual states, see Styles and Template Overview.
For the list of ClientUI walkthroughs, see Walkthroughs and How-to Topics.
For the list of ClientUI samples available in local installation, see Locating the Samples in Local Installation.