Intersoft ClientUI Documentation
Walkthrough: Add Button, Split Button and Dropdown to Tool Bar in Designer

This walkthrough shows how to add various button types to UXToolBar using designer tools available in Visual Studio 2010.

In this walkthrough, you perform the following tasks:

Prerequisites

You need the following components to complete this walkthrough:

Creating a new ClientUI Application Project

The first step is to create a new ClientUI Application project using Intersoft ClientUI Application project template in Visual Studio.

To create the ClientUI Application project

  1. Start Visual Studio 2010.
  2. Create a new ClientUI Application project using Intersoft ClientUI Application project template. To learn more, see Walkthrough: Create New Intersoft ClientUI Application Template.

To add the resources file

  1. In your project, create new folder with name Assets.
  2. In Assets folder, create new folder with name Images.
  3. In Images folder, copy the images from [Intersoft Installation Folder]Intersoft WebUI Studio 2010 R1\Samples\SL4\ClientUI Samples\Intersoft.ClientUI.Samples.Assets\Images\Office\.

Creating The Application Interface

This section show how to add button, splitbutton and drodpwn button to UXToolBar using designer.
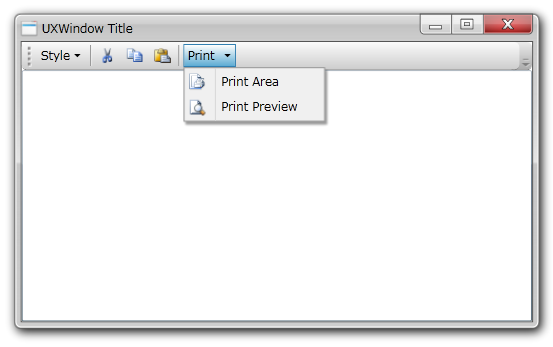
To add button, splitbutton and dropdown button to UXToolBar using designer.
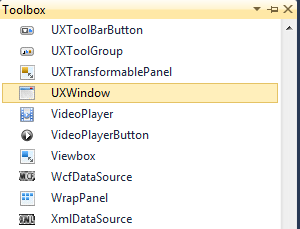
  1. Open the Toolbox window if it is not already open.
  2. From the Toolbox, Double-click the UXWindow control.
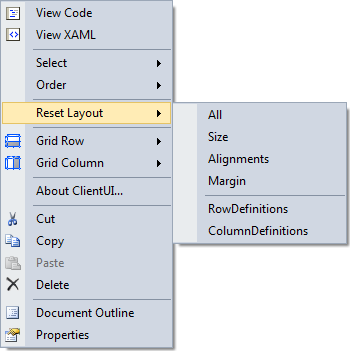
  3. Right-click the UXWindow, click Reset Layout, and then click Alignments and Margin.
  4. Select the UXWindow.
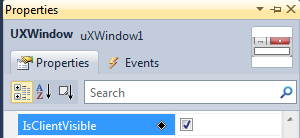
  5. Locate the IsClientVisible property in the Properties window or you can filter the properties in the search box.
  6. Set the IsClientVisible property to True.
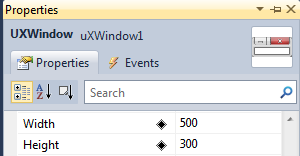
  7. Still on UXWindow, set the Width and Height properties to 500 and 300.
  8. Double-click a DockPanel within the UXWindow element.
  9. Double-click the UXToolBar control just under the DockPanel control, but within the UXWindow.
  10. Set the dock position to Dock to Top by clicking the top square of the icon indicator.
  11. Right-click the UXToolBar, click Reset Layout, and then click All.
  12. Remove / delete the two predefined toolbar buttons when you insert the toolbar.
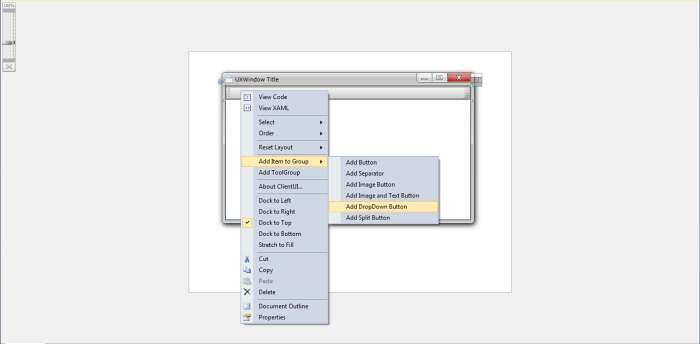
  13. Add the Dropdown Button within the toolbar. 
  14. Set the Content property of UXToolBarButton to Style.
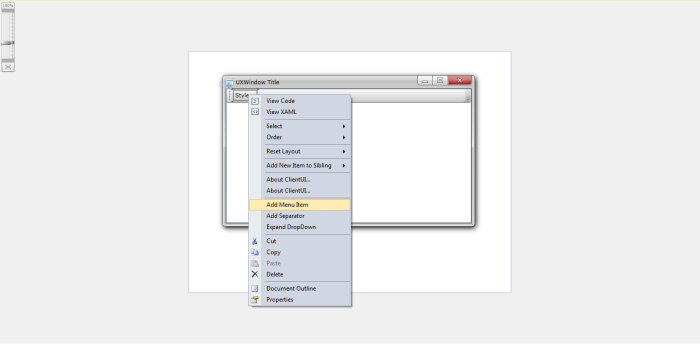
  15. Add the UXMenuItem within the Style toolbar by right-click on the Style toolbar, click Add Item.
  16. Set the Content and Icon properties of the new created UXToolBarButton to Bold and boldhs.png.
     
  17. Add one additional MenuItem and set the Content and Icon properties of UXToolBarButton to Italic and ItalicHS.png.
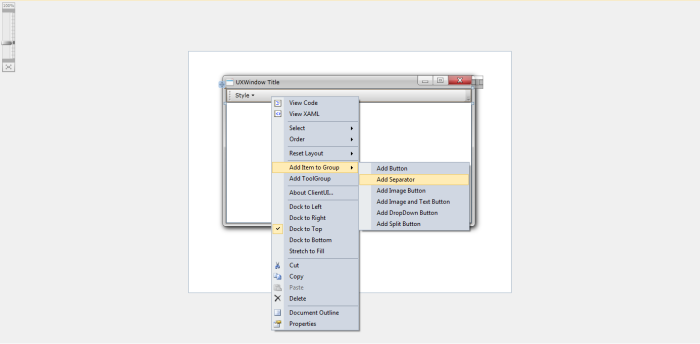
  18. Add a UXSeparator by right-click on the toolbar, click Add Item to Group, click Add Separator.
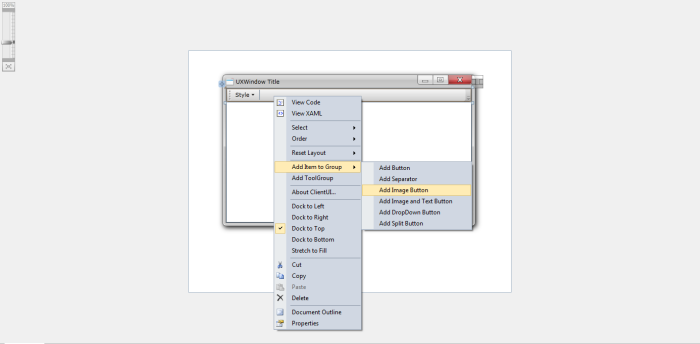
  19. Add an Image Button by right-click on the toolbar, click Add Item to Group, click Add Image Button.
  20. Set the Icon property of the new created Image Button to CutHS.png.
  21. Add two additional Image Button and set the Icon property of UXToolBarButton to CopyHS.png and PasteHS.png.
  22. Add another separator.
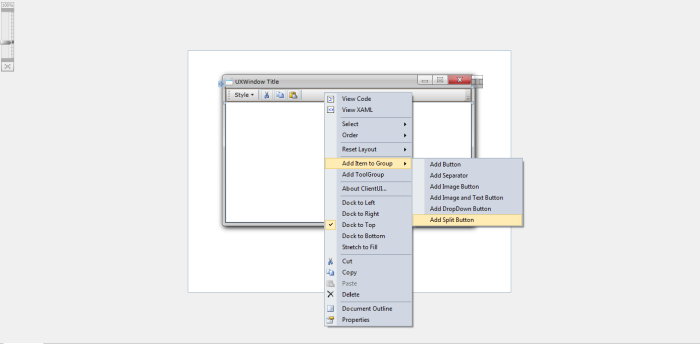
  23. Add the Split Button within the toolbar by right-click on the toolbar, click Add Item to Group, click Add Split Button.
  24. Set the Content property of Split Button to Print.
  25. Add two additional MenuItem within the Split Button.
  26. Set the Content and Icon properties of the first MenuItem to Print Area and PrintArea.png.
  27. Set the Content and Icon properties of the second MenuItem to Print Preview and PrintPreviewHS.png.
  28. Double-click the xtBox control just under the DockPanel control, but within the UXWindow.
  29. Set the dock position to Stretch to Fill by click the middle square of the icon indicator.
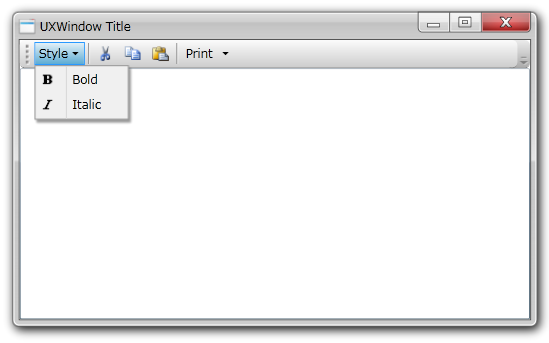
  30. Run the project.
In this walkthrough, you have learned how to create ClientUI Application project using Intersoft ClientUI Application project template, create the UXToolBar and add the UXToolBarButton and UXSeparator using the Visual Studio designer.

Complete Code Listing

MainPage.xaml


MainPage
Copy Code
<Intersoft:UXPage 
        xmlns="http://schemas.microsoft.com/winfx/2006/xaml/presentation"
        xmlns:x="http://schemas.microsoft.com/winfx/2006/xaml" 
        xmlns:d="http://schemas.microsoft.com/expression/blend/2008"
        xmlns:mc="http://schemas.openxmlformats.org/markup-compatibility/2006"
        mc:Ignorable="d"
        xmlns:Intersoft="http://intersoft.clientui.com/schemas"
        x:Class="AddButtontoToolBar.MainPage" 
        Title="MainPage Page"
        d:DesignWidth="640" d:DesignHeight="480">
        
        <Grid x:Name="LayoutRoot">
        <Intersoft:UXWindow Header="UXWindow Title" Height="300" Name="uXWindow1" Width="500" IsClientVisible="True">
            <Grid>
                <Intersoft:DockPanel Name="dockPanel1" FillChildMode="Custom">
                    <Intersoft:UXToolBar Name="uXToolBar1" Intersoft:DockPanel.Dock="Top">
                        <Intersoft:UXToolGroup>
                            <Intersoft:UXToolBarButton Content="Style" ButtonType="DropdownButton">
                                <Intersoft:UXMenuItem Header="Bold" Icon="/AddButtontoToolBar;component/Assets/Images/boldhs.png" />
                                <Intersoft:UXMenuItem Header="Italic" Icon="/AddButtontoToolBar;component/Assets/Images/ItalicHS.png" />
                            </Intersoft:UXToolBarButton>
                            <Intersoft:UXSeparator Name="uXSeparator1" />
                            <Intersoft:UXToolBarButton Name="uXToolBarButton1" Icon="/AddButtontoToolBar;component/Assets/Images/CutHS.png" DisplayMode="Image" />
                            <Intersoft:UXToolBarButton Name="uXToolBarButton2" Icon="/AddButtontoToolBar;component/Assets/Images/CopyHS.png" DisplayMode="Image" />
                            <Intersoft:UXToolBarButton Name="uXToolBarButton3" Icon="/AddButtontoToolBar;component/Assets/Images/PasteHS.png" DisplayMode="Image" />
                            <Intersoft:UXSeparator Name="uXSeparator2" />
                            <Intersoft:UXToolBarButton ButtonType="SplitButton" Content="Print" Name="uXToolBarButton4" Icon="/AddButtontoToolBar;component/Assets/Images/PrintHS.png" DisplayMode="ContentAndImage">
                                <Intersoft:UXMenuItem Header="Print Area" Icon="/AddButtontoToolBar;component/Assets/Images/PrintArea.png" />
                                <Intersoft:UXMenuItem Header="Print Preview" Icon="/AddButtontoToolBar;component/Assets/Images/PrintPreviewHS.png" />
                            </Intersoft:UXToolBarButton>
                        </Intersoft:UXToolGroup>
                    </Intersoft:UXToolBar>
                    <RichTextBox Name="richTextBox1" Intersoft:DockPanel.IsFillElement="True" />
                </Intersoft:DockPanel>
            </Grid>
        </Intersoft:UXWindow>
    </Grid>
</Intersoft:UXPage>
See Also

Concepts

Other Resources