
| Intersoft ClientUI 8 > ClientUI Fundamentals > MVVM Pattern Overview > MVVM Pattern Walkthroughs > Walkthrough: Display UXFlow’s SelectedItem in DialogBox using MVVM Pattern |
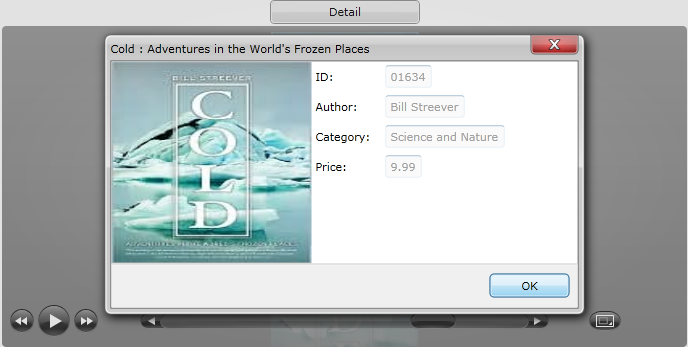
This walkthrough shows you how to display detail information of SelectedItem from UXFlow using UXDialogBox with MVVM pattern. This walkthrough demonstrates the following concept:
You need the following components to complete this walkthrough:
You also need the following resources to complete this walkthrough:
 |
The assembly is required for the XML data source and images |
The first step is to create a new ClientUI MVVM Application project using Intersoft ClientUI MVVM Application project template in Visual Studio.
This section shows how to create a Model class in Book.cs. The model will map each information in the data entity to a property.
| C# |
Copy Code
|
|---|---|
private string _author; public string Author { get { return _author; } set { if (_author != value) { _author = value; OnPropertyChanged("Author"); } } } |
|
| C# |
Copy Code
|
|---|---|
public string ShortTitle { get { if (this.Title.Length < 80) return this.Title; else return this.Title.Substring(0, 80) + "..."; } } |
|
| C# |
Copy Code
|
|---|---|
public Book(XElement x) : this() { this._author = x.Element("Author").Value.Trim(); this._title = x.Element("Title").Value.Trim(); this._category = x.Element("Category").Value.Trim(); this._ID = x.Element("ID").Value.Trim(); this._price = double.Parse(x.Element("Price").Value.Trim()); this._image = new Uri("/Intersoft.ClientUI.Samples.Assets;component/Images/Books/" + x.Element("Image").Value.Trim(), UriKind.RelativeOrAbsolute); } |
|
This section shows how to create a ViewModel to hold the collection of Book object and selected Book object.
| C# |
Copy Code
|
|---|---|
public ObservableCollection<Book> FilteredBooks{ get; set; } |
|
| C# |
Copy Code
|
|---|---|
private Book _selectedItem = null; public Book SelectedItem { get { return _selectedItem; } set { if (_selectedItem != value) { _selectedItem = value; OnPropertyChanged("SelectedItem"); } } } |
|
| C# |
Copy Code
|
|---|---|
public BookFlowViewModel() { this.LoadBooks(); } private void LoadBooks() { // loads book data from xml file StreamResourceInfo resource = System.Windows.Application.GetResourceStream( new Uri("Intersoft.ClientUI.Samples.Assets;component/Data/BookDataSource.xml", UriKind.Relative)); XDocument doc = XDocument.Load(resource.Stream); var filteredBooks = (from x in doc.Descendants("Book") where x.Element("Category").Value.Trim() == "Science and Nature" select new Book(x)).Take(8); FilteredBooks = new ObservableCollection<Book>(filteredBooks); } |
|
This sections shows how to create two view. BookFlow.xaml display Book collection using UXFlow while BookDetail.xaml display the Book detail information.
This section shows how to create a page which hosts the UXFlow and UXButton. The page is using BookFlow.xaml.
 |
For more information on how to add a new item in Visual Studio, see Walkthrough: Add New Item such as Page, Dialog Box and Window in VS 2010 |
| XAML |
Copy Code
|
|---|---|
<Intersoft:UXPage ... xmlns:ViewModels="clr-namespace:DialogBoxFlowItemMVVM.ViewModels" ... > ... </Intersoft:UXPage> |
|
| XAML |
Copy Code
|
|---|---|
<Intersoft:UXPage.DataContext> <ViewModels:BookFlowViewModel /> </Intersoft:UXPage.DataContext> |
|
| Property | Value |
|---|---|
| Margin | 0,24,0,0 |
| ImageMemberPath | Image |
| SubTitleMemberPath | Author |
| TitleMemberPath | ShortTitle |
| XAML |
Copy Code
|
|---|---|
<Intersoft:UXFlow x:Name="uXFlow1" Margin="0,24,0,0" ItemsSource="{Binding Path=FilteredBooks}" ImageMemberPath="Image" SubTitleMemberPath="Author" TitleMemberPath="ShortTitle" SelectedItem="{Binding Path=SelectedItem, Mode=TwoWay}" /> |
|
| Property | Value |
|---|---|
| Content | Detail |
| HorizontalAlignment | Center |
| VerticalAlignment | Top |
| Width | 150 |
| Height | 24 |
| XAML |
Copy Code
|
|---|---|
<Intersoft:UXButton Content="Detail" HorizontalAlignment="Center" Name="uXButton1" VerticalAlignment="Top" Width="150" Height="24" Click="uXButton1_Click" /> |
|

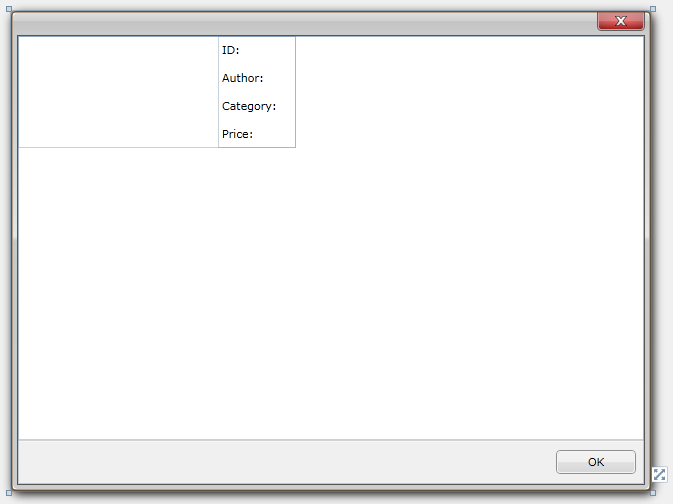
This section shows how to create a UXDialogBox to show detail information for the SelectedItem in the UXFlow from the BookFlow view.
 |
For more information on how to add a new item in Visual Studio, see Walkthrough: Add New Item such as Page, Dialog Box and Window in VS 2010 |

| Property | Value |
|---|---|
| HeaderWidth | 70 |
| Header | ID: |
| Author: | |
| Category: | |
| Price: |
| XAML |
Copy Code
|
|---|---|
<Intersoft:FieldLabel Header="ID: " HeaderWidth="70"> ... </Intersoft:FieldLabel> |
|
| Property | Value |
|---|---|
| TextWrapping | Wrap |
| Text | {Binding Path=ID} |
| {Binding Path=Author} | |
| {Binding Path=Category} | |
| {Binding Path=Price} |
| XAML |
Copy Code
|
|---|---|
<TextBlock Text="{Binding Path=ID}" TextWrapping="Wrap" /> |
|
| XAML |
Copy Code
|
|---|---|
<Intersoft:UXDialogBox.Header> <TextBlock Text="{Binding Path=Title}" TextWrapping="Wrap" HorizontalAlignment="Center" /> </Intersoft:UXDialogBox.Header> |
|

This section shows how to show a UXDialogBox using UXButton Click event handler.
| C# |
Copy Code
|
|---|---|
private void uXButton1_Click(object sender, RoutedEventArgs e) { BookFlowViewModel bookVM = (BookFlowViewModel)this.DataContext; BookDetail dlgBox = new BookDetail(); dlgBox.DataContext = bookVM.SelectedItem; dlgBox.ShowDialog(null, (DialogResult) => { }); } |
|
In order to view the result, you will need to build the Silverlight project and run the test page in browser.

In this walkthrough, you have learned how to create ClientUI MVVM Application project using Intersoft ClientUI MVVM Application project template, and create classes and page based on the MVVM pattern. You also learned how to bind UXFlow to a collection of data and how to utilize UXButton Click event handler to programatically show UXDialogBox with UXFlow SelectedItem object.
For more information about application development using MVVM pattern, see MVVM Pattern Overview.
This section lists the complete code used in this walkthrough.
| C# |
Copy Code
|
|---|---|
using System; using System.Net; using System.Windows; using System.Windows.Controls; using System.Windows.Documents; using System.Windows.Ink; using System.Windows.Input; using System.Windows.Media; using System.Windows.Media.Animation; using System.Windows.Shapes; using DialogBoxFlowItemMVVM.ViewModels; using System.Xml.Linq; namespace DialogBoxFlowItemMVVM.Models { public class Book : ModelBase { public Book() { } public Book(XElement x) : this() { this._author = x.Element("Author").Value.Trim(); this._title = x.Element("Title").Value.Trim(); this._category = x.Element("Category").Value.Trim(); this._ID = x.Element("ID").Value.Trim(); this._price = double.Parse(x.Element("Price").Value.Trim()); this._image = new Uri("/Intersoft.ClientUI.Samples.Assets;component/Images/Books/" + x.Element("Image").Value.Trim(), UriKind.RelativeOrAbsolute); } private Uri _image = null; private string _author; private string _title; private string _category; private string _ID; private double _price; public string Author { get { return _author; } set { if (_author != value) { _author = value; OnPropertyChanged("Author"); } } } public string Title { get { return _title; } set { if (_title != value) { _title = value; OnPropertyChanged("Title"); } } } public string Category { get { return _category; } set { if (_category != value) { _category = value; OnPropertyChanged("Category"); } } } public string ID { get { return _ID; } set { if (_ID != value) { _ID = value; OnPropertyChanged("ID"); } } } public double Price { get { return _price; } set { if (_price != value) { _price = value; OnPropertyChanged("Price"); } } } public Uri Image { get { return _image; } set { if (_image != value) { _image = value; OnPropertyChanged("Image"); } } } public string ShortTitle { get { if (this.Title.Length < 80) return this.Title; else return this.Title.Substring(0, 80) + "..."; } } } } |
|
| C# |
Copy Code
|
|---|---|
using System.Collections.ObjectModel; using System.Linq; using DialogBoxFlowItemMVVM.Models; using System.Windows.Resources; using System; using System.Xml.Linq; namespace DialogBoxFlowItemMVVM.ViewModels { public class BookFlowViewModel : ViewModelBase { private Book _selectedItem = null; public Book SelectedItem { get { return _selectedItem; } set { if (_selectedItem != value) { _selectedItem = value; OnPropertyChanged("SelectedItem"); } } } public ObservableCollection<Book> FilteredBooks { get; set; } public BookFlowViewModel() { this.LoadBooks(); } private void LoadBooks() { // loads book data from xml file StreamResourceInfo resource = System.Windows.Application.GetResourceStream( new Uri("Intersoft.ClientUI.Samples.Assets;component/Data/BookDataSource.xml", UriKind.Relative)); XDocument doc = XDocument.Load(resource.Stream); var filteredBooks = (from x in doc.Descendants("Book") where x.Element("Category").Value.Trim() == "Science and Nature" select new Book(x)).Take(8); FilteredBooks = new ObservableCollection<Book>(filteredBooks); } } } |
|
| XAML |
Copy Code
|
|---|---|
<Intersoft:UXPage xmlns="http://schemas.microsoft.com/winfx/2006/xaml/presentation" xmlns:x="http://schemas.microsoft.com/winfx/2006/xaml" xmlns:d="http://schemas.microsoft.com/expression/blend/2008" xmlns:mc="http://schemas.openxmlformats.org/markup-compatibility/2006" xmlns:Intersoft="http://intersoft.clientui.com/schemas" xmlns:ViewModels="clr-namespace:DialogBoxFlowItemMVVM.ViewModels" mc:Ignorable="d" x:Class="DialogBoxFlowItemMVVM.Views.BookFlow" Title="BookFlow Page" d:DesignWidth="640" d:DesignHeight="480"> <Intersoft:UXPage.DataContext> <ViewModels:BookFlowViewModel /> </Intersoft:UXPage.DataContext> <Grid x:Name="LayoutRoot"> <Intersoft:UXFlow x:Name="uXFlow1" Margin="0,24,0,0" ItemsSource="{Binding Path=FilteredBooks}" ImageMemberPath="Image" SubTitleMemberPath="Author" TitleMemberPath="ShortTitle" SelectedItem="{Binding Path=SelectedItem, Mode=TwoWay}" /> <Intersoft:UXButton Content="Detail" HorizontalAlignment="Center" Name="uXButton1" VerticalAlignment="Top" Width="150" Height="24" Click="uXButton1_Click" /> </Grid> </Intersoft:UXPage> |
|
| C# |
Copy Code
|
|---|---|
using System; using System.Collections.Generic; using System.Linq; using System.Net; using System.Windows; using System.Windows.Controls; using System.Windows.Documents; using System.Windows.Input; using System.Windows.Media; using System.Windows.Media.Animation; using System.Windows.Shapes; using Intersoft.Client.UI.Navigation; using DialogBoxFlowItemMVVM.ViewModels; namespace DialogBoxFlowItemMVVM.Views { public partial class BookFlow : UXPage { public BookFlow() { InitializeComponent(); } // Executes when the user navigates to this page. protected override void OnNavigatedTo(NavigationEventArgs e) { } private void uXButton1_Click(object sender, RoutedEventArgs e) { BookFlowViewModel bookVM = (BookFlowViewModel)this.DataContext; UXDialogBox1 dlgBox = new UXDialogBox1(); dlgBox.DataContext = bookVM.SelectedItem; dlgBox.ShowDialog(null, (DialogResult) => { }); } } } |
|
| XAML |
Copy Code
|
|---|---|
<Intersoft:UXDialogBox xmlns="http://schemas.microsoft.com/winfx/2006/xaml/presentation" xmlns:x="http://schemas.microsoft.com/winfx/2006/xaml" xmlns:d="http://schemas.microsoft.com/expression/blend/2008" xmlns:mc="http://schemas.openxmlformats.org/markup-compatibility/2006" mc:Ignorable="d" xmlns:Intersoft="http://intersoft.clientui.com/schemas" x:Class="DialogBoxFlowItemMVVM.Views.BookDetail" ContentMargin="0" d:DesignWidth="640" d:DesignHeight="480"> <Intersoft:UXDialogBox.Header> <TextBlock Text="{Binding Path=Title}" TextWrapping="Wrap" HorizontalAlignment="Center" /> </Intersoft:UXDialogBox.Header> <Grid x:Name="LayoutRoot"> <Grid.RowDefinitions> <RowDefinition/> <RowDefinition Height="44"/> </Grid.RowDefinitions> <Grid> <Intersoft:DockPanel HorizontalAlignment="Left" VerticalAlignment="Top" FillChildMode="Custom"> <Image Stretch="None" Width="200" HorizontalAlignment="Center" VerticalAlignment="Center" Intersoft:DockPanel.Dock="Left" Source="{Binding Path=Image}" /> <Intersoft:UXStackPanel Intersoft:DockPanel.IsFillElement="True" Orientation="Vertical"> <Intersoft:FieldLabel Header="ID: " HeaderWidth="70"> <TextBlock Text="{Binding Path=ID}" TextWrapping="Wrap" /> </Intersoft:FieldLabel> <Intersoft:FieldLabel Header="Author: " HeaderWidth="70"> <TextBlock Text="{Binding Path=Author}" TextWrapping="Wrap"/> </Intersoft:FieldLabel> <Intersoft:FieldLabel Header="Category: " HeaderWidth="70"> <TextBlock Text="{Binding Path=Category}" TextWrapping="Wrap"/> </Intersoft:FieldLabel> <Intersoft:FieldLabel Header="Price: " HeaderWidth="70"> <TextBlock Text="{Binding Path=Price}" TextWrapping="Wrap"/> </Intersoft:FieldLabel> </Intersoft:UXStackPanel> </Intersoft:DockPanel> </Grid> <Intersoft:UXCommandBar Height="44" VerticalAlignment="Bottom" Grid.Row="1"> <Intersoft:UXButton Content="OK" Width="80" IsDefault="True" DialogResult="OK"/> </Intersoft:UXCommandBar> </Grid> </Intersoft:UXDialogBox> |
|