

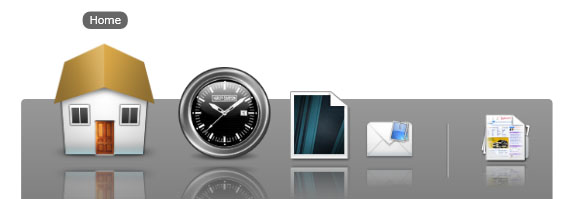
Intersoft ClientUI introduces UXDock, a high performance docking navigation control with modern design and interactive animation.
One of the most unique feature is the new Fluid background behavior in addition to the default Fixed behavior. In Fluid mode, the Dock’s background will automatically shrink and grow as the zooming process takes place. With the 6 predefined styles, elegant auto hide, four-side docking, built-in drag-drop framework, custom stack template, and more, UXDock adds the WoW factor to your business applications that users love without the steep learning curve.
To learn more about the breaking changes from the earlier version, please refer to the Migration from previous version.
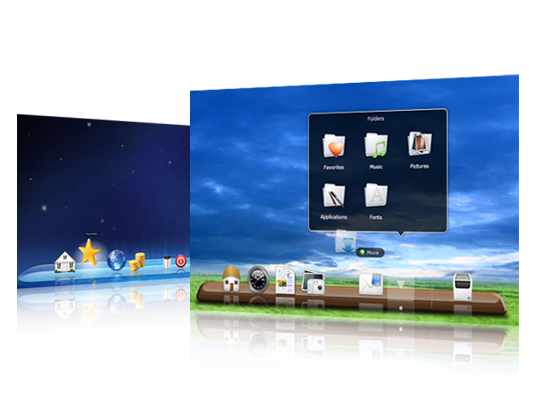
UXDock is inherited from ISItemsControl. For more information about selection control see ItemsControl Overview and Content Model Overview.
Like any other ISItemsControl you can bind collection of data to ItemsSource property. To learn more about data binding see Data Binding Overview.
The following are data members that available for simple data binding:
The following examples shows how to perform simple hierarchical binding to UXDock.
| ButtonObject (Model) |
Copy Code
|
|---|---|
using System.ComponentModel; using System.Collections.ObjectModel; namespace ClientUI.Samples.Models { public class ButtonObject: INotifyPropertyChanged { private ObservableCollection<ItemObject> _subItems; private string _text; private string _image; public ObservableCollection<ItemObject> SubItems { get { return this._subItems; } set { if (this._subItems != value) { this._subItems = value; this.OnPropertyChanged("SubItems"); } } } public string Text { get { return this._text; } set { if (this._text != value) { this._text = value; this.OnPropertyChanged("Text"); } } } public string Image { get { return this._image; } set { if (this._image != value) { this._image = value; this.OnPropertyChanged("Image"); } } } protected void OnPropertyChanged(string propertyName) { if (this.PropertyChanged != null) { this.PropertyChanged(this, new PropertyChangedEventArgs(propertyName)); } } public event PropertyChangedEventHandler PropertyChanged; } } |
|
| ItemObject (Model) |
Copy Code
|
|---|---|
using System; using System.Net; using System.Windows; using System.Windows.Controls; using System.Windows.Documents; using System.Windows.Ink; using System.Windows.Input; using System.Windows.Media; using System.Windows.Media.Animation; using System.Windows.Shapes; using System.ComponentModel; namespace ClientUI.Samples.Models { public class ItemObject : INotifyPropertyChanged { private string _text; private string _image; public string Text { get { return this._text; } set { if (this._text != value) { this._text = value; this.OnPropertyChanged("Text"); } } } public string Image { get { return this._image; } set { if (this._image != value) { this._image = value; this.OnPropertyChanged("Image"); } } } protected void OnPropertyChanged(string propertyName) { if (this.PropertyChanged != null) { this.PropertyChanged(this, new PropertyChangedEventArgs(propertyName)); } } public event PropertyChangedEventHandler PropertyChanged; } } |
|
| View Model |
Copy Code
|
|---|---|
using System.Collections.ObjectModel; using System.ComponentModel; using ClientUI.Samples.Models; namespace ClientUI.Samples.ViewModels { public class MainPageViewModel : INotifyPropertyChanged { public MainPageViewModel() { this.Buttons = new ObservableCollection<ButtonObject>(); this.Buttons.Add(new ButtonObject() { Text = "Home", Image = "Home.png" }); this.Buttons.Add(new ButtonObject() { Text = "Clock", Image = "Clock.png" }); this.Buttons.Add(new ButtonObject() { Text = "Photo", Image = "Photo.png" }); this.Buttons.Add(new ButtonObject() { Text = "Mail", Image = "Mail.png" }); ButtonObject document = new ButtonObject() { Text = "Document", Image = "Document.png" }; document.SubItems = new ObservableCollection<ItemObject>(); document.SubItems.Add(new ItemObject() { Text = "Video", Image = "Video.png" }); document.SubItems.Add(new ItemObject() { Text = "Picture", Image = "Picture.png" }); document.SubItems.Add(new ItemObject() { Text = "Music", Image = "mp3.png" }); document.SubItems.Add(new ItemObject() { Text = "Text", Image = "text.png" }); this.Buttons.Add(document); } private ObservableCollection<ButtonObject> _buttons; public ObservableCollection<ButtonObject> Buttons { get { return this._buttons; } set { if (this._buttons != value) { this._buttons = value; this.OnPropertyChanged("Buttons"); } } } protected void OnPropertyChanged(string propertyName) { PropertyChangedEventHandler handler = PropertyChanged; if (handler != null) { handler(this, new PropertyChangedEventArgs(propertyName)); } } public event PropertyChangedEventHandler PropertyChanged; } } |
|
| XAML |
Copy Code
|
|---|---|
<UserControl x:Class="ClientUI.Samples.MainPage" xmlns="http://schemas.microsoft.com/winfx/2006/xaml/presentation" xmlns:x="http://schemas.microsoft.com/winfx/2006/xaml" xmlns:d="http://schemas.microsoft.com/expression/blend/2008" xmlns:mc="http://schemas.openxmlformats.org/markup-compatibility/2006" xmlns:Intersoft="http://intersoft.clientui.com/schemas" xmlns:vm="clr-namespace:ClientUI.Samples.ViewModels" mc:Ignorable="d" d:DesignHeight="300" d:DesignWidth="400"> <Grid x:Name="LayoutRoot" Background="White"> <Grid.DataContext> <vm:MainPageViewModel/> </Grid.DataContext> <Intersoft:UXDock ItemsSource="{Binding Buttons}" DisplayMemberPath="Text" ImageMemberPath="Image" CollectionMemberPath="SubItems"/> </Grid> </UserControl> |
|
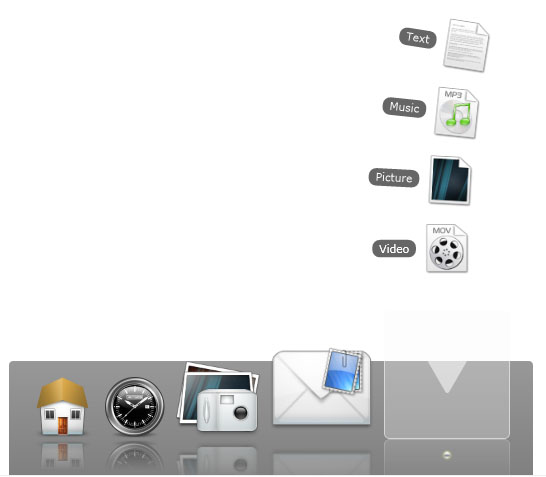
This example is using MVVM Pattern to perform the data binding, to learn more about MVVM Pattern see MVVM Pattern Overview.
UXDockButton is inherited from UXStackButton. Therefore it has the same item container type which is UXStackItem.
UXStackItem implements both ICommandSource and INavigationSource that allows both commanding and navigation using UXStackItem. To learn more about commanding, see Commanding Overview. To learn more about navigation, see Navigation Overview.
UXDock has certain layouting settings controlled by internal mechanism, so it is important to understand the layouting concept before trying to modify layouting aspects of UXDock.
Several properties that are locked are:
These properties are used in the internal mechanism to control the dock layouting, since the layouting is quite complex we provide a simpler layouting property called DockPosition and DockMargin.
The following is the structure illustration of UXDock.
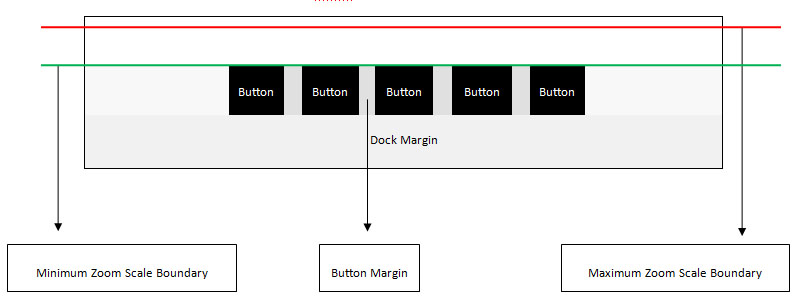
Depending on the DockPosition you can only control one of the dimension aspects at one time while MagnifiedSize property control the other dimension aspects.
For example:
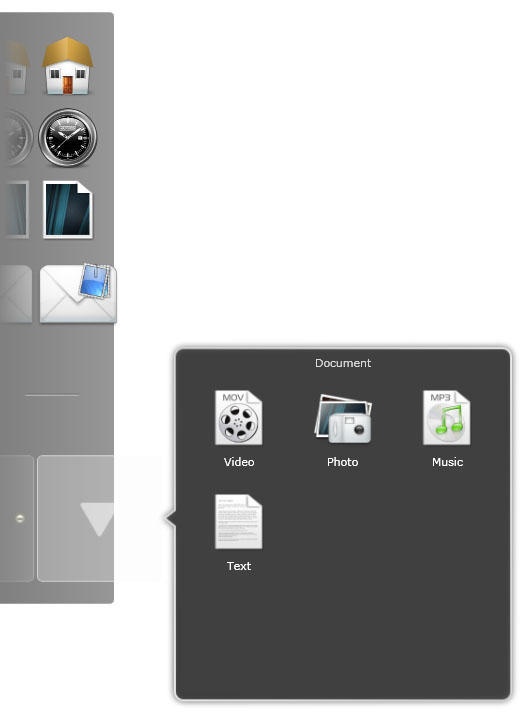
UXDock positioning can be controlled using DockPosition property by default the DockPosition is set to Bottom. When you change this property the UXDock will transform all its elements such as reflection, tooltip position, stack button position etc accordingly.
| XAML |
Copy Code
|
|---|---|
<Intersoft:UXDock DockPosition="Left"> <Intersoft:UXDockButton Text="Home" Icon="Home.png"/> <Intersoft:UXDockButton Text="Clock" Icon="Clock.png"/> <Intersoft:UXDockButton Text="Picture" Icon="Picture.png"/> <Intersoft:UXDockButton Text="Mail" Icon="Mail.png"/> <Intersoft:UXDockSeparator/> <Intersoft:UXDockButton Text="Document" Icon="Document.png" StackMode="GridStyle"> <Intersoft:UXStackItem Text="Video" Icon="Video.png"/> <Intersoft:UXStackItem Text="Photo" Icon="Photo.png"/> <Intersoft:UXStackItem Text="Music" Icon="Mp3.png"/> <Intersoft:UXStackItem Text="Text" Icon="Text.png"/> </Intersoft:UXDockButton> </Intersoft:UXDock> |
|
DockMargin provides space between UXDock and the container. In a sense it can also be uses to determine the reflection area.
| XAML |
Copy Code
|
|---|---|
<Intersoft:UXDock DockMargin="16,16,16,60"> <Intersoft:UXDockButton Text="Home" Icon="Home.png"/> <Intersoft:UXDockButton Text="Clock" Icon="Clock.png"/> <Intersoft:UXDockButton Text="Picture" Icon="Picture.png"/> <Intersoft:UXDockButton Text="Mail" Icon="Mail.png"/> <Intersoft:UXDockSeparator/> <Intersoft:UXDockButton Text="Document" Icon="Document.png" StackMode="GridStyle"> <Intersoft:UXStackItem Text="Video" Icon="Video.png"/> <Intersoft:UXStackItem Text="Photo" Icon="Photo.png"/> <Intersoft:UXStackItem Text="Music" Icon="Mp3.png"/> <Intersoft:UXStackItem Text="Text" Icon="Text.png"/> </Intersoft:UXDockButton> </Intersoft:UXDock> |
|

Zooming Effect of UXDock is determined by the following properties.
 |
MagnifiedSize should never have lower value than ButtonSize. |
| XAML |
Copy Code
|
|---|---|
<Intersoft:UXDock ButtonSize="50" MagnifiedSize="125" ZoomEffect="2"> <Intersoft:UXDockButton Text="Home" Icon="Home.png"/> <Intersoft:UXDockButton Text="Clock" Icon="Clock.png"/> <Intersoft:UXDockButton Text="Picture" Icon="Picture.png"/> <Intersoft:UXDockButton Text="Mail" Icon="Mail.png"/> <Intersoft:UXDockSeparator/> <Intersoft:UXDockButton Text="Document" Icon="Document.png" StackMode="GridStyle"> <Intersoft:UXStackItem Text="Video" Icon="Video.png"/> <Intersoft:UXStackItem Text="Photo" Icon="Photo.png"/> <Intersoft:UXStackItem Text="Music" Icon="Mp3.png"/> <Intersoft:UXStackItem Text="Text" Icon="Text.png"/> </Intersoft:UXDockButton> </Intersoft:UXDock> |
|
There are also three types of ZoomBoundaryMode.

There are many UXDock visuals that can be easily customized. In general the visual can be divided into three sections as follows:
UXDock has three of background mode you can choose from. The following are the list of background modes available in UXDock.
| XAML |
Copy Code
|
|---|---|
<Intersoft:UXDock Background="Orange" BorderThickness="8" BorderBrush="Gold" CornerRadius="12"> <Intersoft:UXDockButton Text="Home" Icon="Home.png"/> <Intersoft:UXDockButton Text="Clock" Icon="Clock.png"/> <Intersoft:UXDockButton Text="Picture" Icon="Picture.png"/> <Intersoft:UXDockButton Text="Mail" Icon="Mail.png"/> <Intersoft:UXDockSeparator/> <Intersoft:UXDockButton Text="Document" Icon="Document.png" StackMode="GridStyle"> <Intersoft:UXStackItem Text="Video" Icon="Video.png"/> <Intersoft:UXStackItem Text="Photo" Icon="Photo.png"/> <Intersoft:UXStackItem Text="Music" Icon="Mp3.png"/> <Intersoft:UXStackItem Text="Text" Icon="Text.png"/> </Intersoft:UXDockButton> </Intersoft:UXDock> |
|

| XAML |
Copy Code
|
|---|---|
<Intersoft:UXDock BackgroundImageCenter="dockwood_center.png" BackgroundImageLeft="dockwood_left.png" BackgroundImageRight="dockwood_right.png" BackgroundMode="ComplexImages"> <Intersoft:UXDockButton Text="Home" Icon="Home.png"/> <Intersoft:UXDockButton Text="Clock" Icon="Clock.png"/> <Intersoft:UXDockButton Text="Picture" Icon="Picture.png"/> <Intersoft:UXDockButton Text="Mail" Icon="Mail.png"/> <Intersoft:UXDockSeparator/> <Intersoft:UXDockButton Text="Document" Icon="Document.png" StackMode="GridStyle"> <Intersoft:UXStackItem Text="Video" Icon="Video.png"/> <Intersoft:UXStackItem Text="Photo" Icon="Photo.png"/> <Intersoft:UXStackItem Text="Music" Icon="Mp3.png"/> <Intersoft:UXStackItem Text="Text" Icon="Text.png"/> </Intersoft:UXDockButton> </Intersoft:UXDock> |
|


| XAML |
Copy Code
|
|---|---|
<UserControl.Resources> <DataTemplate x:Key="BackgroundTemplate"> <Grid> <Grid.Background> <LinearGradientBrush EndPoint="2.446,1.507" StartPoint="-0.17,0.131"> <GradientStop Color="#FFFFFB8F" Offset="0"/> <GradientStop Color="#FF9400FF" Offset="1"/> </LinearGradientBrush> </Grid.Background> <TextBlock Margin="0,0,0,4" TextWrapping="Wrap" Text="Background Template" d:LayoutOverrides="Width, Height" HorizontalAlignment="Right" VerticalAlignment="Bottom" Foreground="White" FontSize="26.667"/> </Grid> </DataTemplate> </UserControl.Resources> <Grid x:Name="LayoutRoot" Background="White"> <Intersoft:UXDock BackgroundTemplate="{StaticResource BackgroundTemplate}"> <Intersoft:UXDockButton Text="Home" Icon="Home.png"/> <Intersoft:UXDockButton Text="Clock" Icon="Clock.png"/> <Intersoft:UXDockButton Text="Picture" Icon="Picture.png"/> <Intersoft:UXDockButton Text="Mail" Icon="Mail.png"/> <Intersoft:UXDockSeparator/> <Intersoft:UXDockButton Text="Document" Icon="Document.png" StackMode="GridStyle"> <Intersoft:UXStackItem Text="Video" Icon="Video.png"/> <Intersoft:UXStackItem Text="Photo" Icon="Photo.png"/> <Intersoft:UXStackItem Text="Music" Icon="Mp3.png"/> <Intersoft:UXStackItem Text="Text" Icon="Text.png"/> </Intersoft:UXDockButton> </Intersoft:UXDock> </Grid> |
|

By default the background will adjust its width or height based when the zooming effect is applied. To turn off this feature, set the BackgroundBehavior property to Fix.
The tooltip of a button will be shown when the button is focused. It will display the text specified in Text property of a button.
There are two modes how the tooltip can be displayed:
| XAML |
Copy Code
|
|---|---|
<Intersoft:UXDock TooltipMode="Auto"> </Intersoft:UXDock> |
|
Each button also has an indicator element, which indicated the last selected button.
Important thing to be noted is that by default each button has an indicator that take place below the button. You need to make sure that there is enough space specified from DockMargin. Alternatively you can change the position of Indicator from IndicatorOffset property.
Follows are settings related to indicator appearances:
| XAML |
Copy Code
|
|---|---|
<Intersoft:UXDock IndicatorSource="newIndicator.jpg"> </Intersoft:UXDock> |
|
Properties related to indicator settings are available UXDock level and UXDockButton level. Modifying the properties at UXDock level will apply to all buttons belong to UXDock.
On the other hand, modifying the value at UXDockButton level will only apply to that specified button.
Auto hide feature allows UXDock to be hidden after a certain idle time.
To enable this feature, set the AutoHide property to True, and then configure the related properties if necessary. The following are settings related to auto hide feature:
| XAML |
Copy Code
|
|---|---|
<Intersoft:UXDock AutoHide="True" AutoHideCollapsedHeight="10"> </Intersoft:UXDock> |
|
UXDock has the ability to play a short audio or voice clip when a button is clicked. To achieve this, you set the AudioSource property to a supported media type such as MP3 or WAV. Leave the property empty if you do not want to play an audio when the button is clicked.
| XAML |
Copy Code
|
|---|---|
<Intersoft:UXDock AudioSource="audio.wav"> </Intersoft:UXDock> |
|
This property is available UXDock level and UXDockButton level. Modifying the properties at UXDock level will apply to all buttons belong to UXDock.
On the other hand, modifying the value at UXDockButton level will only apply to that specified button.
By default, the button reflection is enabled. You can disable it through the ButtonReflectionVisibility property.
Note that disabling button reflection does not automatically collapse the reflection space. You need to modify the DockMargin if you want to reduce the space between the UXDock and its container.
| XAML |
Copy Code
|
|---|---|
<Intersoft:UXDock ButtonReflectionVisibility="Collapsed"> </Intersoft:UXDock> |
|
This property is available UXDock level and UXDockButton level. Modifying the properties at UXDock level will apply to all buttons belong to UXDock.
On the other hand, modifying the value at UXDockButton level will only apply to that specified button.
To add a separator to UXDock, just insert an object called UXDockSeparator. UXDockSeparator is different from UXDockButton, it does not have tooltip, indicator, sound, or any visual effects, but only have an image.
The following are settings related to indicator appearance:
UXDockButton is inherited from UXStackButton, it has all the characteristics of a stack button and adjusted to follow the user experiences of UXDock.
To learn more about the stack button features, see UXStackButton Overview.
Beside zoom effects, UXDock also has others visual effects. The following list describes the visual effects available in UXDock.
To enable spotlight effect simply, set the SpotlightEffectEnabled property to True. You can also controls the initial opacity from SpotlightEffectInitialOpacity property.
| XAML |
Copy Code
|
|---|---|
<Intersoft:UXDock DockPosition="Bottom" SpotlightEffectEnabled="True" SpotlightEffectInitialOpacity="0.18"> <Intersoft:UXDockButton Text="Home" Icon="Home.png"/> <Intersoft:UXDockButton Text="Clock" Icon="Clock.png"/> <Intersoft:UXDockButton Text="Picture" Icon="Picture.png"/> <Intersoft:UXDockButton Text="Mail" Icon="Mail.png"/> <Intersoft:UXDockSeparator/> <Intersoft:UXDockButton Text="Document" Icon="Document.png" StackMode="GridStyle"> <Intersoft:UXStackItem Text="Video" Icon="Video.png"/> <Intersoft:UXStackItem Text="Photo" Icon="Photo.png"/> <Intersoft:UXStackItem Text="Music" Icon="Mp3.png"/> <Intersoft:UXStackItem Text="Text" Icon="Text.png"/> </Intersoft:UXDockButton> </Intersoft:UXDock> |
|


To enable jumping effect on your UXDockButton, set the JumpingEffectEnabled property at UXDock level or UXDockButton level. Note that assigning properties at UXDock level will apply to all buttons.
| XAML |
Copy Code
|
|---|---|
<Intersoft:UXDock DockPosition="Bottom" JumpingEffectEnabled="True" JumpingEffectHeight="120"> <Intersoft:UXDockButton Text="Home" Icon="Home.png" JumpingEffectEnabled="False"/> <Intersoft:UXDockButton Text="Clock" Icon="Clock.png"/> <Intersoft:UXDockButton Text="Picture" Icon="Picture.png"/> <Intersoft:UXDockButton Text="Mail" Icon="Mail.png"/> </Intersoft:UXDock> |
|
To enable flipping effect on your UXDockButton, set the FlippingEffectEnabled property at UXDock level or UXDockButton level. Note that assigning properties at UXDock level will apply to all buttons.
| XAML |
Copy Code
|
|---|---|
<Intersoft:UXDock DockPosition="Bottom" FlippingEffectEnabled="True" FlippingEffectMode="Vertical"> <Intersoft:UXDockButton Text="Home" Icon="Home.png" JumpingEffectEnabled="False"/> <Intersoft:UXDockButton Text="Clock" Icon="Clock.png"/> <Intersoft:UXDockButton Text="Picture" Icon="Picture.png"/> <Intersoft:UXDockButton Text="Mail" Icon="Mail.png"/> </Intersoft:UXDock> |
|
To enable glowing effect on your UXDockButton, set the GlowingEffectEnabled property at UXDock level or UXDockButton level. Note that assigning properties at UXDock level will apply to all buttons.
| XAML |
Copy Code
|
|---|---|
<Intersoft:UXDock DockPosition="Bottom" GlowingEffectEnabled="True"> <Intersoft:UXDockButton Text="Home" Icon="Home.png" JumpingEffectEnabled="False"/> <Intersoft:UXDockButton Text="Clock" Icon="Clock.png"/> <Intersoft:UXDockButton Text="Picture" Icon="Picture.png"/> <Intersoft:UXDockButton Text="Mail" Icon="Mail.png"/> </Intersoft:UXDock> |
|
UXDock also supports drag drop capability by utilizing ClientUI DragDrop Framework. To learn more how to enable drag drop capability in UXDock, see ItemsControl Overview and Drag-drop Framework Overview.