

| Intersoft ClientUI 8 > ClientUI Fundamentals > Items Control Overview |
This topic discusses the items control model in Intersoft ClientUI controls line up.
An ItemsControl is a type of Control that can contain multiple items. There are generally two types of ItemsControl in Intersoft ClientUI:
The main difference between these two controls is the content model. HeaderedItemsControl contains a header that represents the items while ItemsControl does not contain a header. To learn more about these content model see Content Model Overview.
This topic contains the following sections:
You can use either the Items or the ItemsSource property to define the item collection for your ItemsControl.
The ItemsSource property of the ItemsControl enables you to use any type that implements IEnumerable as the content of the ItemsControl. ItemsSource is typically used to display a data collection or to bind an ItemsControl to a collection object.
When the ItemsSource property is set, the Items collection is set to read-only and fixed-size. This means that you cannot add items to the collection directly. When ItemsSource is in use, setting the property to null removes the collection and restores usage to Items, which will be an empty ItemCollection.
If you do not want to use an object that implements IEnumerable to populate the ItemsControl, you can add items by using the Items property.
| XAML |
Copy Code
|
|---|---|
<Intersoft:UXListBox HorizontalAlignment="Left" Height="200" VerticalAlignment="Top" Width="150"> <Intersoft:UXListBoxItem Content="Item #1"/> <Intersoft:UXListBoxItem Content="Item #2"/> <Intersoft:UXListBoxItem Content="Item #3"/> </Intersoft:UXListBox> |
|
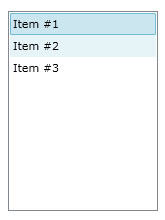
Each ItemsControl type has a corresponding item container type.
The following table lists the ItemsControl objects in ClientUI controls and their corresponding item containers.
These item container types indicate the control type used as the item of each ItemsControl that you can easily customize using ItemsContainerStyle.To learn more about styling and templating, see Styling and Templating section.
One of the common types of ItemsControl is selection control or selector. This type of control has properties that indicate the current selection such as SelectedIndex, SelectedItem, SelectedValue, SelectedValuePath, SelectedElement which you can bind to a DataContext or using MVVM pattern. To learn more about using MVVM pattern, see MVVM Pattern Overview.
Any changes to one of the properties means that the current selection has changed, and it will synchronize the UI and other related properties automatically.
The base class for selection controls in ClientUI is ISSelectionControl which implements ISelection interface.
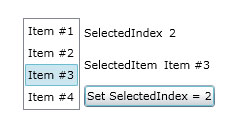
The following example shows how these properties working together.
| XAML |
Copy Code
|
|---|---|
<Intersoft:DockPanel HorizontalAlignment="Center" VerticalAlignment="Center"> <Intersoft:UXListBox x:Name="ListBox1" HorizontalAlignment="Center" VerticalAlignment="Center"> <Intersoft:UXListBoxItem Content="Item #1"/> <Intersoft:UXListBoxItem Content="Item #2"/> <Intersoft:UXListBoxItem Content="Item #3"/> <Intersoft:UXListBoxItem Content="Item #4"/> </Intersoft:UXListBox> <Intersoft:FieldLabel Intersoft:DockPanel.Dock="Top" Header="SelectedIndex"> <TextBlock Text="{Binding SelectedIndex, ElementName=ListBox1}" Margin="4"/> </Intersoft:FieldLabel> <Intersoft:FieldLabel Intersoft:DockPanel.Dock="Top" Header="SelectedItem"> <TextBlock Text="{Binding SelectedItem.Content, ElementName=ListBox1}" Margin="4"/> </Intersoft:FieldLabel> <Button Intersoft:DockPanel.Dock="Top" Content="Set SelectedIndex = 2" Margin="4" Click="Button_Click"/> </Intersoft:DockPanel> |
|
| C# |
Copy Code
|
|---|---|
private void Button_Click(object sender, System.Windows.RoutedEventArgs e) { this.ListBox1.SelectedIndex = 2; } |
|
This sample demonstrates that whenever you change the selection, the SelectedIndex and SelectedItem properties are synchronized automatically and vice versa. When these properties are changed, the UI of the selection control will be updated as well.
The item of a selection control is called Selection Item Control. This item control has IsSelected property that indicates whether the particular item is currently selected. Changing this property will also invalidate the whole selection process. This means that it will update the properties of the selection control such as SelectedIndex, SelectedItem, SelectedValue, etc.
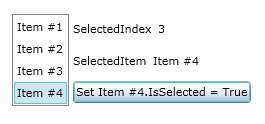
The following example shows how IsSelected property works.
| XAML |
Copy Code
|
|---|---|
<Intersoft:DockPanel HorizontalAlignment="Center" VerticalAlignment="Center"> <Intersoft:UXListBox x:Name="ListBox1" HorizontalAlignment="Center" VerticalAlignment="Center"> <Intersoft:UXListBoxItem Content="Item #1" IsSelected="True"/> <Intersoft:UXListBoxItem Content="Item #2"/> <Intersoft:UXListBoxItem Content="Item #3"/> <Intersoft:UXListBoxItem Content="Item #4"/> </Intersoft:UXListBox> <Intersoft:FieldLabel Intersoft:DockPanel.Dock="Top" Header="SelectedIndex"> <TextBlock Text="{Binding SelectedIndex, ElementName=ListBox1}" Margin="4"/> </Intersoft:FieldLabel> <Intersoft:FieldLabel Intersoft:DockPanel.Dock="Top" Header="SelectedItem"> <TextBlock Text="{Binding SelectedItem.Content, ElementName=ListBox1}" Margin="4"/> </Intersoft:FieldLabel> <Button Intersoft:DockPanel.Dock="Top" Content="Set Item #4.IsSelected = True" Margin="4" Click="Button_Click"/> </Intersoft:DockPanel> |
|
| C# |
Copy Code
|
|---|---|
private void Button_Click(object sender, System.Windows.RoutedEventArgs e) { ((UXListBoxItem)this.ListBox1.Items[3]).IsSelected = true; } |
|
This sample demonstrates that whenever the selection is changed, the item's IsSelected property is also synchronized. Similar to the previous sample, you can also use IsSelected property to control the selection.
The base class for multiple selection controls in ClientUI is ISMultipleSelectionControl. This class inherits ISSelectionControl and defines SelectedItems property which you can also bind using MVVM pattern. This property indicates the current selected items and also can be used to define the selected items.
When this property is changed, it means that the current selection has changed. Consequently, it will synchronize all selection related properties, including updating the IsSelected property for each item.
You can change the selection by replacing the SelectedItems property, or adding and removing the items from the current SelectedItems collection.
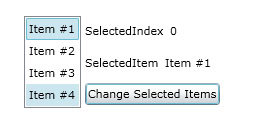
The following example shows how to work with SelectedItems property.
| XAML |
Copy Code
|
|---|---|
<Intersoft:DockPanel HorizontalAlignment="Center" VerticalAlignment="Center"> <Intersoft:UXListBox x:Name="ListBox1" HorizontalAlignment="Center" VerticalAlignment="Center" SelectionMode="Extended"> <Intersoft:UXListBoxItem Content="Item #1" IsSelected="True"/> <Intersoft:UXListBoxItem Content="Item #2" IsSelected="True"/> <Intersoft:UXListBoxItem Content="Item #3"/> <Intersoft:UXListBoxItem Content="Item #4"/> </Intersoft:UXListBox> <Intersoft:FieldLabel Intersoft:DockPanel.Dock="Top" Header="SelectedIndex"> <TextBlock Text="{Binding SelectedIndex, ElementName=ListBox1}" Margin="4"/> </Intersoft:FieldLabel> <Intersoft:FieldLabel Intersoft:DockPanel.Dock="Top" Header="SelectedItem"> <TextBlock Text="{Binding SelectedItem.Content, ElementName=ListBox1}" Margin="4"/> </Intersoft:FieldLabel> <Button Intersoft:DockPanel.Dock="Top" Content="Change Selected Items" Margin="4" Click="Button_Click"/> </Intersoft:DockPanel> |
|
| C# |
Copy Code
|
|---|---|
private void Button_Click(object sender, System.Windows.RoutedEventArgs e) { ObservableCollection<object> selectedItems = new ObservableCollection<object>(); selectedItems.Add(this.ListBox1.Items[0]); selectedItems.Add(this.ListBox1.Items[3]); this.ListBox1.SelectedItems = selectedItems; } |
|
This sample demonstrates that when you perform multiple selection, such as by holding Shift or Ctrl key, the SelectedItems property will be updated. You can also change the selected items by changing this SelectedItems property as demonstrated when you click the button.
Some of ItemsControl in ClientUI such as UXListBox, UXAccordion, and UXDock, supports built-in drag drop capability thanks to ClientUI Drag-drop Framework.
These controls have similar properties such as implemented in Interactive Panels to enable drag and drop operation. The following are the list of properties that related to drag drop support.
To learn more about this Drag-drop capability, see Drag-drop Framework Overview.
Some of these dragable ItemsControl implements ITransformInfo interface, which allows them to easily transform an object from different ItemsControl to its own type.
Controls that support this transformable object concept are UXListBox, UXAccordion, and UXDock.
The following example shows how transformable object concept works in these controls.
| XAML |
Copy Code
|
|---|---|
<Grid x:Name="LayoutRoot" Background="White"> <StackPanel Orientation="Horizontal" d:LayoutOverrides="Height" HorizontalAlignment="Center" VerticalAlignment="Center"> <Intersoft:UXAccordion Height="200" Width="150" Margin="16,0" AllowMoveItem="True" AllowRemoveItem="True" AllowReorderItem="True"> <Intersoft:UXAccordionItem Header="Andreas" ContentType="ContentAndImage" Icon="2.jpg" AllowDropItem="True" > <Intersoft:UXAccordionOption Content="David" Icon="3.jpg" ContentType="ContentAndImage"/> <Intersoft:UXAccordionOption Content="Silvia" Icon="4.jpg" ContentType="ContentAndImage"/> </Intersoft:UXAccordionItem> <Intersoft:UXAccordionItem Header="Brad" ContentType="ContentAndImage" Icon="5.jpg" AllowDropItem="True" > <Intersoft:UXAccordionOption Content="Phil" Icon="6.jpg" ContentType="ContentAndImage"/> </Intersoft:UXAccordionItem> </Intersoft:UXAccordion> <Intersoft:UXListBox Height="200" Width="150" ItemContentType="ContentAndImage" Margin="16,0" AllowDropItem="True" AllowMoveItem="True" AllowRemoveItem="True" AllowReorderItem="True"> <Intersoft:UXListBoxItem Content="Maria" Icon="0.jpg"/> <Intersoft:UXListBoxItem Content="Steven" Icon="1.jpg"/> </Intersoft:UXListBox> </StackPanel> <Intersoft:UXDock HorizontalAlignment="Left" VerticalAlignment="Top" AllowDropItem="True" AllowMoveItem="True" AllowRemoveItem="True" AllowReorderItem="True"> <Intersoft:UXDockButton d:LayoutOverrides="Width, Height" Icon="7.jpg" Content="" Text="Michael"> <Intersoft:UXStackItem Icon="8.jpg" Text="John"/> <Intersoft:UXStackItem Icon="9.jpg" Text="Rusell"/> </Intersoft:UXDockButton> <Intersoft:UXDockButton Icon="10.jpg" Text="Lisa"/> <Intersoft:UXDockButton Icon="11.jpg" Text="Marrie"/> </Intersoft:UXDock> </Grid> |
|
This example has UXListBox, UXAccordion and UXDock, each of them has an item that can be dragged from one ItemsControl to another. When the item is dropped to another ItemsControl, it will automatically transform those items to underlying item type. The information about the original object remains saved in the items itself which enables the items to convert back to its original type when needed.
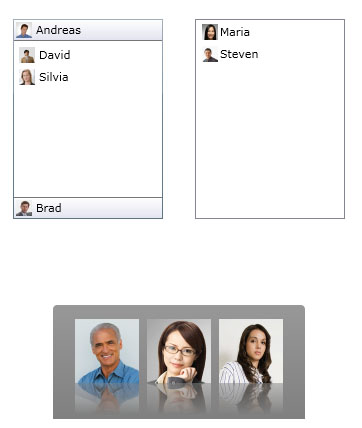
Try to move item from UXListBox to UXAccordion and you will see something like the following figure.
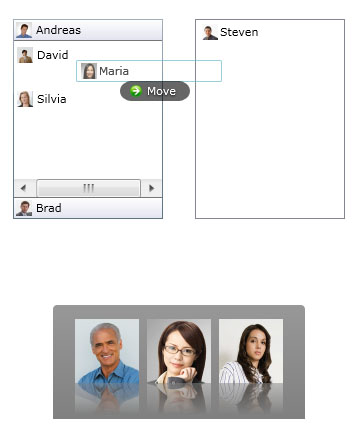
The following figure shows the illustration after the item is dropped.
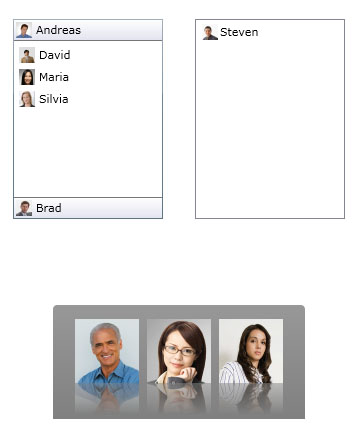
Notice that the text and image are identical, but its not UXListBoxItem control anymore its already transformed into UXAccordionOption control.
If you move the item from UXAccordion to UXDock, you will see something similar to the following figure.
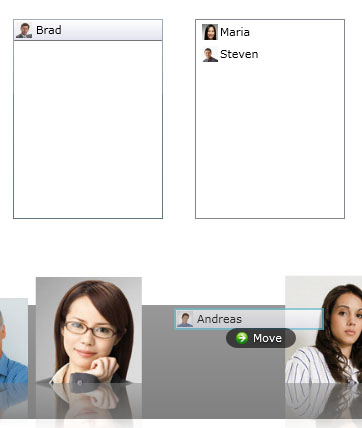
After the item is dropped and the UXDockButton is opened, you can notice that the UXAccordionItem is now transformed to UXDockButton. The items of the UXAccordionItem, which is UXAccordionOption, is appropriately transformed to UXStackItem.

The transformable object concept generally applies the adapter pattern which allows an object to have different kind of presentation based on where the object is placed. This architecture is particularly useful when used together with drag and drop operation. For more information about drag and drop support in ClientUI, see Drag-drop Framework Overview.
To perform items styling or templating, the items controls in ClientUI provides several fundamental approaches such as explained in the following sections.
Styling using ItemContainerStyle property is the basic way to style the items of ItemsControl. As discussed above each ItemsControl has an item container type, you generally just need to provide the style of the item container type and assign it to ItemContainerStyle property.
The following example shows how to style the item of UXListBox using ItemContainerStyle property.
| XAML |
Copy Code
|
|---|---|
<UserControl.Resources> <Style x:Key="UXListBoxItemStyle1" TargetType="Intersoft:UXListBoxItem"> <Setter Property="Background" Value="Transparent"/> <Setter Property="BorderThickness" Value="0"/> <Setter Property="CornerRadius" Value="0"/> <Setter Property="IsTabStop" Value="False"/> <Setter Property="Padding" Value="3"/> <Setter Property="HorizontalContentAlignment" Value="Left"/> <Setter Property="VerticalContentAlignment" Value="Center"/> <Setter Property="Template"> <Setter.Value> <ControlTemplate TargetType="Intersoft:UXListBoxItem"> <Grid x:Name="RootElement" Background="LightBlue"> <VisualStateManager.VisualStateGroups> <VisualStateGroup x:Name="CommonStates"> <VisualState x:Name="Normal"/> <VisualState x:Name="MouseOver"> <Storyboard> <DoubleAnimation Duration="0" To=".35" Storyboard.TargetProperty="Opacity" Storyboard.TargetName="FillColor"/> </Storyboard> </VisualState> <VisualState x:Name="Disabled"> <Storyboard> <DoubleAnimation Duration="0" To=".55" Storyboard.TargetProperty="Opacity" Storyboard.TargetName="ContentPresenter"/> </Storyboard> </VisualState> </VisualStateGroup> <VisualStateGroup x:Name="SelectionStates"> <VisualState x:Name="Unselected"/> <VisualState x:Name="Selected"> <Storyboard> <DoubleAnimation Duration="0" To=".75" Storyboard.TargetProperty="Opacity" Storyboard.TargetName="FillColor2"/> </Storyboard> </VisualState> </VisualStateGroup> <VisualStateGroup x:Name="FocusStates"> <VisualState x:Name="Focused"> <Storyboard> <ObjectAnimationUsingKeyFrames Duration="0" Storyboard.TargetProperty="Visibility" Storyboard.TargetName="FocusVisualElement"> <DiscreteObjectKeyFrame KeyTime="0"> <DiscreteObjectKeyFrame.Value> <Visibility>Visible</Visibility> </DiscreteObjectKeyFrame.Value> </DiscreteObjectKeyFrame> </ObjectAnimationUsingKeyFrames> </Storyboard> </VisualState> <VisualState x:Name="Unfocused"/> </VisualStateGroup> </VisualStateManager.VisualStateGroups> <Border x:Name="FillColor" Background="Magenta" CornerRadius="1" IsHitTestVisible="False" Opacity="0"/> <Border x:Name="FillColor2" Background="Magenta" CornerRadius="1" IsHitTestVisible="False" Opacity="0"/> <Intersoft:StylishLabel x:Name="ContentPresenter" BorderBrush="{TemplateBinding BorderBrush}" BorderThickness="{TemplateBinding BorderThickness}" Background="{TemplateBinding Background}" ContentType="{TemplateBinding ContentType}" ContentTemplate="{TemplateBinding ContentTemplate}" Content="{TemplateBinding Content}" ContentEffect="{x:Null}" CornerRadius="{TemplateBinding CornerRadius}" HorizontalAlignment="{TemplateBinding HorizontalContentAlignment}" HorizontalContentAlignment="Stretch" IsTabStop="False" ImageMargin="{TemplateBinding ImageMargin}" ImageWidth="{TemplateBinding ImageWidth}" ImageStretch="{TemplateBinding ImageStretch}" ImageSource="{TemplateBinding Icon}" ImageHeight="{TemplateBinding ImageHeight}" Padding="{TemplateBinding Padding}" TextImageRelation="{TemplateBinding TextImageRelation}" VerticalAlignment="{TemplateBinding VerticalContentAlignment}" VerticalContentAlignment="Stretch"/> <Border x:Name="FocusVisualElement" BorderBrush="#FF6DBDD1" BorderThickness="1" CornerRadius="1" Visibility="Collapsed"/> </Grid> </ControlTemplate> </Setter.Value> </Setter> </Style> </UserControl.Resources> <Grid x:Name="LayoutRoot" Background="White"> <Intersoft:UXListBox x:Name="ListBox1" HorizontalAlignment="Center" VerticalAlignment="Center" ItemContainerStyle="{StaticResource UXListBoxItemStyle1}"> <Intersoft:UXListBoxItem Content="Item #1"/> <Intersoft:UXListBoxItem Content="Item #2"/> <Intersoft:UXListBoxItem Content="Item #3"/> <Intersoft:UXListBoxItem Content="Item #4"/> </Intersoft:UXListBox> </Grid> |
|

ItemContainerStyleSelector is used to perform certain validation before applying the style. This approach can be used to alternate style between items, or highlighting certain items based on certain condition and many other scenarios.
To use this approach you need to create a class that inherit from StyleSelector class.
The following example shows how to use StyleSelector to create alternate item style in UXListBox.
| XAML |
Copy Code
|
|---|---|
<UserControl xmlns="http://schemas.microsoft.com/winfx/2006/xaml/presentation" xmlns:x="http://schemas.microsoft.com/winfx/2006/xaml" xmlns:Intersoft="http://intersoft.clientui.com/schemas" xmlns:local="clr-namespace:ClientUI.Sample" xmlns:d="http://schemas.microsoft.com/expression/blend/2008" xmlns:mc="http://schemas.openxmlformats.org/markup-compatibility/2006" mc:Ignorable="d" x:Class="ClientUI.Sample.MainPage" Width="800" Height="600"> <UserControl.Resources> <Style x:Key="ItemStyle1" TargetType="Intersoft:UXListBoxItem"> <Setter Property="Background" Value="Gold"/> </Style> <Style x:Key="ItemStyle2" TargetType="Intersoft:UXListBoxItem"> <Setter Property="Background" Value="Silver"/> </Style> <local:AlternateStyleSelector x:Key="AlternateStyleSelector" ItemStyle="{StaticResource ItemStyle1}" AlternateItemStyle="{StaticResource ItemStyle2}"/> </UserControl.Resources> <Grid> <Intersoft:UXListBox x:Name="ListBox1" HorizontalAlignment="Center" VerticalAlignment="Center" ItemContainerStyleSelector="{StaticResource AlternateStyleSelector}"> <Intersoft:UXListBoxItem Content="Item #1"/> <Intersoft:UXListBoxItem Content="Item #2"/> <Intersoft:UXListBoxItem Content="Item #3"/> <Intersoft:UXListBoxItem Content="Item #4"/> </Intersoft:UXListBox> </Grid> </UserControl> |
|
| C# |
Copy Code
|
|---|---|
using System.Windows; using Intersoft.Client.Framework; using Intersoft.Client.UI.Aqua.UXCollection; namespace ClientUI.Sample { public class AlternateStyleSelector: StyleSelector { public Style ItemStyle { get; set; } public Style AlternateItemStyle { get; set; } public override Style SelectStyle(object item, DependencyObject container) { UXListBoxItem control = container as UXListBoxItem; if (control != null) { UXListBox owner = control.Owner as UXListBox; if (owner.Items.IndexOf(control) % 2 == 0) return this.ItemStyle; } return this.AlternateItemStyle; } } } |
|

When the ItemsControl is bound to a collection of object, you can use ItemTemplate to control the look and feel of the content.
The following example shows how to perform templating using ItemTemplate property.
| XAML |
Copy Code
|
|---|---|
<UserControl.Resources> <DataTemplate x:Key="ItemTemplate1"> <Intersoft:DockPanel FillChildMode="Custom"> <Image Source="{Binding Picture}" Height="64" Width="64" Intersoft:DockPanel.Dock="Left"/> <Grid Intersoft:DockPanel.IsFillElement="True"> <StackPanel VerticalAlignment="Center" Margin="8"> <TextBlock Text="{Binding ContactName}" /> <TextBlock Text="{Binding EmailAddress}" /> </StackPanel> </Grid> </Intersoft:DockPanel> </DataTemplate> </UserControl.Resources> <Grid x:Name="LayoutRoot" Background="White" DataContext="{Binding Source={StaticResource SampleDataSource}}"> <Intersoft:UXListBox HorizontalAlignment="Center" VerticalAlignment="Center" ItemTemplate="{StaticResource ItemTemplate1}" ItemsSource="{Binding Collection}"/> </Grid> |
|

Similar with ItemContainerStyleSelector, you can also create an ItemTemplateSelector by creating a class that inherit from DataTemplateSelector. This template selector allows you to apply different template on different item based on the logic describes in the template selector.
The following example shows how to use DataTemplateSelector to create alternate item template in UXListBox.
| XAML |
Copy Code
|
|---|---|
<UserControl xmlns="http://schemas.microsoft.com/winfx/2006/xaml/presentation" xmlns:x="http://schemas.microsoft.com/winfx/2006/xaml" xmlns:Intersoft="http://intersoft.clientui.com/schemas" xmlns:local="clr-namespace:ClientUI.Sample" xmlns:d="http://schemas.microsoft.com/expression/blend/2008" xmlns:mc="http://schemas.openxmlformats.org/markup-compatibility/2006" mc:Ignorable="d" x:Class="ClientUI.Sample" Width="800" Height="600"> <UserControl.Resources> <DataTemplate x:Key="ItemTemplate1"> <Intersoft:DockPanel FillChildMode="Custom" Width="250"> <Image Source="{Binding Picture}" Height="64" Width="64" Intersoft:DockPanel.Dock="Left"/> <Grid Intersoft:DockPanel.IsFillElement="True"> <StackPanel VerticalAlignment="Center" Margin="8"> <TextBlock Text="{Binding ContactName}" /> <TextBlock Text="{Binding EmailAddress}" /> </StackPanel> </Grid> </Intersoft:DockPanel> </DataTemplate> <DataTemplate x:Key="ItemTemplate2"> <Intersoft:DockPanel FillChildMode="Custom" Width="250"> <Image Source="{Binding Picture}" Height="64" Width="64" Intersoft:DockPanel.Dock="Right"/> <Grid Intersoft:DockPanel.IsFillElement="True"> <StackPanel VerticalAlignment="Center" Margin="8"> <TextBlock Text="{Binding ContactName}" /> <TextBlock Text="{Binding EmailAddress}" /> </StackPanel> </Grid> </Intersoft:DockPanel> </DataTemplate> <local:AlternateTemplateSelector x:Key="AlternateTemplateSelector" ItemTemplate="{StaticResource ItemTemplate1}" AlternateItemTemplate="{StaticResource ItemTemplate2}"/> </UserControl.Resources> <Grid x:Name="LayoutRoot" Background="White" DataContext="{Binding Source={StaticResource SampleDataSource}}"> <Intersoft:UXListBox HorizontalAlignment="Center" VerticalAlignment="Center" ItemTemplateSelector="{StaticResource AlternateTemplateSelector}" ItemsSource="{Binding Collection}"/> </Grid> </UserControl> |
|
| C# |
Copy Code
|
|---|---|
using System.Windows; using Intersoft.Client.Framework; using Intersoft.Client.UI.Aqua.UXCollection; namespace ClientUI.Sample { public class AlternateTemplateSelector: DataTemplateSelector { public DataTemplate ItemTemplate { get; set; } public DataTemplate AlternateItemTemplate { get; set; } public override DataTemplate SelectTemplate(object item, DependencyObject container) { UXListBoxItem control = container as UXListBoxItem; if (control != null) { UXListBox owner = control.Owner as UXListBox; if (owner.Items.IndexOf(item) % 2 == 0) return this.ItemTemplate; } return this.AlternateItemTemplate; } } } |
|
