
| Intersoft ClientUI 8 > ClientUI Fundamentals > MVVM Pattern Overview > MVVM Pattern Walkthroughs > Walkthrough: Display Data in UXListBox using MVVM Pattern |
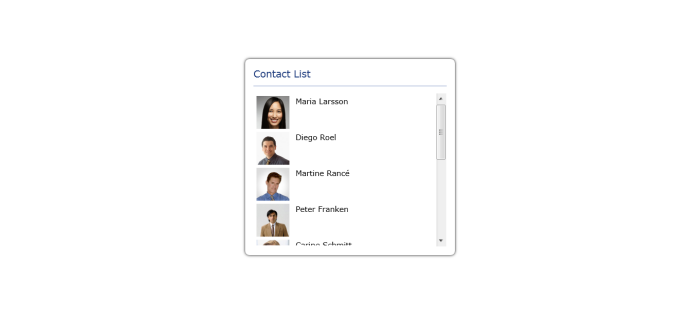
This walkthrough shows how to bind data to UXListBox using MVVM pattern.
In this walkthrough, you perform the following tasks:
You need the following components to complete this walkthrough:
The first step is to create a new ClientUI MVVM Application project using Intersoft ClientUI MVVM Application project template in Visual Studio.
Next, you will create the Contact model class that represent the data entity used in this walkthrough.
This section shows you how to create the Contact model class that represents the data entity used in this walkthrough. To create the Contact model class, see Walkthrough: Creating Model for Contact Data.
Next, you will create the view for your simple contacts list application.
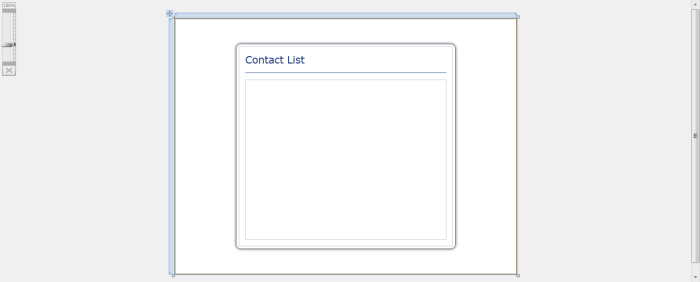
This section steps you through the process of creating a page that uses a variety of ClientUI controls such as Intersoft DockPanel, StylishLabel, UXSeparator and UXListBox. The UXListBox is used to display a collection of Contact data.
 |
For more information on how to add a new item in Visual Studio, see Walkthrough: Add New Item such as Page, Dialog Box and Window in VS 2010 |
| Property | Value |
|---|---|
| Background | White |
| CornerRadius | 8 |
| VerticalAlignment | Center |
| HorizontalAlignment | Center |
In the Border's effect you also need to set the ShadowDepth property to 0 and BlurRadius property to 8
| Property | Value |
|---|---|
| FillChildMode | Custom |
| Width | 400 |
| Margin | 4 |
| Property | Value |
|---|---|
| Content | Contact List |
| Intersoft:DockPanel.Dock | Top |
| CornerRadius | 4,4,0,0 |
| Background | White |
| HorizontalContentAlignment | Left |
| FontSize | 18.667 |
| Padding | 12,12,12,8 |
| BorderThickness | 0 |
| Foreground | #FF234385 |
| Property | Value |
|---|---|
| Intersoft:DockPanel.Dock | Top |
| Margin | 12,0 |
| Background | #FF8EA2CC |
| Property | Value |
|---|---|
| BorderBrush | {x:Null} |
| HorizontalAlignment | Stretch |
| IsTextSearchEnabled | True |
| ItemContentType | ContentAndImage |
| Padding | 2 |
| ItemImageMargin | 0,0,12,0 |
| ItemImageHeight | 64 |
| ItemImageWidth | 64 |
| Height | 300 |
| FontSize | 14.667 |
| XAML |
Copy Code
|
|---|---|
<Grid x:Name="LayoutRoot"> <Border Background="White" CornerRadius="8" VerticalAlignment="Center" HorizontalAlignment="Center"> <Border.Effect> <DropShadowEffect ShadowDepth="0" BlurRadius="8"/> </Border.Effect> <Intersoft:DockPanel FillChildMode="Custom" Width="400" Margin="4"> <Intersoft:StylishLabel Content="Contact List" Intersoft:DockPanel.Dock="Top" CornerRadius="4,4,0,0" Background="White" HorizontalContentAlignment="Left" FontSize="18.667" Padding="12,12,12,8" BorderThickness="0" Foreground="#FF234385"/> <Intersoft:UXSeparator Intersoft:DockPanel.Dock="Top" Margin="12,0" Background="#FF8EA2CC"/> <Grid Margin="12" Intersoft:DockPanel.IsFillElement="True" > <Intersoft:UXListBox BorderBrush="{x:Null}" x:Name="SampleControl1" HorizontalAlignment="Stretch" IsTextSearchEnabled="True" ItemContentType="ContentAndImage" Padding="2" ItemImageMargin="0,0,12,0" ItemImageHeight="64" ItemImageWidth="64" Height="300" FontSize="14.667" /> </Grid> </Intersoft:DockPanel> </Border> </Grid> |
|

This section steps you through the process of creating a ViewModel class that contains the properties to describe the View that you created in the previous section.
To create the ContactList ViewModel| C# |
Copy Code
|
|---|---|
public class ContactListViewModel : ViewModelBase { } |
|
| C# |
Copy Code
|
|---|---|
// Views public ObservableCollection<Contact> ContactsData { get; set; } public ContactListViewModel() { this.LoadContacts(); } private void LoadContacts() { // loads contact data from xml file StreamResourceInfo resource = System.Windows.Application.GetResourceStream( new Uri("UXListBoxMVVM;component/Data/ContactDataSource.xml", UriKind.Relative)); XDocument doc = XDocument.Load(resource.Stream); var contacts = from x in doc.Descendants("Customer") select new Contact(x); this.ContactsData = new ObservableCollection<Contact>(); foreach (Contact contact in contacts) { contact.SetPhoto(this.ContactsData.Count.ToString()); this.ContactsData.Add(contact); } resource.Stream.Close(); } |
|
In the previous sections, you have learned how to create the Model and ViewModel classes, as well as the View that contains the user interface and controls used in this walkthrough. This section shows how to instantiate the ViewModel in the XAML page and bind the UI elements to the properties in the ViewModel.
| XAML |
Copy Code
|
|---|---|
<Intersoft:UXPage ... xmlns:ViewModels="clr-namespace:UXListBoxMVVM.ViewModels" ...> |
|
| XAML |
Copy Code
|
|---|---|
<Intersoft:UXPage ... > <Intersoft:UXPage.Resources> <ViewModels:ContactListViewModel x:Key="ContactsData" /> </Intersoft:UXPage.Resources> ... </Intersoft:UXPage> |
|
| XAML |
Copy Code
|
|---|---|
<Grid x:Name="LayoutRoot"> <Border ... > ... <Intersoft:DockPanel ... > ... <Grid ... DataContext="{Binding Source={StaticResource ContactsData}}"> <Intersoft:UXListBox ... /> </Grid> </Intersoft:DockPanel> </Border> </Grid> |
|
| XAML |
Copy Code
|
|---|---|
<Grid x:Name="LayoutRoot"> <Border ... > ... <Intersoft:DockPanel ... > ... <Grid ... > <Intersoft:UXListBox ... ItemsSource="{Binding Path=ContactsData}" /> </Grid> </Intersoft:DockPanel> </Border> </Grid> |
|
| Property | Value |
|---|---|
| SelectedValuePath | Id |
| DisplayMemberPath | Name |
| ImageMemberPath | Photo |
| XAML |
Copy Code
|
|---|---|
<Grid x:Name="LayoutRoot"> <Border ... > ... <Intersoft:DockPanel ... > ... <Grid ... > <Intersoft:UXListBox ... SelectedValuePath="Id" DisplayMemberPath="Name" ImageMemberPath="Photo" /> </Grid> </Intersoft:DockPanel> </Border> </Grid> |
|

In this walkthrough, you have learned how to create ClientUI MVVM Application project using Intersoft ClientUI MVVM Application project template, and create the classes and page based on the Model, View and ViewModel pattern. You also learned how to bind UXListBox to a collection of data.
To learn more about UI development using MVVM pattern, see MVVM Pattern Overview.
This section lists the complete code used in this walkthrough.
| C# |
Copy Code
|
|---|---|
using System; using System.Net; using System.Windows; using System.Windows.Controls; using System.Windows.Documents; using System.Windows.Ink; using System.Windows.Input; using System.Windows.Media; using System.Windows.Media.Animation; using System.Windows.Shapes; using UXListBoxMVVM.ViewModels; using System.Xml.Linq; namespace UXListBoxMVVM.Models { public class Contact : ModelBase { #region Constructors public Contact() { } public Contact(XElement x) : this() { this._id = x.Element("Id").Value.Trim(); this._name = x.Element("Name").Value.Trim(); } #endregion #region Fields private string _name = string.Empty; private string _id = string.Empty; private Uri _photo = null; #endregion #region Properties public string Name { get { return this._name; } set { if (this._name != value) { this._name = value; this.OnPropertyChanged("Name"); } } } public string Id { get { return this._id; } set { if (this._id != value) { this._id = value; this.OnPropertyChanged("Id"); } } } public Uri Photo { get { return this._photo; } set { if (this._photo != value) { this._photo = value; this.OnPropertyChanged("Photo"); } } } #endregion #region Methods public void SetPhoto(string uri) { this.Photo = new Uri("/UXListBoxMVVM;component/Images/Photos/" + uri + ".jpg", UriKind.RelativeOrAbsolute); } public void SetPhoto(Uri uri) { this.Photo = uri; } #endregion } } |
|
| C# |
Copy Code
|
|---|---|
using System; using System.Net; using System.Windows; using System.Windows.Controls; using System.Windows.Documents; using System.Windows.Ink; using System.Windows.Input; using System.Windows.Media; using System.Windows.Media.Animation; using System.Windows.Shapes; using Intersoft.Client.Framework.Input; using System.Collections.ObjectModel; using UXListBoxMVVM.Models; using System.Windows.Resources; using System.Xml.Linq; using System.Linq; namespace UXListBoxMVVM.ViewModels { public class ContactListViewModel : ViewModelBase { // Views public ObservableCollection<Contact> ContactsData { get; set; } public ContactListViewModel() { this.LoadContacts(); } private void LoadContacts() { // loads contact data from xml file StreamResourceInfo resource = System.Windows.Application.GetResourceStream( new Uri("UXListBoxMVVM;component/Data/ContactDataSource.xml", UriKind.Relative)); XDocument doc = XDocument.Load(resource.Stream); var contacts = from x in doc.Descendants("Customer") select new Contact(x); this.ContactsData = new ObservableCollection<Contact>(); foreach (Contact contact in contacts) { contact.SetPhoto(this.ContactsData.Count.ToString()); this.ContactsData.Add(contact); } resource.Stream.Close(); } } } |
|
| XAML |
Copy Code
|
|---|---|
<Intersoft:UXPage xmlns="http://schemas.microsoft.com/winfx/2006/xaml/presentation" xmlns:x="http://schemas.microsoft.com/winfx/2006/xaml" xmlns:d="http://schemas.microsoft.com/expression/blend/2008" xmlns:mc="http://schemas.openxmlformats.org/markup-compatibility/2006" xmlns:Intersoft="http://intersoft.clientui.com/schemas" xmlns:ViewModels="clr-namespace:UXListBoxMVVM.ViewModels" mc:Ignorable="d" x:Class="UXListBoxMVVM.Views.ContactList" Title="ContactList Page" d:DesignWidth="640" d:DesignHeight="480"> <Intersoft:UXPage.Resources> <ViewModels:ContactListViewModel x:Key="ContactsData" /> </Intersoft:UXPage.Resources> <Grid x:Name="LayoutRoot"> <Border Background="White" CornerRadius="8" VerticalAlignment="Center" HorizontalAlignment="Center"> <Border.Effect> <DropShadowEffect ShadowDepth="0" BlurRadius="8"/> </Border.Effect> <Intersoft:DockPanel FillChildMode="Custom" Width="400" Margin="4"> <Intersoft:StylishLabel Content="Contact List" Intersoft:DockPanel.Dock="Top" CornerRadius="4,4,0,0" Background="White" HorizontalContentAlignment="Left" FontSize="18.667" Padding="12,12,12,8" BorderThickness="0" Foreground="#FF234385"/> <Intersoft:UXSeparator Intersoft:DockPanel.Dock="Top" Margin="12,0" Background="#FF8EA2CC"/> <Grid Margin="12" Intersoft:DockPanel.IsFillElement="True" DataContext="{Binding Source={StaticResource ContactsData}}"> <Intersoft:UXListBox BorderBrush="{x:Null}" x:Name="SampleControl1" HorizontalAlignment="Stretch" IsTextSearchEnabled="True" ItemContentType="ContentAndImage" Padding="2" ItemImageMargin="0,0,12,0" ItemImageHeight="64" ItemImageWidth="64" Height="300" FontSize="14.667" ItemsSource="{Binding Path=ContactsData}" SelectedValuePath="Id" DisplayMemberPath="Name" ImageMemberPath="Photo" /> </Grid> </Intersoft:DockPanel> </Border> </Grid> </Intersoft:UXPage> |
|