


This walkthrough shows you how to use numerous column types available in WebGrid to display richer content data presentation.
During this walkthrough, you will learn how to do the following:
- Use numerous column type like Text(default), Image, ImageAndText, CheckBox, Button and Custom.
- Connect to a Microsoft Access database using Microsoft Jet 4.0 OLE DB Provider.
- Use WebGrid's InitializeRow to set the row in WebGrid.
 Prerequisites
In order to complete this walkthrough, you will need the following:
- Access to the Microsoft Access Northwind database.
- Visual Studio 2005/2008/2010 Application.
Step-By-Step Instructions
To create new web application and use numerous column types
- Bind WebGrid to AccesDataSource control.
- In WebGrid.NET Designer - Advanced tab, expand RootTable and select Columns.
- Add a new column and set its properties like following:
Property Value ColumnType Button ButtonText Edit Width 50px Bound False
- Add another new column and set its properties like following:
Property Value ColumnType Image CellImage /CommonLibrary/Images/Order-Details.gif Width 20px Bound False
- Add a new column and set its properties like following:
Property Value ColumnType CheckBox Width 20px Bound False
- Add another new column and set its properties like following:
Property Value ColumnType Custom Width 150px Bound False
- Now, select LayoutSettings node and set RowHeightDefault to 25px. Then, expand ButtonStyle node and set its properties like following:
Property Value BackColor LighSteelBlue BorderColor Navy BorderStyle Solid BorderWidth 1px
- Set WebGrid's width to 800px from its properties.
- Now, switch to HTML view and add OnInitializeRow="WebGrid1_InitRow" in the WebGrid tag.
- Switch back to code behind and add the following codes:
C#  Copy Code
protected void WebGrid1_InitRow(object sender ISNet.WebUI.WebGrid.RowEventArgs e)
{
  if (e.Row.Type == RowType.Record)
  {
    WebGridCellCollection cells = e.Row.Cells;
    cells.GetNamedItem("Custom").Text = "<b>Custom<b>";
  }
}
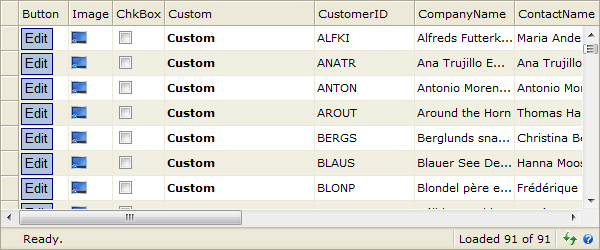
- Compile and run the WebForm. The WebGrid will look like following.
 See Also
Tasks
Walkthrough: Utilizing button ColumnType
Walkthrough: Utilizing Various ColumnTypes
Walkthrough: Using CheckBox column in Hierarchical WebGrid
Walkthrough: Deleting a record using WebGrid button
Walkthrough: Configuring password as Column Type
Concepts
Column Types
Other Resources
Walkthrough Topics
How-to Topics