This walkthrough shows you how to WebGrid to client-binding using AdoDataService mode.
During this walkthrough, you will learn how to do the following:
- Create and use AdoDataService mode.
- Configure WebGrid to client-binding using AdoDataService mode
 Prerequisites
In order to complete this walkthrough, you will need the following:
- Access to the Microsoft Access Northwind database.
- Visual Studio 2008 Application.
Step-By-Step Instructions
To configure client binding using AdoDataService mode
- Launch Visual Studio.NET 2008.
- Click on File menu, then select New and click Web Site.
- Select ASP.NET Web Site in the Template box and set Location to HTTP.
- Named the Web Site and click OK.
- In the Solution Explorer, right-click on App_Data and select Add Existing Item.
- Browse and add Northwind.mdf in C:\Program Files\Intersoft Solutions\WebUI Studio for ASP.NET\Data (Default installation folder).
- In the Solution Explorer, right-click on App_Code and select Add New Item.
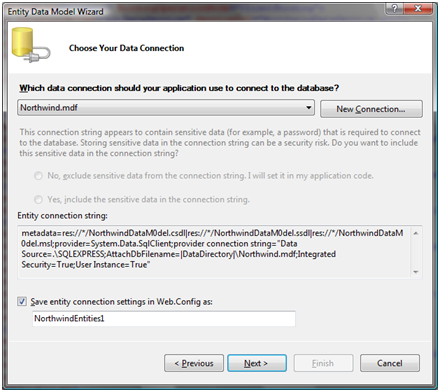
- Create a new ADO.NET Entity Data Model and named it NorthwindDataModel.edmx. Pick generate the model from database, choose Northwind.mdf as the data source and named the entity as NorthwindEntities.
- On the next screen, choose Customers to include in your database model. Click Finish.
- In the Solution Explorer, right-click on the WebProject and select Add New Item.
- Create a new ADO.NET Data Service and named it NorthwindDataService.svc.
- Modify the NorthwindDataService.svc.cs to accept Customers and have full access.
C#  Copy Code
using System;
using System.Collections.Generic;
using System.Data.Services;
using System.Linq;
using System.ServiceModel.Web;
using System.Web;
namespace WebApplicationWalkthrough2009
{
   [System.ServiceModel.ServiceBehavior(IncludeExceptionDetailInFaults = true)]
   public class NorthwindDataService : DataService<northwindentities>
   {
      // This method is called only once to initialize service-wide policies.
      public static void InitializeService(IDataServiceConfiguration config)
      {
         // TODO: set rules to indicate which entity sets and service operations are visible, updatable, etc.
         // Examples:
         // config.SetEntitySetAccessRule("MyEntityset", EntitySetRights.AllRead);
         // config.SetServiceOperationAccessRule("MyServiceOperation", ServiceOperationRights.All);

         config.SetEntitySetAccessRule("*", EntitySetRights.All);
         config.SetServiceOperationAccessRule("*", ServiceOperationRights.All);
         config.UseVerboseErrors = true;
      }
   }
}
- In the Solution Explorer, right click on the project and select Add New Item.
- Select Web Form in the Templates box and named it as Walkthrough.aspx.
- Open Walkthrough.aspx in Source view and change the doctype from
<!DOCTYPE html PUBLIC "-//W3C//DTD XHTML 1.0 Transitional//EN" "http://www.w3.org/TR/xhtml1/DTD/xhtml1-transitional.dtd">
<html xmlns="http://www.w3.org/1999/xhtml">
Into the following<!DOCTYPE html PUBLIC "-//W3C//DTD HTML 4.0 Transitional//EN"> <html>
- Drag WebGrid instance from ToolBar to WebForm.
- Click the smart tag button on the upper right corner of WebGrid and then select WebGrid.NET Designer.
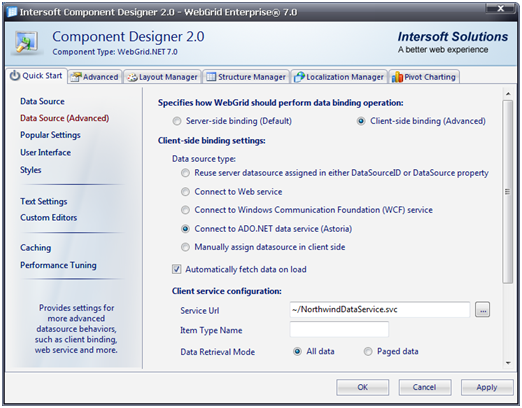
- Select Data Source (Advanced) from the left pane of Quick Start tab.
- On the specifies how WebGrid should perform data binding operation option, please select Client-side binding (Advanced).
- Select Connect to ADO.NET data service (Astoria) from Data source type option
- Set the Service Url to NorthwindDataService.svc.
- Click the Advanced tab and go to WebGrid - WebGrid1 > RootTable.
- Set DataKeyField to CustomerID and DataMember to Customers.
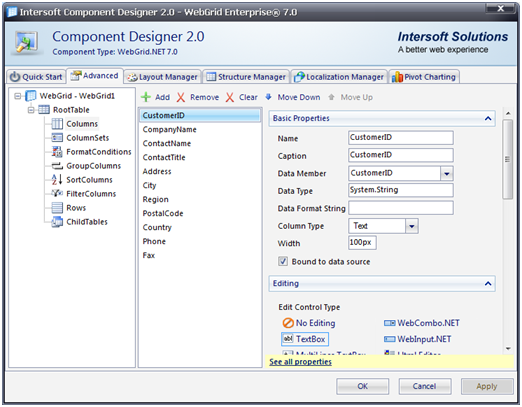
- Click the Advanced tab and go to WebGrid - WebGrid1 > RootTable > Columns.
- Click Add button from the right pane toolbar.
- Set Name, Caption, and DataMember to CustomerID.
- Repeat step number 26 and set the value of those properties to CompanyName; ContactName; ContactTitle; Address; City; Region; PostalCode; Country; Phone; and Fax.
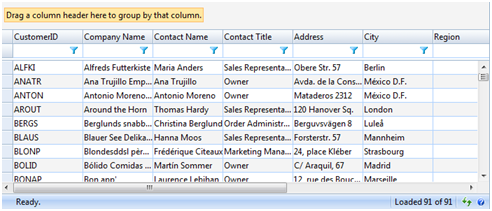
- Run the project and the WebGrid should look like following.