


This walkthrough shows you how to configure WebService on a client-binding WebGrid to return paged data.
During this walkthrough, you will learn how to do the following:
- Create WebService data.
- Bind a paged data WebService to a WebGrid using client binding
 Prerequisites
In order to complete this walkthrough, you will need the following:
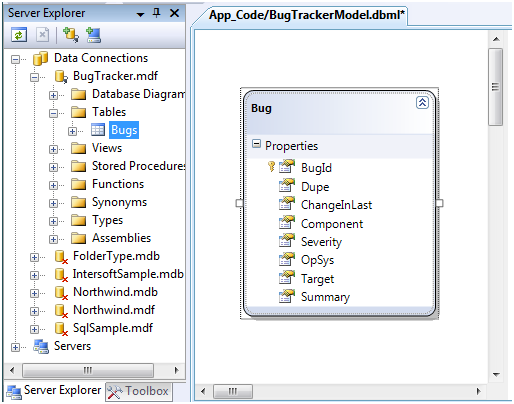
- Access to BugTracker.mdf database.
- Visual Studio 2008 Application.
Step-By-Step Instructions
To configure WebService client-binding to return paged data
- Launch Visual Studio.NET 2008.
- Click on File menu, then select New and click Web Site.
- Select ASP.NET Web Site in the Template box and set Location to HTTP.
- Named the Web Site and click OK.
- In the Solution Explorer, right-click on App_Data and select Add Existing Item.
- Browse and add BugTracker.mdf in C:\Program Files\Intersoft Solutions\WebUI Studio for ASP.NET\Data (Default installation folder).
- In the Solution Explorer, right-click on App_Code and select Add New Item.
- Create a new LINQ to SQL Class and named it BugTrackerModel.dbml.
- Drag and drop the Bugs table from the server explorer.
- Right-click on Project's name and select Add New Item.
- Select Web Service in the My Templates box and named it as WebService.asmx.
- Add a new WebMethod GetPagedBugs in the WebService.cs located in App_Code.
C#  Copy Code
[WebMethod]
public object GetPagedBugs(DataSourceSelectArguments selectArguments)
{
   BugTrackerModelDataContext context = new BugTrackerModelDataContext();
   context.DeferredLoadingEnabled = false;
   var pagedData = context.Bugs.AsQueryable();

   // handle sorting
   if (!string.IsNullOrEmpty(selectArguments.SortExpression))
      pagedData = pagedData.OrderBy(selectArguments.SortExpression);

   // handle filtering
   if (!string.IsNullOrEmpty(selectArguments.FilterExpression))
      pagedData = pagedData.Where(selectArguments.GetLinqFilterExpression());

   if (selectArguments.OperationType == SelectOperation.SelectData)
   {
      // handle paging
      if (selectArguments.MaximumRows > 0)
         pagedData = pagedData.Skip(selectArguments.StartRowIndex).Take(selectArguments.MaximumRows - selectArguments.StartRowIndex);
         return pagedData.ToList();
   }
   else if (selectArguments.OperationType == SelectOperation.SelectCount)
      return pagedData.Count();
      throw new InvalidOperationException("Unsupported operation type!");
}
- Right-click on Project's name and select Add New Item.
- Select Intersoft AppForm in the My Templates box and named it as Walkthrough.aspx.
- Drag WebGrid instance from ToolBar to WebForm.
- Click the SmartTag on the upper right of the WebGrid and click the WebGrid.NET Designer link to open the Designer.
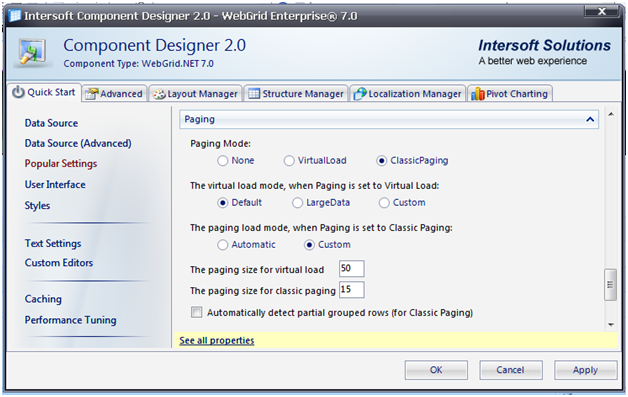
- In the Popular Setting page, set PagingMode to ClassicPaging and PagingSize to 15.
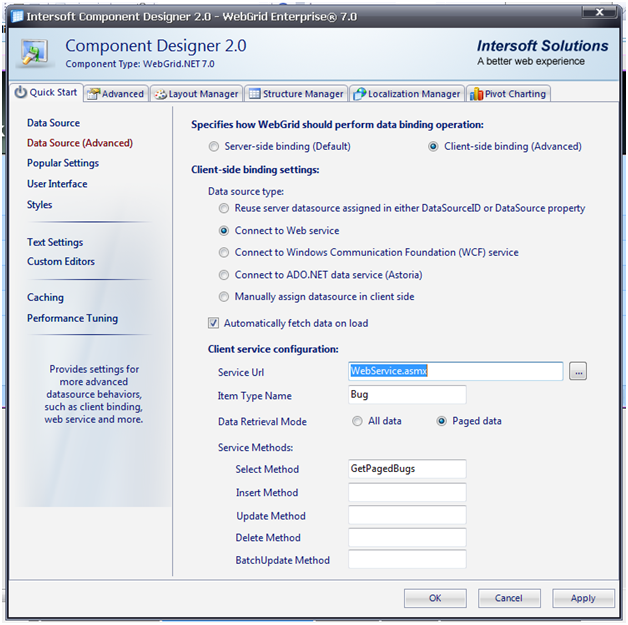
- On the Data Source (Advanced) page, use Client-side binding and connect to a WebService. Insert WebService.asmx to the service URL, Bug in the Item Type Name, and GetPagedBugs in the SelectMethod.
- Click OK.
- You are all set. Run the page in browser.