Silverlight project files are text files that you can create and edit using different tools. For example, you can use Visual Studio 2010 and also Expression Blend to create Silverlight projects or modify existing projects.
This topic describes how to use Visual Studio 2010 to create and build a new Intersoft ClientUI Basic Navigation Application project.
Prerequisites
You need the following components to complete this walkthrough:
- Visual Studio 2010
- Silverlight 4 Tools for Visual Studio 2010
- Intersoft ClientUI
Intersoft ClientUI Basic Navigation Application Project
To create basic navigation application, we are using Intersoft ClientUI Basic Navigation Application project template. Use the following steps to create a new Intersoft ClientUI Basic Navigation Application project.
- Start Visual Studio 2010.
- On the File menu, click New and then Project.
The New Project dialog box appears.
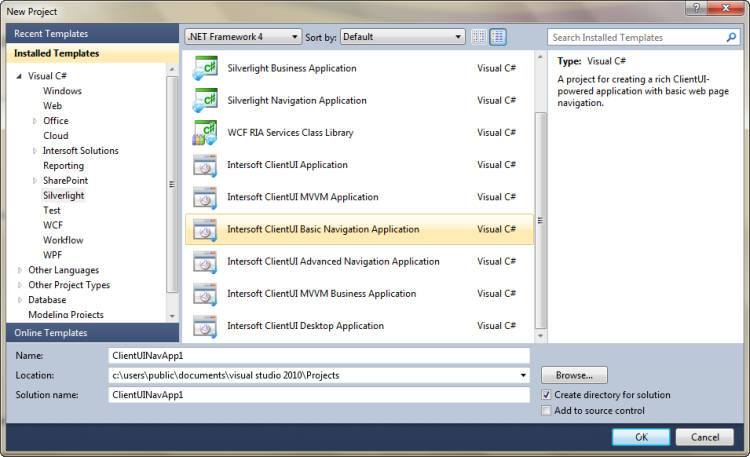
- In the Installed Templates pane, expand the Visual C# node and select Silverlight.
- In the list of templates, select Intersoft ClientUI Basic Navigation Application. The following illustration shows an example of the Silverlight project templates.

- Specify a name and a location for the application and then click OK.
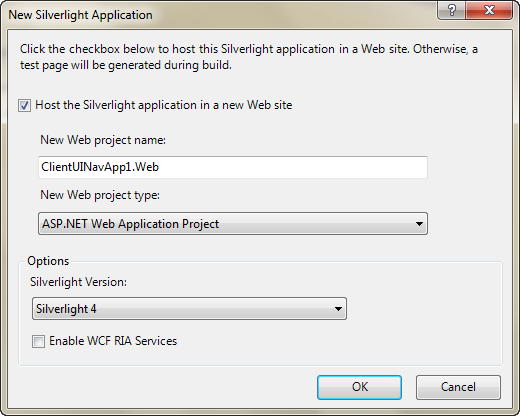
The New Silverlight Application dialog box appears as shown in the following illustration.

- Select a method for hosting your Silverlight application.
- Uncheck the Host the Silverlight application in a new Web site check box if you do not want to use a Web site to host your Silverlight application. Instead, an HTML test page will be generated to host your application.
- Check the Host the Silverlight application in a new Web site check box if you want to add a separate ASP.NET Web site or ASP.NET Web Application Project to your solution to host the Silverlight application. If you select this option, you must also specify the New Web project name and New Web Project Type.
- From the Silverlight Version drop-down list, select the version of Silverlight that you want to target. In this walkthrough we are using Silverlight 4.
- Click the OK button.
- To build the Silverlight application project, in the Build menu, click Build Solution.
- To debug the Silverlight application project, in the Debug menu, click Start Debugging.
- To run the Silverlight application project, in the Debug menu, click Start Without Debugging.
Intersoft ClientUI Basic Navigation Application Project Files
Intersoft ClientUI Basic Navigation Application project contains the following configuration, assembly references, and code files:
- AppManifest.xml
This is the application manifest file that is required to generate the application package. You must not edit this file.
- AssemblyInfo.cs
This file contains the name and version metadata that is embedded into the generated assembly.
- .xap file
This is the Silverlight application package. It is generated when the Intersoft ClientUI Basic Navigation Application project is built. An application package is a compressed zip file that has a .xap file extension and contains all the files that you need to start your application.
- A Silverlight application project contains references to the following assemblies:
Intersoft.Client.Framework.dll
Intersoft.Client.UI.Aqua.dll
Intersoft.Client.UI.Controls.dll
Intersoft.Client.UI.Controls.Interactivity.dll
Intersoft.Client.UI.Navigation.dll
mscorlib.dll
System.dll
System.Core.dll
System.Net.dll
System.Windows.dll
System.Windows.Browser.dll
System.Xml.dll
- MainPage files
The MainPage class is used to create the user interface for the Intersoft ClientUI Basic Navigation Application. The MainPage class derives from UXPage. You can implement the MainPage class by using MainPage.xaml for XAML markup and MainPage.xaml.cs for the code-behind.
- App files
The App class is required by Intersoft ClientUI Basic Navigation Application to display the application user interface. The App class is implemented by using App.xaml and App.xaml.cs. The App class is instantiated by the Silverlight plug-in after the application package (.xap file) is created.
- Branding.xaml
The Branding class is used to put the company logo, name and description. The Branding class derives from UXPage. You can implement the Branding class by using Branding.xaml for XAML markup and Branding.xaml.cs for the code-behind.
- ErrorPage.xaml
The ErrorPage class is used by the end-user to input error that they got when running your application. The ErrorPage class derives from UXPage. You can implement the ErrorPage class by using ErrorPage.xaml for XAML markup and ErrorPage.xaml.cs for the code-behind.
- AboutUs.xaml
The AboutUs class is used to put company profile and how to contact your company. The AboutUs class derives from UXPage. You can implement the AboutUs class by using AboutUs.xaml for XAML markup and AboutUs.xaml.cs for the code-behind.
- Home.xaml
The Home class is used as opening page of the application. The Home class derives from UXPage. You can implement the Home class by using Home.xaml for XAML markup and Home.xaml.cs for the code-behind.
- Services.xaml
The Services class is used to put info about what services that the company provided and details of each services. The Services class derives from UXPage. You can implement the Services class by using Services.xaml for XAML markup and Services.xaml.cs for the code-behind.
Intersoft ClientUI Basic Navigation Application Project Web Site Files
If you check the Host the Silverlight application in a new Web site check box in the New Silverlight Application dialog box, an ASP.NET Web site is created and added to the Silverlight solution. The Web site contains the following files:
See Also


