
| Intersoft ClientUI 8 > ClientUI Controls > Control Library > Data Controls Overview > UXGridView > Customizing Edit Controls in UXGridView |
This topic provides an overview of the editing architecture in UXGridView and explains how to customize the edit controls using the provided edit template and edit template selector. For information about UXGridView and its features in general, see UXGridView Overview.
Depending on the column type you used, you have different kind of editing controls that you can choose from. The available built-in column types with specific editing controls are:
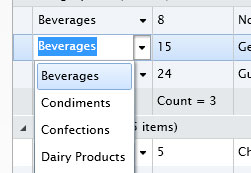
Using UXGridViewTextColumn and UXGridViewCheckBoxColumn is fairly straightforward, you just need to set the Binding and Header properties, and you are all set. For UXGridViewComboBoxColumn, you need to specify the ValueListSource which is required for the combo box data source, along with the DisplayMemberPath and ValueMemberPath for the display and value object respectively.
To assign the ValueListSource, you can use static resource as shown in the following code.
| XAML |
Copy Code
|
|---|---|
<Intersoft:UXGridView.Columns> <Intersoft:UXGridViewComboBoxColumn Header="Category ID" DisplayMemberPath="CategoryName" ValueMemberPath="CategoryID" Width="120" Binding="{Binding CategoryID, Converter={StaticResource CategoryConverter}}" ValueListSource="{Binding Categories, Source={StaticResource CategoriesViewModel}}"/> </Intersoft:UXGridView.Columns> |
|

In many business scenarios, you are often asked to provide more advanced editing controls in the UXGridView rather than just a plain textbox, such as DateTimePicker, Slider, MaskedInput, etc. To use custom editing control in UXGridView is easy, you simply need to create a data template that contains the input control of your choice, and assign it to the CellEditingTemplate property of the UXGridViewBoundColumn.
The following example shows how to customize the editing control of each column through the provided CellEditingTemplate property.
| XAML |
Copy Code
|
|---|---|
<Intersoft:UXGridView ItemsSource="{Binding Products}"> <Intersoft:UXGridView.Columns> <Intersoft:UXGridViewCheckBoxColumn Header="Discontinued" Binding="{Binding Discontinued}"/> <Intersoft:UXGridViewTextColumn Header="Category ID" Binding="{Binding CategoryID}" IsReadOnlyBinding="{Binding Discontinued}"/> <Intersoft:UXGridViewTextColumn Header="Product ID" Binding="{Binding ProductID}" IsReadOnly="True" Aggregate="Count" FooterFormatString="Count = {0}"/> <Intersoft:UXGridViewTextColumn Header="Units In Stock" Binding="{Binding UnitsInStock}"> <Intersoft:UXGridViewTextColumn.CellEditingTemplate> <DataTemplate> <Intersoft:UXNumericUpDown Maximum="9999" Value="{Binding UnitsInStock, Mode=TwoWay}" HorizontalAlignment="Stretch" VerticalAlignment="Stretch"/> </DataTemplate> </Intersoft:UXGridViewTextColumn.CellEditingTemplate> </Intersoft:UXGridViewTextColumn> <Intersoft:UXGridViewTextColumn Header="Unit Price" Binding="{Binding UnitPrice}"> <Intersoft:UXGridViewTextColumn.CellEditingTemplate> <DataTemplate> <Intersoft:UXCurrencyEditor EditMask="c2" UseEditMaskAsDisplayMask="True" Value="{Binding UnitPrice, Mode=TwoWay}"/> </DataTemplate> </Intersoft:UXGridViewTextColumn.CellEditingTemplate> </Intersoft:UXGridViewTextColumn> <Intersoft:UXGridViewTextColumn Header="Units On Order" Binding="{Binding UnitsOnOrder}"> <Intersoft:UXGridViewTextColumn.CellEditingTemplate> <DataTemplate> <Intersoft:UXSliderBar Value="{Binding UnitsOnOrder, Mode=TwoWay}" SmallChange="10" LargeChange="20" Maximum="100"/> </DataTemplate> </Intersoft:UXGridViewTextColumn.CellEditingTemplate> </Intersoft:UXGridViewTextColumn> <Intersoft:UXGridViewTextColumn Header="Last Modified Date" Binding="{Binding LastModifiedDate, StringFormat=MM/dd/yyyy}"> <Intersoft:UXGridViewTextColumn.CellEditingTemplate> <DataTemplate> <Grid Background="White" Margin="1"> <Intersoft:UXDateTimePicker Value="{Binding LastModifiedDate, Mode=TwoWay}" EditMask="MM/dd/yyyy" BorderThickness="0" UseEditMaskAsDisplayMask="True" VerticalAlignment="Center" HorizontalAlignment="Stretch"/> </Grid> </DataTemplate> </Intersoft:UXGridViewTextColumn.CellEditingTemplate> </Intersoft:UXGridViewTextColumn> </Intersoft:UXGridView.Columns> </Intersoft:UXGridView> |
|
A rather unique scenario is where the users would like to have different editing control for the same column that depends on the data that currently being edited. This can be achieved elegantly in UXGridView by using CellEditingTemplateSelector. It works similarly to any other template selectors.
The following code shows how to create the editing template selector and used it in UXGridView.
| Cell Editing Template Selector |
Copy Code
|
|---|---|
using System.Windows; using Intersoft.Client.Framework; using Intersoft.Client.UI.Data; namespace UXGridView.Samples.Selectors { public class CellEditingSelector: DataTemplateSelector { public DataTemplate NumericEditor { get; set; } public DataTemplate SliderEditor { get; set; } public override DataTemplate SelectTemplate(object item, DependencyObject container) { UXGridViewCell cell = container as UXGridViewCell; UXGridViewRowBase rowBase = cell.OwningRowBase; UXGridViewRow row = rowBase as UXGridViewRow; switch (cell.OwningColumn.PropertyName) { case "UnitsInStock": if (rowBase.IsNewRow || (row != null && row.Index % 2 != 0)) return this.SliderEditor; else return this.NumericEditor; } return null; } } } |
|
| View |
Copy Code
|
|---|---|
<Grid.Resources> <DataTemplate x:Key="NumericEditor"> <Intersoft:UXNumericUpDown Maximum="100" Value="{Binding UnitsInStock, Mode=TwoWay}" HorizontalAlignment="Stretch" VerticalAlignment="Stretch"/> </DataTemplate> <DataTemplate x:Key="SliderEditor"> <Intersoft:UXSliderBar Value="{Binding UnitsInStock, Mode=TwoWay}" SmallChange="10" LargeChange="20" Maximum="100"/> </DataTemplate> <Selectors:CellEditingSelector x:Key="CellEditingSelector" NumericEditor="{StaticResource NumericEditor}" SliderEditor="{StaticResource SliderEditor}"/> </Grid.Resources> <Intersoft:UXGridView CellEditingTemplateSelector="{StaticResource CellEditingSelector}"> |
|
As the results, editing the cells of UnitsInStock for the normal row will show a UXNumericUpDown control. While editing the cells for the alternating row of the same column will show a UXSliderBar control instead. See the illustration below.
Editing the UnitsInStock for the normal row:

Editing the UnitsInStock for the alternating row: