Intersoft ClientUI Documentation
How-to: Customize UXPopup Bounding Box

| Intersoft ClientUI 8 > ClientUI Fundamentals > Popup Overview > Popup How-to Topics > How-to: Customize UXPopup Bounding Box |
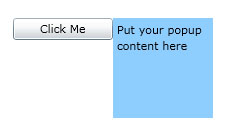
This example shows you how to customize the binding box of UXPopup.
By default the bounding box of UXPopup is the control itself, you can customize this by specifying RelativeTo property.
The following code shows to change the bounding box to another UIElement, in this case, a Button.
| XAML |
Copy Code
|
|---|---|
<Grid x:Name="LayoutRoot"> <Grid VerticalAlignment="Top" HorizontalAlignment="Left"> <Intersoft:UXPopup PreferredPosition="TopRight" x:Name="MyPopup" RelativeTo="{Binding ElementName=MyButton}"> <Grid Width="100" Height="100" Background="#FF8ECEFF"> <TextBlock TextWrapping="Wrap" Text="Put your popup content here" Margin="4"/> </Grid> </Intersoft:UXPopup> </Grid> <Button Width="100" Content="Click Me" x:Name="MyButton" HorizontalAlignment="Center" VerticalAlignment="Center" Click="MyButton_Click"/> </Grid> |
|
| C# |
Copy Code
|
|---|---|
private void Button_Click(object sender, System.Windows.RoutedEventArgs e) { this.MyPopup.IsOpen = !this.MyPopup.IsOpen; } |
|
