
| Intersoft ClientUI 8 > ClientUI Controls > Control Library > UI Controls Overview > CallOut > How-to: Customize Pointer Shapes in CallOut |
One of the most unique features in CallOut control is the ability to easily customize the pointer shape.
The following sections explain the properties that render the shape of the call out control.
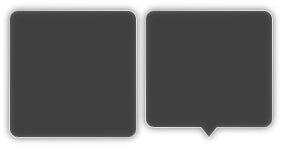
ShowPointer determines whether the pointer is visible or not.
The following example shows how to visible or not the pointer shapes in CallOut.
| XAML |
Copy Code
|
|---|---|
<StackPanel HorizontalAlignment="Center" VerticalAlignment="Center" Orientation="Horizontal"> <Intersoft:CallOut Margin="4" ShowPointer="False" Width="128" Height="128"/> <Intersoft:CallOut Margin="4" Width="128" Height="128"/> </StackPanel> |
|

PointerPosition determines the position of your pointer. You can choose Top, Left, Right, or Bottom.
The following example shows how to customize pointer position in CallOut.
| XAML |
Copy Code
|
|---|---|
<StackPanel HorizontalAlignment="Center" VerticalAlignment="Center" Orientation="Horizontal"> <Intersoft:CallOut Margin="4" Width="128" Height="128"/> <Intersoft:CallOut Margin="4" Width="128" Height="128" PointerPosition="Left"/> <Intersoft:CallOut Margin="4" Width="128" Height="128" PointerPosition="Top"/> <Intersoft:CallOut Margin="4" Width="128" Height="128" PointerPosition="Right"/> </StackPanel> |
|

PointerOffset determines the offset position from its default positioning (at center of the CallOut).
The following example shows how to customize pointer offset in CallOut.
| XAML |
Copy Code
|
|---|---|
<StackPanel HorizontalAlignment="Center" VerticalAlignment="Center" Orientation="Horizontal"> <Intersoft:CallOut Margin="4" Width="128" Height="128" PointerOffset="20"/> <Intersoft:CallOut Margin="4" Width="128" Height="128" PointerPosition="Left" PointerOffset="20"/> <Intersoft:CallOut Margin="4" Width="128" Height="128" PointerPosition="Top" PointerOffset="20"/> <Intersoft:CallOut Margin="4" Width="128" Height="128" PointerPosition="Right" PointerOffset="20"/> </StackPanel> |
|

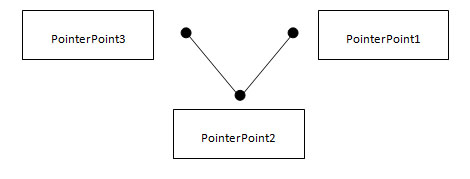
PointerPoint1, PointerPoint2 and PointerPoint3, determine the triangular points that create the pointer shape.

Note that all the points are relative to the center point of the CallOut. Which mean point (0, 0) is the center, point (-8, 0) is 8 pixel to left from the center point, and point (8, 0) is 8 pixel to right from the center point.
The following example shows how to customize pointer points in CallOut.
| XAML |
Copy Code
|
|---|---|
<StackPanel HorizontalAlignment="Center" VerticalAlignment="Center" Orientation="Horizontal"> <Intersoft:CallOut Margin="4" Width="128" Height="128" PointerOffset="20" PointerPoint1="2,0" PointerPoint3="20,0" PointerPoint2="0,24"/> <Intersoft:CallOut Margin="4" Width="128" Height="128" PointerPosition="Left" PointerOffset="20" PointerPoint1="2,0" PointerPoint3="20,0" PointerPoint2="0,24"/> <Intersoft:CallOut Margin="4" Width="128" Height="128" PointerPosition="Top" PointerOffset="20" PointerPoint1="2,0" PointerPoint3="20,0" PointerPoint2="0,24"/> <Intersoft:CallOut Margin="4" Width="128" Height="128" PointerPosition="Right" PointerOffset="20" PointerPoint1="2,0" PointerPoint3="20,0" PointerPoint2="0,24"/> </StackPanel> |
|
