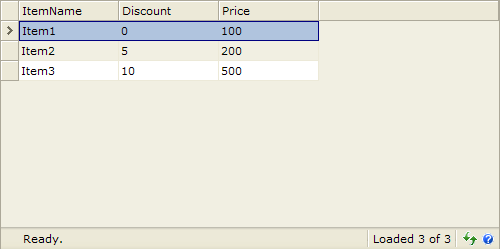
This walkthrough shows you how to use WebGrid in unbound mode for displaying static columns and rows.
During this walkthrough, you will learn how to do the following:
- Use WebGrid.NET Designer to set unbound mode.
 Prerequisites
In order to complete this walkthrough, you will need the following:
- Visual Studio 2005 Application.
 Step-By-Step Instructions
To Create WebGrid in Unbound Mode
- Launch Visual Studio.NET 2005.
- Click on File menu, then select New and click Web Site.
- Select ASP.NET Web Site in the Template box and set Location to HTTP.
- Named the Web Site and click OK.
- Right-click on Project's name and select Add New Item.
- Select Intersoft AppForm in the My Templates box and named it as UnboundMode.aspx.
- Create new instance of WebGrid by dragging it from Toolbox to the WebForm.
- Right click on the WebGrid and click on WebGrid.NET Designer.
- The designer window appears, expand RootTable and select Columns node.
- Click Add three times to add three new columns.
- Select Column0 and set its Caption to "Item Name", Column1 to "Discount" and Column2 to "Price".
- Click on Rows node and click Add three times to add three new rows.
- Select Rows0 and click on ellipsis button of Cells to open Cells Editor. You will see three cells, which correspond to three columns you created in step 10.
- Click on Cell0 and set its Text to "Item1", Cell1 Text to "0", Cell2 Text to "100".
- Select Rows1 and repeat step 13 and 14. Set the Text of each cell to "Item2", "5", and "200".
- Select Rows2 and repeat step 13 and 14. Set the Text of each cell to "Item3", "10" and "500".
- Click OK.
- Save the WebForm and view in browser.
- The WebGrid will look like following.


