This walkthrough will guide you to link two WebCombo instances.
During this walkthrough, you will learn how to do the following:
- Configure the LINQ to SQL classes.
 Prerequisites
In order to complete this walkthrough, you will need the following:
- Visual Studio 2008/2010 Application.
- Microsoft.NET Framework 3.5.
 Step-By-Step Instructions
To create new web application and apply linked WebCombo feature
- Create a new WebForm page to your Website project.
- Add two instances of WebCombo to the page.
- Add two instances of LinqDataSource to the page.
- Bind the first LinqDataSource to Customers table, and the second one to Orders table. Place the WebCombo in a table such as shown below.

- Select the first WebCombo, set its DataSourceID to LinqDataSource1, DataTextField to ContactName and DataValueField to CustomerID.
- Select the second WebCombo, set its DataSourceID to LinqDataSource2, DataTextField and DataValueField to OrderID.
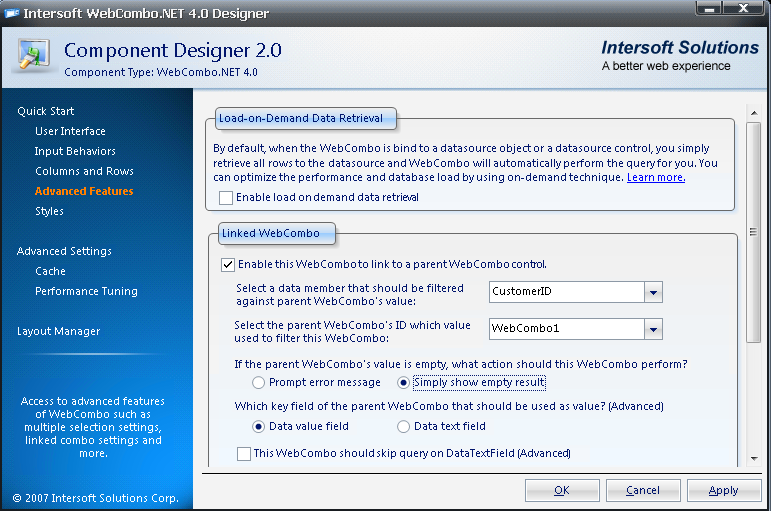
- Configure LinkSettings for Orders WebCombo by launching WebCombo Designer. Follow the configuration as shown in the following.

- Save the page, and run it to browser.
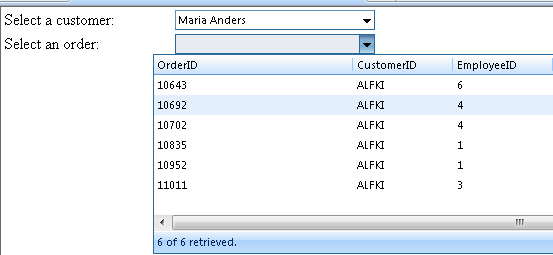
- Your browser should look like the following screenshot.

Try to interact with the WebCombo, such as selecting a customer. Next, when you open the Orders' WebCombo dropdown, you will see the order list of the selected customers.

New enhancement: When bound to LinqDataSource, WebCombo can now perform wildcard search on non-string type. For instance as in above sample, the OrderID is of integer type. If you typed in "10" then it will show the records starting with "10". This feature is not possible before LinqDataSource, as non-string type can't be queried using like or contains predicate in ADO.NET objects.


