UXClock is a visually-compelling control used to display and edit time value. It re-invents the time editing experience by allowing users to drag the hour hand to the desired angle to set the hour value. The same goes true for the minutes and seconds hand. Conforming to ISO 9241 standards, you can also use Tab key to navigate between the hands, then use the Up or Down arrow key to increase or decrease the value of the focused hand.
Using UXClock
UXClock is a lightweight analog clock control to display and edit the time value of a DateTime object. UXClock provides UXClockHourHand, UXClockMinuteHand, and UXClockSecondHand to display the time and also edit the time. Users can drag and drop these hands to change the time represented by the clock.
You specify the Value property to set the initial time in UXClock, which will process the time part of the Value property to display the time.
| View |  Copy Code Copy Code |
|---|---|
<Intersoft:UXClock x:Name="uxClock1" Value="12/21/2010 10:10:0"/> |
|
You can use UXClock in two main application scenarios:
- As a clock widget for presentation purpose.
- As a time editing control which represents the time value of a DateTime object.
The editing mode and behaviors are explained later in this topic.
Enabling Auto Update Mode
In UXClock, you can use AutoUpdate property to enable automatic update on UXClock value based on the current time. When this mode is enabled, UXClock will work like a general analog clock and the time will be automatically updated.
| View | Copy Code |
|---|---|
<Intersoft:UXClock x:Name="uxClock1" AutoUpdate="True"/> |
|
By default when auto update mode is enabled, UXClock will use the millisecond update to update its display. You can customize the ticking mode to Second using TickingMode property.
| View | Copy Code |
|---|---|
<Intersoft:UXClock x:Name="uxClock1" AutoUpdate="True" TickingMode="Second"/> |
|
Understanding How to Edit Time Value using UXClock
To enable editing in UXClock, you set the IsEditable property to true.
| View | Copy Code |
|---|---|
<Intersoft:UXClock x:Name="uxClock1" IsEditable="True"/> |
|
When IsEditable is set to true, you can interact with the UXClock through several ways such as explained below.
- The first thing you can do is simply moving the hour hand / minute hand or second hand of UXClock along with the AM / PM slider bar. You can drag each of these elements and drop it at the desired value.
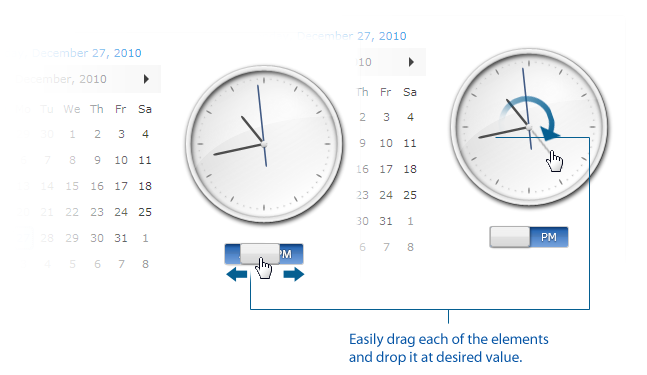
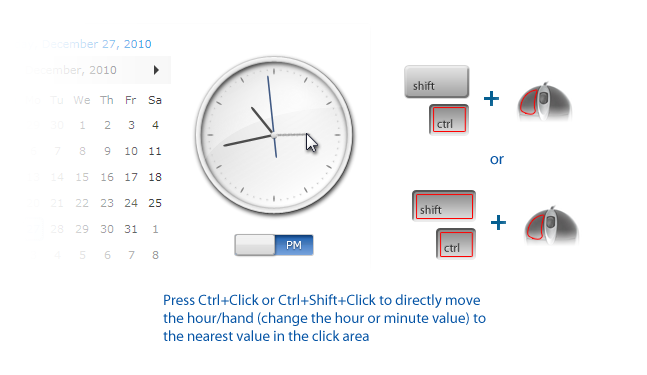
- The second approach to change the value is using combination of keyboard modifiers and mouse click. You can use either Ctrl + Click or Ctrl + Shift + Click to directly move the hour / hand (change the hour or minute value) to the nearest value in your click area. This mode enables you to quickly change hour / minute in editing scenario.
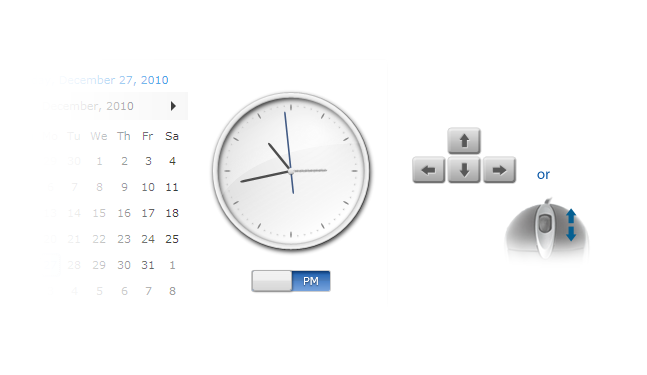
- The third approach is using Arrow Key and Mouse Wheel. This approach requires active element to be focused first by simply clicking them or using Tab navigation.
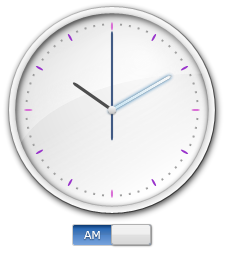
When IsEditable property is set to False, all user interactions will be disabled and the AM/PM slider bar will be replaced with a textual content to display the current time. The format of this display time can be changed using TimeFormat property.
| View | Copy Code |
|---|---|
<Intersoft:UXClock x:Name="uxClock1" IsEditable="True" TimeFormat="hh:mm:ss t"/> |
|
Understanding Value Changed Behavior
By default, when you changed the value of UXClock using the methods described above, it will decrease or increase the time globally which affects all parts of the DateTime object. This means that when you increase an hour from 5/10/2010 23:45:00, it will become 5/11/2010 00:45:00. You can change the value behavior to apply the time value changes locally by setting the ValueMode property to Local, such as shown in the following example.
| View | Copy Code |
|---|---|
<Intersoft:UXClock x:Name="uxClock1" IsEditable="True" ValueMode="Local"/> |
|
Customizing Editing Behavior
There are two editing modes that you can choose to enhance your editing experience that you can set from EditingMode property.
- KeepExistingValue.
In this mode, whenever you change the hour the minutes and the seconds are not changed. - ResetValue.
In this mode, whenever you change the hour, the minutes and seconds value will be reset to 0. The same thing applies when you change the minute, the seconds value will be reset.
Understanding UXClock Command
UXClock is built around the commanding semantics which allows the value changing interaction to be executed through declarative definition in the XAML markup. The commanding semantics is also an ideal approach for MVVM pattern development. To learn more about this see MVVM Pattern Overview and Commanding Overview.
UXClock already includes several predefined commands to change the selected value that you can use in your application.
- Decrease
Subtracts the value of the related time part based on the active hand. - Increase
Adds the value of the related time part based on the active hand.
When Decrease or Increase command is invoked in UXClock, UXClock will check the active hand and perform the action to the related time part. If the Hour hand is active and you press Down key, UXClock will invoke Decrease command and will subtract the hour part of the Value property by one. So, if the original Value property is set to 12/21/2010 10:10:0 and Decrease command is invoked, the Value property will be changed to 12/21/2010 9:10:0.
Customizing UXClock Appearance
You can easily customize the UXClock appearance using the following properties.
- AMPMDesignatorPosition: gets or sets position of AM/PM time designator.
- AMPMDesignatorMargin: gets or sets margin of AM/PM time designator.
- AMPMDesignatorVisibility: gets or sets the visibility of AM/PM time designator.
- SecondHandVisibility: gets or sets the visibility of second hand element.
- MarkersPadding: gets or sets the distance between outer circle and markers.
- LongMarkerStyle: gets or sets the style for each hour marker.
- ShortMarkerStyle: gets or sets the style for each minute marker.
If you would like to completely customize the control appearance or if you want to change the styles of each visual state, you can edit the template of the control and do the modification accordingly.
To learn how to customize the template and visual states, see Styles and Template Overview.
Styling Markers using MarkersStyleSelector
Although the general hour and minute markers can be specified using LongMarkerStyle and ShortMarkerStyle properties, you can also use MarkersStyleSelector to customize the styles of markers based on certain condition.
This property requires an object inherited from StyleSelector class that will do the custom logic to determine which style to be applied to specific markers.
The following example shows how to use MarkersStyleSelector property to customize the style for hour 0, 3, 6, and 9.
| View | Copy Code |
|---|---|
using System.Windows; using Intersoft.Client.Framework; using Intersoft.Client.UI.Aqua.UXInput; namespace ClientUI.Sample { public class MainMarkerStyleSelector : StyleSelector { public Style LongMarkerStyle { get; set; } public Style ShortMarkerStyle { get; set; } public Style MainMarkerStyle { get; set; } public override Style SelectStyle(object item, DependencyObject container) { UXClockMarkerBase marker = container as UXClockMarkerBase; if (marker != null) { if (marker.Time % 15 == 0) return this.MainMarkerStyle; if (marker.Time % 5 == 0) return this.LongMarkerStyle; } return this.ShortMarkerStyle; } } } |
|
| View | Copy Code |
|---|---|
<UserControl x:Class="ClientUI.Sample.Views.ClockMarkerSelector" xmlns="http://schemas.microsoft.com/winfx/2006/xaml/presentation" xmlns:x="http://schemas.microsoft.com/winfx/2006/xaml" xmlns:d="http://schemas.microsoft.com/expression/blend/2008" xmlns:mc="http://schemas.openxmlformats.org/markup-compatibility/2006" xmlns:Intersoft="http://intersoft.clientui.com/schemas" xmlns:local="clr-namespace:ClientUI.Sample" mc:Ignorable="d" d:DesignHeight="300" d:DesignWidth="400"> <UserControl.Resources> <Style x:Key="ItemStyle1" TargetType="Intersoft:UXClockMarkerBase"> <Setter Property="Background" Value="DarkOrchid"/> </Style> <Style x:Key="ItemStyle2" TargetType="Intersoft:UXClockMarkerBase"> <Setter Property="Background" Value="Orchid"/> <Setter Property="Width" Value="4"/> </Style> <Style x:Key="ItemStyle3" TargetType="Intersoft:UXClockMarkerBase"> <Setter Property="Background" Value="Gray"/> </Style> <local:MainMarkerStyleSelector x:Key="MainMarkerStyleSelector" LongMarkerStyle="{StaticResource ItemStyle1}" ShortMarkerStyle="{StaticResource ItemStyle3}" MainMarkerStyle="{StaticResource ItemStyle2}"/> </UserControl.Resources> <Grid x:Name="LayoutRoot" Background="White"> <Intersoft:UXClock Height="250" Width="250" MarkersStyleSelector="{StaticResource MainMarkerStyleSelector}" /> </Grid> </UserControl> |
|
The following figure shows the result of the above configuration.