


This walkthrough shows you how to configure multiple values editing using WebCombo.NET 4.0 control in WebGrid.
During this walkthrough, you will learn:
- Use SqlDatasource to bind the grid.
- Use WebValueList.
- Configure WebCombo to be inserted into WebGrid.
 Prerequisites
In order to complete this walkthrough, you will need the following:
- Visual Studio 2005 Application.
Step-By-Step Instructions
To Configure multiple values editing using WebCombo.NET 4.0 control in WebGrid
- Launch Visual Studio.NET 2005.
- Click on File menu, then select New and click Project.
- Select Visual C# Project in Project Types.
- Select ASP.NET Web Application in the Template box.
- Specify the Project's Location and click OK.
- Drag a WebGrid instance into WebForm.
- Drag a WebCombo instance into WebForm.
- Drag two SqlDataSource controls into WebForm.
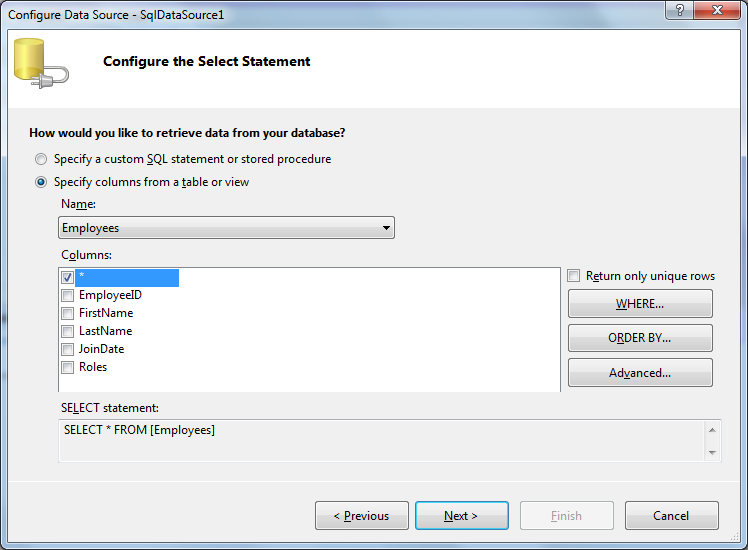
- Right click to the SqlDatasource1 and select Configure Datasource, then choose SqlSampleConnection.
- Select statement "SELECT * FROM [Employees]".
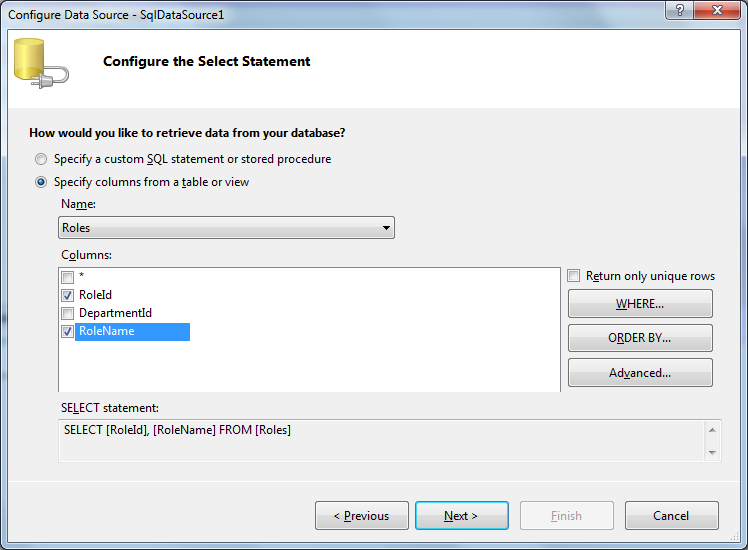
- Right click to the SqlDatasource2 and select Configure Datasource, then choose SqlSampleConnection.
- Select statement "SELECT [RoleId], [RoleName] FROM [Roles]".
- Right click on WebCombo instance and choose Properties.
- Set DataTextField to "RoleName" and DataValueField to "RoleId".
- Right click on WebCombo instance and choose WebCombo.NET Designer.
- Go to Advanced Features, set the MultipleSelection Enabled to True, and SeparatorChar to ",".
- In Advanced Settings, LayoutSettings, set the following properties:
Property Value AllowFloatingText False BoundMode ForceUnbound TextMode ReadOnly StatusBoxVisible False
- Place the following code in Page_Load server side event.
C#  Copy Code
protected void Page_Load(object sender, EventArgs e)
{
   if (!IsPostBack)
   {
      /* populate data as unbound to enable checkbox mode in multiple selection */
      DataView view = SqlDataSource2.Select(DataSourceSelectArguments.Empty) as DataView;
      WebCombo1.PopulateUnboundData(view, true);
   }
}
- Open WebGrid.NET Designer - RootTable - Columns. Add EmployeeID, FirstName, LastName, JoinDate, Roles columns.
- In Advanced Settings, LayoutSettings, set AllowEdit to Yes.
- In the Roles properties, expand ValueList and set the following properties:
Property Value DataSourceID SqlDataSource2 DataTextField RoleName DataValueField RoleId EnableMultipleValues True
- Set Edit Control Type to "WebComboNET" and choose WebComboID to "WebCombo1"
- Compile and run the WebForm. The WebGrid will look like following.

 See Also
Tasks
Walkthrough: Configuring the WebValueList of a WebGridColumn to translate multiple values data
FAQ: Does WebCombo.NET 4.0 control included in WebGrid.NET Enterprise 5.0?
References
DataSourceID Property
DataTextField Property
DataValueField Property
EnableMultipleValues Property
WebValueList Class
Other Resources
Walkthrough Topics
How-to Topics