This walkthrough shows you how to create and bind WebCombo to XML-based DataSource.
During this walkthrough, you will learn how to do the following:
- Use XML-based DataSource.
- Use InitializeDataSource events to set the DataSource.
 Prerequisites
In order to complete this walkthrough, you will need the following:
- Access to the XML database.
- Visual Studio 2005/2008/2010 Application.
 Step-By-Step Instructions
To create new web application and bind WebCombo to XML-based DataSource
- Launch Visual Studio.NET 2005.
- Click on File menu, then select New and click Web Site.
- Select ASP.NET Web Site in the Template box and set Location to HTTP.
- Named the Web Site and click OK.
- Right-click on Project's name and select Add New Item.
- Select Intersoft AppForm in the My Templates box and named it as Walkthrough.aspx.
- Drag WebCombo instance from ToolBar to WebForm.
- Double click the WebCombo instance and put the following code in WebCombo1_InitializeDataSource event :
C#  Copy Code
protected void WebCombo1_InitializeDataSource(object sender, DataSourceEventArgs e)
{
   XmlDataDocument xDoc = new XmlDataDocument();
   xDoc.DataSet.ReadXmlSchema(Server.MapPath("CustomerOrders.xml"));
   xDoc.Load(Server.MapPath("CustomerOrders.xml"));

   e.DataSource = xDoc.DataSet;
   WebCombo1.DataTextField = "CustomerID";
   WebCombo1.DataValueField = "CustomerID";
}
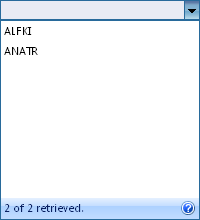
- Run the project and the combo will look like following.

Tasks
Walkthrough: Binding WebCombo to AccessDataSource control
Walkthrough: Binding WebCombo to ObjectDataSource control
Walkthrough: Binding WebCombo to ISDataSource control
References
DataSource Property
DataTextField Property
DataValueField Property
InitializeDataSource Event
OnInitializeDataSource Method


