In WebTextEditor, there are three kinds of views that have their own set of toolbars, such as Design view, HTML view, and Preview. Each toolbars are created in server-side and then serialized to client for UI rendering. This will result in a large page output, especially if you have a large number of tool commands in each toolbar.
If you view source in the page, you will find the following toolbar definition in the xml output.
<ToolBar>
   <WebTextEditorToolBar Text="Formatting" Category="Formatting">
      <ToolCommands>
	 <WebTextEditorToolCommand Text="Bold" DisplayMode="Image"
	    Image="/WebTextEditor/ISRes.axd?E/tb_bold.gif" ToggleGroupName="Bold" />
	 <WebTextEditorToolCommand Text="Italic" CommandType="Italic"
	    DisplayMode="Image" Image="/WebTextEditor/ISRes.axd?E/tb_italic.gif"
	    ToggleGroupName="Italic" />
	 <WebTextEditorToolCommand Text="Underline" CommandType="Underline"
  	    DisplayMode="Image" Image="/WebTextEditor/ISRes.axd?E/tb_underline.gif"
	    ToggleGroupName="Underline" />
	 ...
	 ...
      </ToolCommands>
   </WebTextEditorToolBar>
</ToolBar>
The page output will automatically increase if you have more toolbars and more tool commands. We have made many enhancements in the latest WebTextEditor included in Intersoft WebUI Studio 2009 R1 SP1 installer. One of the enhancements is to significantly reduce the page output size due to the huge toolbar definition.
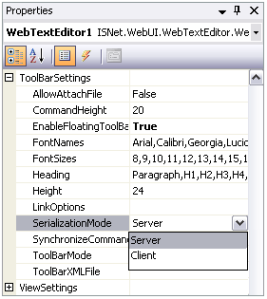
In ToolBarSettings category, we introduced a new property, SerializationMode. To prevent breaking changes with the previous implementation, the default value is set to Server. In this case, toolbars and its tool commands will be specified in server-side and serialized to client-side for UI rendering.

The other value of SerializationMode property which is added in SP1 is Client. When Client is selected, the toolbars and its commands will be created in client-side, thus reducing the large toolbar definition that previously affects the page output. You can view the page source and see that the toolbar definition is no longer included in the xml output. On the other hands, all toolbar functionalities and behaviors remain the same, thus maintaining the stability achieved in both modes.
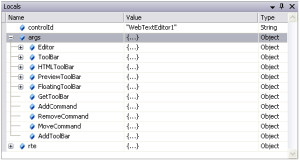
In addition to this enhancement, OnInitializeToolBar client-side event is added to WebTextEditor. In this event, you can customize the tool command sequence, add new tool command, and remove existing tool command. The object parameter passed to this event includes all ToolBar collections in WebTextEditor, such as ToolBar, HTMLToolBar, PreviewToolBar, and FloatingToolBar. Note that these are toolbars collection, not the toolbar instance itself.
<script type="text/javascript">
   function WebTextEditor1_OnInitializeToolBar(controlId, args)
   {
      var rte = ISGetObject(controlId);
      //args parameter includes all toolbar collections
   }
</script>

The object parameter also has some built-in functions which can be easily used to customize the toolbars collection. Each collection can have more than one toolbar and you can add custom toolbars to the existing collection. Simply use AddToolBar function to add the new toolbar to the toolbar collection.
In the following code, two new toolbar are added to ToolBar collection. One toolbar contains Hyperlink and RemoveLink commands, the other toolbar contains Undo and Redo commands.
<script type="text/javascript">
   function WebTextEditor1_OnInitializeToolBar(controlId, args)
   {
      var rte = ISGetObject(controlId);

      // add new toolbars
      var toolbars = [
      {
	 "Name": rte.ID + "_tbLink", "Text": "Link",
	 "Category": "Custom", "Commands": new Array("Hyperlink", "RemoveLink")
      },
      {
	 "Name": rte.ID + "_tbOther", "Text": "Other",
	 "Category": "Custom", "Commands": new Array("Undo", "Redo")
      }];

      args.AddToolBar(args.ToolBar, toolbars);
   }
</script>

Since each collection can have more than one toolbar, you can use GetToolBar function to get a specific toolbar object using its category and name. In the following code, category is used to get Custom category toolbar. If there are multiple toolbars in Custom category (such as mentioned above), the first toolbar will be returned. In this scenario, tb variable will contains tbLink toolbar instance.
var tb = args.GetToolBar("Custom");
If you want to get tbOther toolbar instance, you can use category and name to get a specific toolbar as described in the following code. The tb2 variable will now contains tbOther toolbar instance.
var tb2 = args.GetToolBar("Custom", rte.Id + "_tbOther");
A new command can be added using AddCommand function. You need to specify the toolbar where the new command will be added, the new command, and the position index. If the position index is not specified, the command will be added to the last position in the toolbar. The following code will add a new command, Emoticon, to tbOther toolbar.
var command1 = { "Name": "cmdEmoticon", "Text": "Emoticon",
	"DisplayMode": "Image", "Image": "./Images/smiley1.gif",
	"Type": "ToggleButton", "ToggleGroupName": "TaskPane",
	"Items" : new ISArray() };

args.AddCommand(tb2, command1);

RemoveCommand function can be used to remove a command. Simply specify the toolbar and the command that will be removed. The following command will remove RemoveLink command from tbLink toolbar.
var command2 = tb.ToolCommands.GetNamedItem("cmdRemoveLink");
args.RemoveCommand(tb, command2);

Another useful function is MoveCommand function, which can be used to move a command to another position within one toolbar. You need to specify the toolbar, the command name, and the destination index. The following code will move Emoticon command from the last position to the first position in tbOther toolbar.
args.MoveCommand(tb2, "cmdEmoticon", 0);

There is other point to note when this enhancement is enabled. In ToolBarSettings, you can specify the ToolBarMode as Custom and specify your own toolbar definition in XML file. In this case, you are required to use Server serialization mode. Another alternative is to specify the toolbars and commands manually in OnInitializeToolBar client-side event.
Click here to download the sample.
We have other enhancements in WebTextEditor that includes new client-side event, new client-side API, new properties and other points as described in Intersoft WebUI Studio 2009 R1 SP1 Release Notes. Stay tune as we will write more about them in the coming blogs.
Related