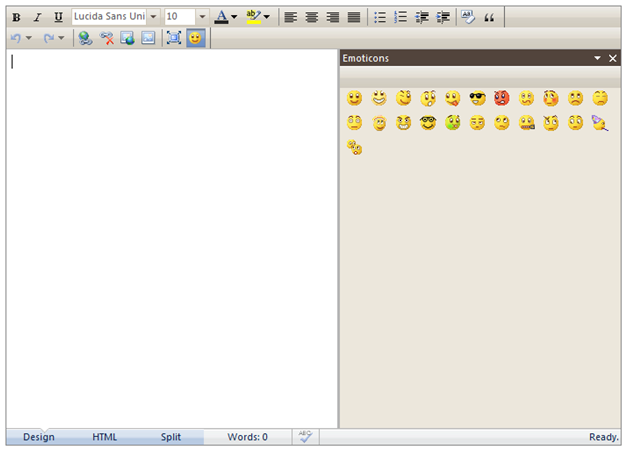
This walkthrough shows you how to create custom task pane in WebTextEditor.
During this walkthrough, you will learn how to do the following:
- Create custom task pane in WebTextEditor.
In order to complete this walkthrough, you will need the following:
- Visual Studio 2008/2010 Application.
To create custom task pane in WebTextEditor
- Launch Visual Studio.NET 2008.
- Click on File menu, then select New and click
Web Site.
- Select ASP.NET Web Site in the Template box and set Location
to HTTP.
- Named the Web Site and click OK.
- Copy the images folder under WebTextEditor >> Images from the WebTextEditor
sample to your project root folder.
- Right-click on Project's name and select Add New Item.
- Select WebForm in the My Templates box and named it as Walkthrough.aspx.
- Drag WebTextEditor instance from ToolBar to WebForm
- In the WebForm aspx, create EmoticonPane() and InsertEmoticon() javascript
function for the custom task pane. Here is the code:
function EmoticonPane()
{
   TaskPaneContent.call(this);   //inherit from TaskPaneContent object
   this.Id = "Emoticon";
   this.OnCreate = function()
   {
      this.Type = "Emoticon";
      this.Caption = "Emoticons";
   };
   this.GetContainerElement = function()
   {
      var str = "<div id='frame'>";
      for (var i = 1; i < 24; i++)
      {
         str += "<div style='float: left; padding-left: 5px;padding-bottom: 5px;'>"
            + "<img src='./images/other/smiley" + i + ".gif' style='cursor: pointer' "
            + "title='Click here to add this emoticon' /></div>";
      }
      str += "</div>";
      var div = document.createElement("DIV");
      div.innerHTML = str;
      return div.children[0];
   };
   this.OnAfterRender = function()
   {
      var el = document.getElementById("frame");
      Listener.Add(el, "onclick", InsertEmoticon, this);
   };
   this.OnClose = function()
   {
      var rte = this.Parent.Parent;
      rte.OnToolbarCommandNotify("Emoticon", false);
   };
   this.OnContentOptionsSelected = function()
   {
      var pane = this.Parent;
      var rte = pane.Parent;
      rte.OnToolbarCommandNotify("Emoticon", pane.ActiveType == "Emoticon" ? true : false);
   };
   this.Unload = function()
   {
      var el = document.getElementById("frame");
      Listener.Unload(el);};
   }

function InsertEmoticon()
{
   var paneContent = this;
   var rte = paneContent.Parent.Parent;
   var el = event.srcElement;
   if (el.tagName == "IMG")
      rte.InsertImage(el.src);
}
|
The GetContainerElement function will create the list of images for this custom
task pane. We also need to add element onclick event in the custom task pane during
AfterRender event to add the image to the TextEditor area.
- Create the new Emoticon task pane during WebTextEditor OnInitialize client-side
event. Here is the code:
rte.RegisterPaneContent(new EmoticonPane());
- Implement WebTextEditor OnToolBarClick client-side event to toggle the Emoticon
command that we create during InitializeToolBar server-side event (detailed
on the next step) and the Media Gallery command. Here is the code:
function WebTextEditor1_OnToolBarClick(controlId, command, commandSection)
{
   var rte = ISGetObject(controlId);
   switch (command.Name)
   {
      case "cmdEmoticon":
         if (command.IsActive)
            rte.ShowTaskPane(command.Text);
         else
            rte.HideTaskPane();
         rte.OnToolbarCommandNotify("MediaGallery", false);
         break;
      case "cmdMediaGallery":
         rte.OnToolbarCommandNotify("Emoticon", false);
         break;
   }
}
|
- Implement WebTextEditor InitializeToolBar server-side event to add Emoticon
command to show/hide the Emoticon task pane. Here is the code:
protected void WebTextEditor1_InitializeToolBar(object sender, ISNet.WebUI.WebTextEditor.WebTextEditorToolBarArgs e)
{
   WebTextEditorToolBar tb = e.GetToolBarByCategory(WebTextEditorToolBarCategory.Standard);
   if (tb != null)
   {
      WebTextEditorToolCommandCollection commands = tb.ToolCommands;
      WebTextEditorToolCommand cmd = new WebTextEditorToolCommand();
      cmd.Name = "cmdEmoticon";
      cmd.Text = "Emoticon";
      cmd.ToggleGroupName = "TaskPane";
      cmd.Type = WebTextEditorToolBarCommandType.ToggleButton;
      cmd.DisplayMode = WebTextEditorToolBarCommandDisplayMode.Image;
      cmd.Image = "./images/other/smiley1.gif";
      commands.Add(cmd);
   }
}
|
- Run the sample in the Web Browser.
